With Microsoft Flow overshadowing the SharePoint Designer (SPD) workflow, I, like most of the others, wanted to revisit my SPD tasks if I could achieve the same automated tasks as in the erstwhile application.
To be honest, being a non-programmer, the SPD to me was much more than an approval/rejection workflow mechanism. From modifying list values to iterating through each item of a list to driving a custom template-based document library from a list, I’ve enjoyed the company of SPD to mask my inability to create script plugins, yet smooth sailing through accomplishing my tasks.
Quickly jumping to the point, my blog on dynamically populating custom word documents for a custom list, saw a lot of visitors. With folks moving towards Flow, I attempted to achieve the same and hence my blog with the same goal, but a different Flow.
Where to start from?
Let’s start with a simple use case so that we understand better how this flow may help. Say, I have a product which might have a few variable properties that may keep changing over a period. I’ll take an example from our daily life say, a loaf of bread. Based on the departmental store discount or some special offer, there may be some offers running on a daily or weekly basis on this item with a certain item code.
Let’s list down what could be the variables in this case:
- Quantity
- Price
- Date of manufacture/packaging
- Description
I assume you should now be able to visualize amongst the above listed properties what kind of variations may happen – it could be 2 loaves at the price of 1, or just a discount on each loaf, the date of manufacture/packaging could vary rendering some near to expiry items on a sale, and lastly a description. I find managing versions (item change history) much easier handled in a document library. At the same time, I find changing item properties can be easier done in a list.
Hence, I create my first creating custom word document flow driven by a custom list.
How to start?
Task 0
A first task is to identify the variables in the document that may undergo change in values. I’ve labelled it Task 0 because it’s a onetime activity to do similar flows. You could either trust me or check for yourself what I say is true on the below 2 constraints:
Constraint #1
Document Property
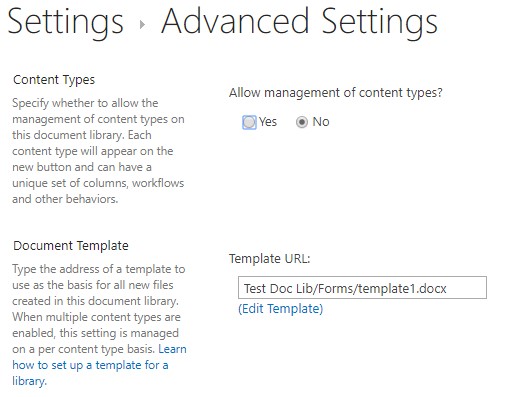
Go to Library Settings > Advanced Settings and Edit Template. The default template file is template.dotx, open it on local MS Word application and save in the same place as ‘./<library name>/Forms/<new template name>.docx’
Edit this template file again and go to Insert > Quick Parts > Document Property
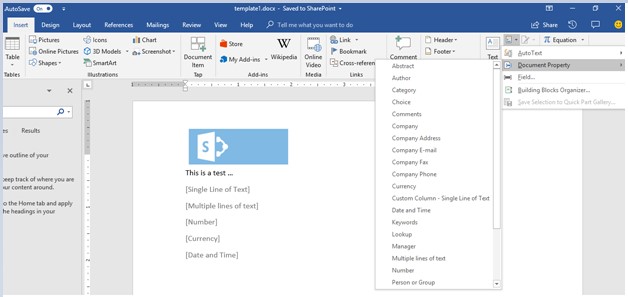
Since I said this is a custom template, you could add header, footer and some static text wherever and however you wish to format the document template.
Constraint #2
Library columns populated using Flow
The final set of column types that a flow could finally dynamically populate is the intersection of above two constraints.
It wasn’t difficult but a time-consuming process to first create one column of each column type in the document library and the driving list to check which columns can be dynamically populated, to conclude that much like my last blog using the SPD, only the following column types work:
- Single line of Text
- Multiple line of Text
- Currency
- Number
- Date and Time
Note: With a few tests, I just discovered that the Multiple line of text works best as a Plain or Rich text in this case since
Enhanced rich text passes on HTML tags to the document with the Flow.

You may also like : SharePoint Custom Development
Task 1
Once you’ve identified what all are the supported column types, create a mapping between the properties of the item and the column type.
For now, a very basic structure with of the supported column types fits well in the example I mentioned earlier. I could map the variables in a loaf of bread as below:
- Available Offer – Single line of Text
- Offer Description – Multiple line of Text
- Quantity – Number
- Price – Current
- Date of Packaging – Date and Time
- Date of Expiry
Task 2
Customize the list and document library structure to contain those columns.
List Column Settings
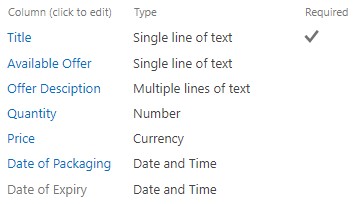
Where Title could just be the item code that remains unique for each item
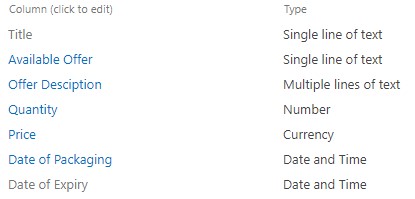
Document Library Column Settings
Task 3
Modify the template in the document library from Library Settings > Advanced Settings > Edit Template and name it with a .docx extension in the same path.
In my example, my document library is Test Doc Lib, and my custom template file is template1.docx

Edit Template and format it – you could use color, font, images…just anything that you want in your static content!
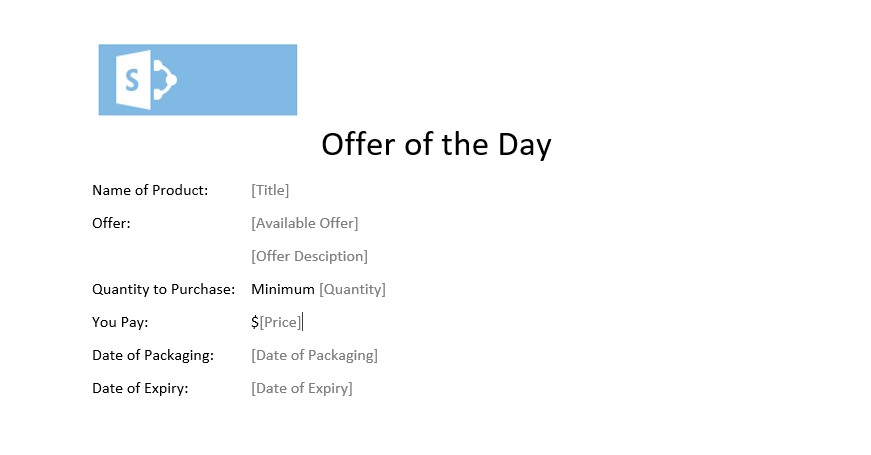
Here, all grey text within square brackets are inserted from Quick Parts > Document Property and the text in black is the static text that should remain constant across all documents in the library as a part of the template.
Task 4
Step 1
Start your flow with a blank template to trigger a flow When an item is created or modified

Step 2
Add the next step to create a document in the library as a copy of the library template file (./<library name>/Forms/<custom template name>).

Special Note
Set the Overwrite Flag as Yes – I’ll explain this later.
Step 3
Add the next action to the Flow to Get file metadata using path (choose the action with SharePoint icon against it from the list of available actions)
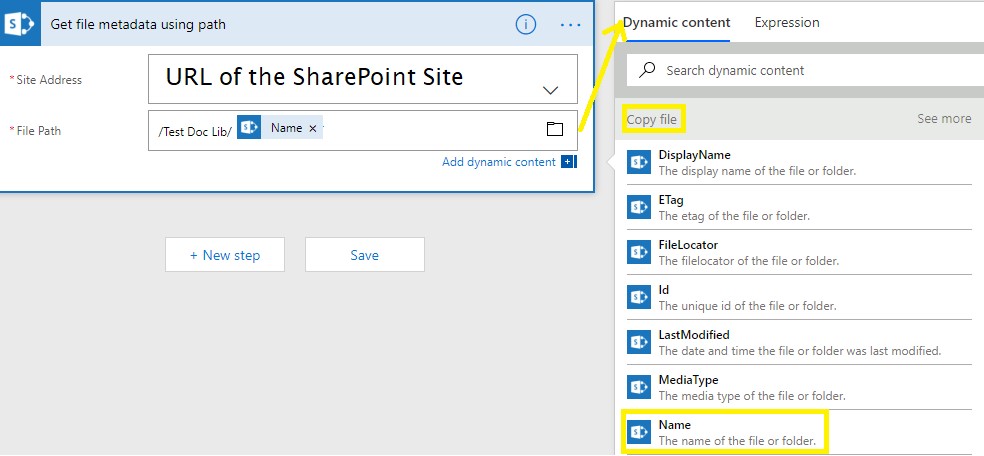
Each step of a Flow provides some Dynamic content to be used. Since this step is using the Name data from the previous action Copy File, expand to see dynamic content underneath when you click in the text box against File Path.
Step 4
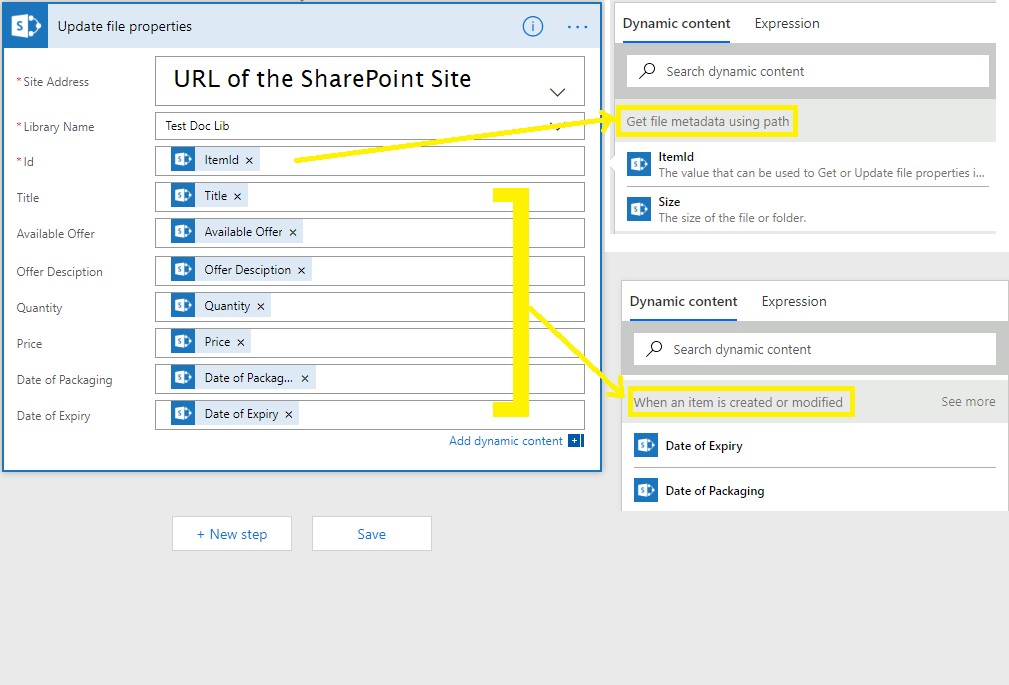
The final step is to update the properties of this file so that the placeholders from the custom document template get filled with real data.
The following screen shot is photo-shopped to show the different Dynamic content used from different actions in the flow.
Step 5
As a final step, save and test the flow.
Example
I’ve filled in one list item for you to see how it works.
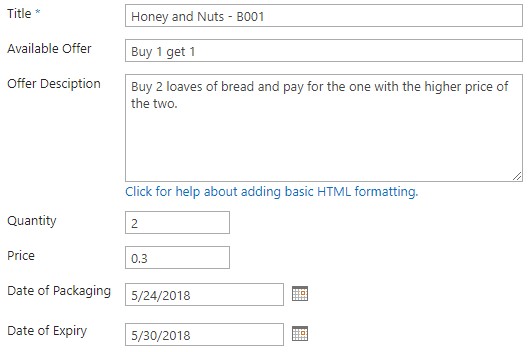
When I check my document library, I see that 1 item is created.

On click of document Name, don’t be shocked to see nothing in your word document when you open in Word Online.
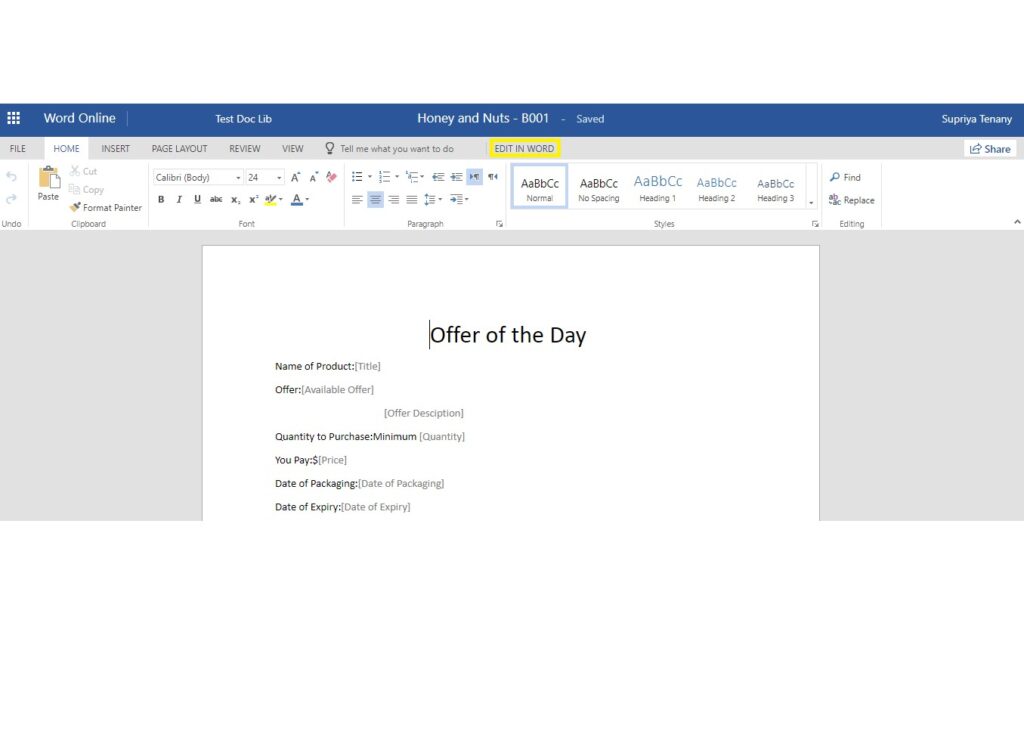
Instead, Edit In Word to open it with your local machine word application.
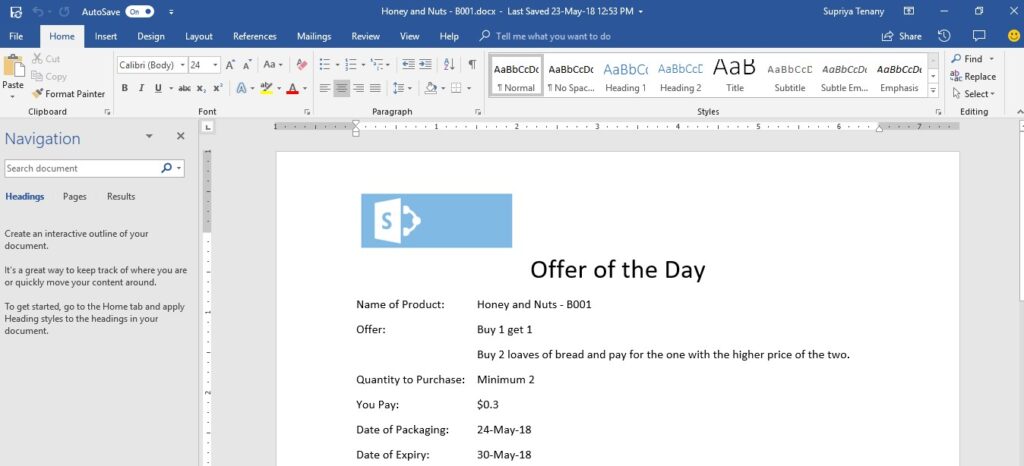
This is a perfect document the way I wanted it to be.
What else should I know?
As I’d promised in an earlier section, here is the explanation of how setting the Overwrite to Yes benefits us.
Not very common that items/products undergo a change in their unique code or name. Hence, in a case like a departmental store, where the same product can undergo frequent periodic changes, you do not want a new word document to be generated each time with a change.
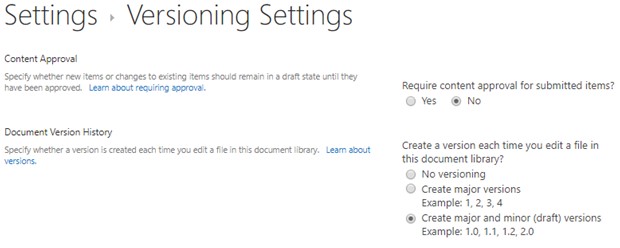
In this case, one additional setting that you’d be needed to do with setting this flag as Yes is set versioning on the document library to Create major and minor (draft) versions, so that each change adds a new version to the same file.
However, since the Flow starts creating a document from a copy of the document library of template and then change its properties based on the list item changes, hence each time a change is made, if an old word document exists in the document library with the same name, a new version is added which is a copy of the template and then the document properties are modified in the next version of the same Flow.
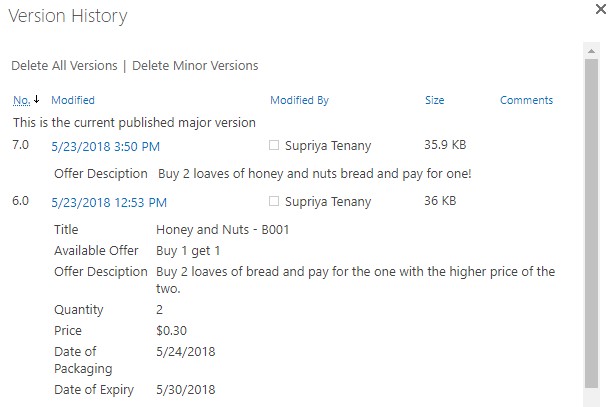
Hence, if you check the Versions history of the document corresponding to any list item, it looks something similar as in the below screenshot.
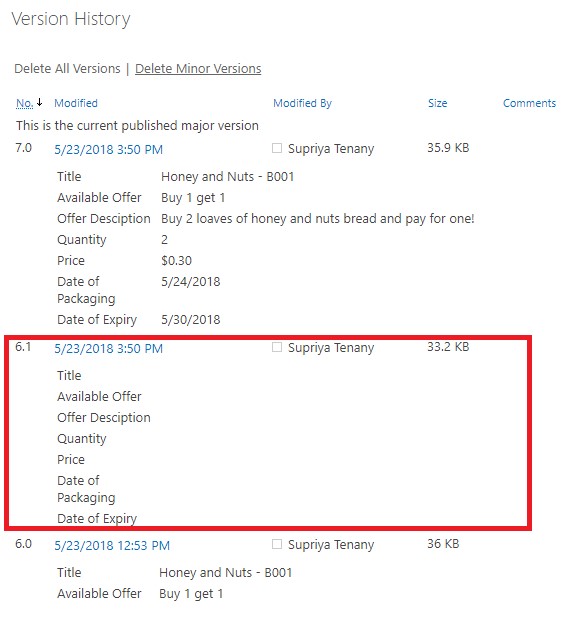
I realize this is quite clumsy, however with the Create major and minor (draft) versions turned ON, when you open Versions History, you could quite easily click on Delete Minor Versions on the top and get rid of all those unwanted versions and your document looks neat and clean as in the following image.
I haven’t come across a better workaround than this, so if you readers want to try out this flow, do drop in your comments letting me know how you have improved it!



hi I did get a bad gate way in the copy file
It may be due to incorrect SharePoint credentials that you are connecting with.
I received a Bad Gateway error in the same place. Where would i check the permissions for this?
It may be some unexpected input at a certain field. Your flow output should detail where the error occurred. For a start you may execute the flow as in my case and thereafter tweak it to your need.
If you got an organizational account, please try signing out and signing back in and make sure you have contribute permissions to the list and document libraries
Hello Supria !
thanks for sharing your knowledge with us. Just wondering how to load table into word file using Microsoft flow.
thanks in adance
Hi Parakarma,
There could be 2 aspects to it:
Case 1. you have a fixed table
Case 2. you have a table with dynamic data (in this case you might not have the flexibility to have dynamic number of rows).
For Case 1 – you could create the table as a part of your document template and the data in it should stay.
For Case 2 – Create a table structure and in each cell place the fields of the document library that will get data populated from the list when the flow runs. However, you will not be able to change (add/remove) the number of rows in run time, but you could definitely get documents of same table structure with dynamic values.
Hope this helps!
Hi Supriya,
i saw your screenshot showing that you can create a field with rich text enabled in the document library when I tried it it doesn’t seem to have this rich text option at all in the document library column settings. do I miss something here?
Thanks
Nick
Hey Nick, I see that as a recent change that may have been rolled out in SharePoint. However I trust that the change shouldn’t impact a lot unless you come across a scenario where you have a dire need of a Rich Text multiple line of text column in a document library.
When I have used Document Properties I find that it only allows 255 chars so when I use template to create a word file with greater than 255. It gives an error on saving
very awesome explanation and it worked as required ; I would further would like to convert this word file into pdf in one drive for business
sudhirkumar you could easily add another step from Microsoft Flow that saves the files as PDF after the document conversion using the OneDrive connector, check this solution from Nate Chamberlain
https://www.youtube.com/watch?v=vUoRAxFNxlA
https://sharepointlibrarian.com/2017/10/03/convert-sharepoint-documents-to-pdf-automatically-using-microsoft-flow/
Cheers
Knut
Supriya great job with this article! Really useful 🙂
Happy New Year, Readers! Thanks for all your comments…keep posting so that I get more challenges.
Cheers!
Hello,
I’m pleased to have found this solution. Unfortunately, I run into a problem when downloading the Word doc from my SP library. Occasionaly I have no issue, but with some documents I receive a message when attempting to open the document that says “We’re sorry. We can’t open [Document Name] because we found a problem with its contents.” I’ve been experimenting all morning and it seems that if I wait a long time (20-30 minutes) after creating an item on my list (which I do through PowerApps) the document will open and load properly.
I guess I just want to know if it is normal to have to wait a while for the doc to be ready?
Thanks
You may face this issue when trying to open the document online on the browser. As long as you’ve executed the steps in the same fashion and are opening on the local word app on your machine, you shouldn’t be facing any issue with the document content.
Thanks for posting this guide, but I have run into a major problem. Downloading the word to view the report has inconsistent results. Sometimes I am able to view the doc with the correct information filled in and other times I get an error message that says “We’re sorry. We can’t open [Document Name] because we found a problem with its contents.”
Do you know why this is happening and how to fix?
Thanks,
JG
I figured it out, disregard.
Just out of curiosity – was this due to opening on browser, or was it due to non-existent list/library item metadata?
So this is solid gold ! Thank you.
One questions, the demo shows a Copy File that is now appreciated. Any way you can also show the new File Copy. Ive created quite a collection of effort messages.
Thanks,
Joe
I’ll put up a solution soon. Thanks for updating on the change.
Hello. I am attempting to implement this flow, and am too encountering an issue with the “Copy File” step due to new SP version. Can you please post a new image of this step?
*depreciated .. no thank You!! autocorrect
When the document is created, Sharepoint does not identify it as a word doc in the library, rather it is simply a “file”. Do you know what would cause this?
As mentioned in ‘Step 2’, do not forget to explicitly save filename parameters as ‘.docx’, hope it helps!
Please verify that you have executed Task 0 and Step 2 as per instructions.
Is there anyway to get any pictures that are added to the list to be added to the .docx document?
It’s a limitation of the Word quick parts to get only a select few fields.
How can we render the word document in Online (browser)rather than in client application. The scene is we dont provide license to open word rather have o365 licence which opens the document online
Hi Supriya,
Is there any way to remove the div tags in flow that we get while using the multi line rich text fields with tables? Thanks in advance.
Hi Sruti, I hope you followed my blog completely which mentions how html tags can be eliminated.
Thank you for prompt response. I see that the article mentions the use of rich text but I’m trying to achieve the same with enhanced rich text field, is there anything that I missed?
Yes, both are different. As I’ve indicated in the screen shot in my blog, a ‘Rich Text’ should serve you better than ‘Enhanced Rich Text’
We wouldn’t have the option to insert tables using the ‘rich text’ field so the only option is for Enhanced rich text and flow doesn’t give any option to remove the div tags. Thank you.
Hello
As I checked and implemented I don’t get success to updating my SharePoint file content.
Kindly help me out.