This blog is part of the following series:
- Installing and configuring the Lotus Domino Server – Part 1
- Search Lotus Notes Documents from SharePoint 2013 – Part 2
- Search Lotus Notes Documents from SharePoint 2013 – Part 3

In the Part 1 of this series I have covered how to install the Lotus Notes Domino Server. In the Part 2 of the series I will discuss how to crawl a Notes database with SharePoint 2013 Search. As part of this effort, we will also need to install the Lotus Notes client and connector on the SharePoint 2013 Server. This blog includes detailed steps of installing Lotus notes connector for SharePoint 2013.
In this blog we’ll install Lotus notes Client with Designer & Administrator. This is the high level architecture of how search works.

Server Details:
Start by logging in to your SP2013 server with Setup account where the SharePoint 2013 is already installed, we will install Lotus Notes client here.
Task 1: Installing Lotus Notes Admin/Designer Client:
Login to SharePoint 2013 Server with the SP_Install user account. The SP_Install user account is a member of the Administrators group on this server. We are now going to install the 32-bit version of Lotus Notes R8.5 on my SharePoint 2013 server. We will install the client and the Designer or Administrator software here.
Step 1: Download the lotus designer & double click.

Step 2: Start Installation. The files are extracted and the installation process begins. The Install Wizard screen appears. Click Next to continue.

Accept the terms in the License Agreement screen and click Next to continue.
Modify the settings in the Custom Setup screen as shown below. Select the Domino Designer and the Administrator Client to be installed since we are going to install all this machine. You can install the Designer & Administrator on another virtual machine (recommended). But in this server we need to install Lotus notes client. Click Next to continue.

Now we can see these icons in the desktop

Step 3: Configure Lotus Notes Client
Let us now configure the Lotus notes client. Double click the Lotus Notes 8.5 icon on the Desktop. Enter your domino server details here. Click Next.

Now we are installing the client in different machine and not in the server. We have entered here the server IP or host name.
Step 5: Continue Installation
Now map the network drive where the domino server stores ID files, generally it is in “Data” folder. Right click the “computer” icon from your desktop and map the network drive. While installation it will ask you for the User ID file, just locate it.

It will prompt for userid/password. Type your Administrator user id & password.


First screen appears 🙂

Task 2: Create the Mappings database
Now we will create the Mappings database, which will map the lotus user ID with windows Domain account. For this we have to open the Lotus Notes Designer client.
Open the Lotus Notes Designer client and create a Notes database.
Step 1: Open the Domino Designer client

Step 2:
- I have opened the Lotus Notes Designer client and created a Notes database and named it “NWMappng”.
- Created a new form with same name “NWMappng”.
- Now we need to add two fields with proper labels.
- Changing the Window Title of the form to “NWMappng”.

- Then created a view named “NWMappng”
- The View Selection formula is: SELECT Form=”NWMappng”.
- Add a column for each field and sort the first column in ascending order.
The view design appears like this:

- Remove the default view. So only NWMappng view is there in view.

Task 3: Create a Discussion Database
Lotus Note connector service started, now we will crawl our Lotus Notes Database from SharePoint.
Step 1:
- Open the Lotus Notes
- Click on Files->Application->New
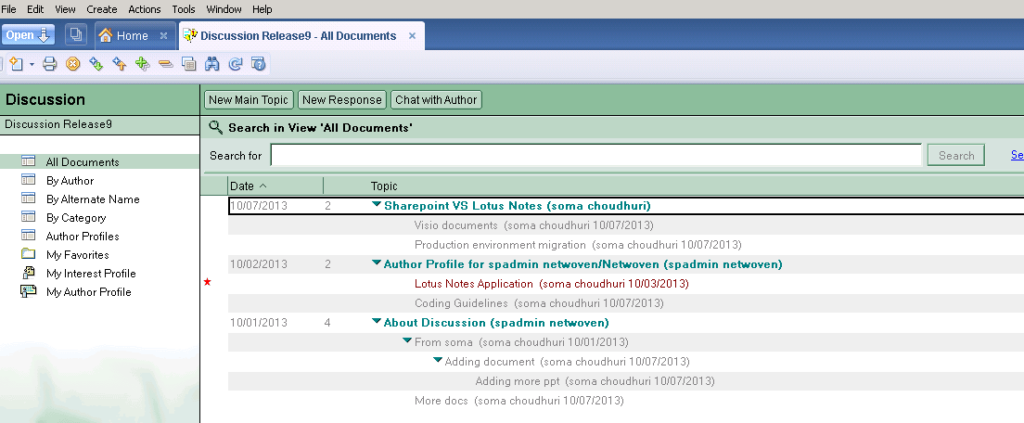
- Create a new Discussion Database ,based on the template


Task 4: Add a user account mapping to the Mappings database
We have created the Mappings database named “NWMappng” with Domino designer. Now we will enter data in this Database.
Step 1: Open the Lotus Notes Client

- Click on File -> Open Application ->select “NWMappng”
- Then click Create->”NWMappng”

- Enter the user ID you want to map

- Here I am adding my user ID and mapping with my windows User ID

Conclusion
We have covered detailed installation of Lotus notes in a SharePoint Server. In my next article, I will discuss installing lotus notes connector from SharePoint. At this point you can create different types of databases in your Lotus notes, which you search from SharePoint.


