Selenium is an open source (free) web testing tool that can automate browser applications. Basic use of Selenium is to automate application process flow to avoid repetitive steps to achieve different test criteria (Functionality testing, database testing, browser compatibility testing etc.).
Is that all? Now what else you can do with this?
That is entirely up to you!
Selenium is just not limited to that. Other than validation, we can take help of Selenium to perform some web-based administration tasks, update site owners/members, banner upload of a site, change Site Features in SPO site etc.
Let’s consider the below scenario. This is a situation which may arise where we need Selenium not to test an application but to follow repetitive steps –
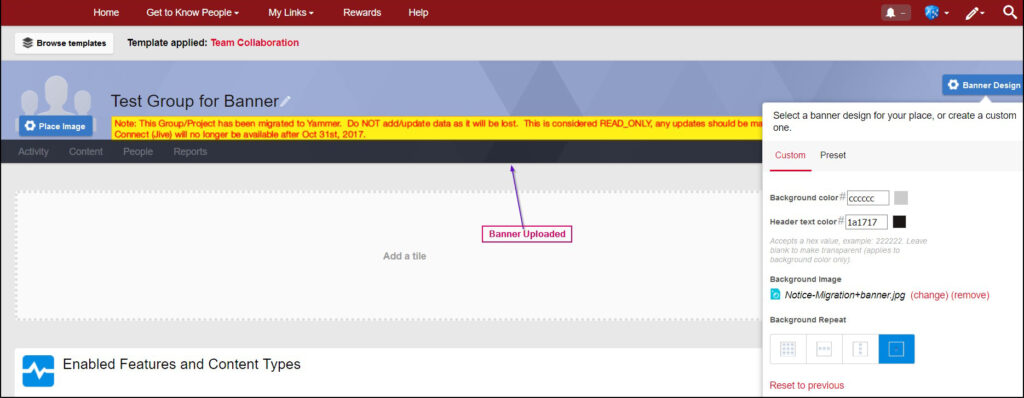
Scenario – As a part of migration process, we have to do the source site locking just before the final migration. In my last project, we were migrating content from Jive to SharePoint, for source locking we have only few hours and number of sites were huge. As the hosted Jive do not have any option to make the Database read-only so, we decided to upload an alert banner to all the source sites by using Selenium.
Selenium does this job quickly and efficiently.
Pre-requisites:
- Important: The steps we are trying to automate can be done manually in the application.
- Any editor supporting Java (Eclipse) should be installed in machine.
- Selenium should be configured in the editor.
- Browsers which support the application.
- User should have a basic level of Java knowledge to build program for the necessary scenario.
Let’s start!
Create a project in Eclipse:
The very first step is to create a project what we will run to execute the steps for the sites. And this needs to be done only once.
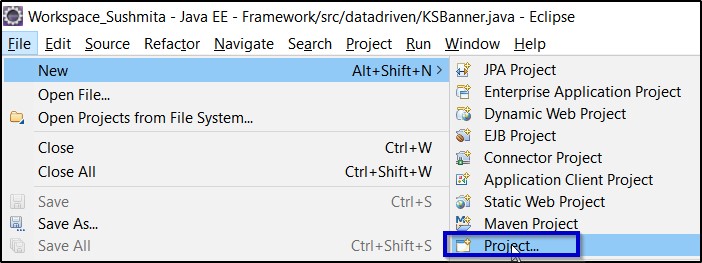
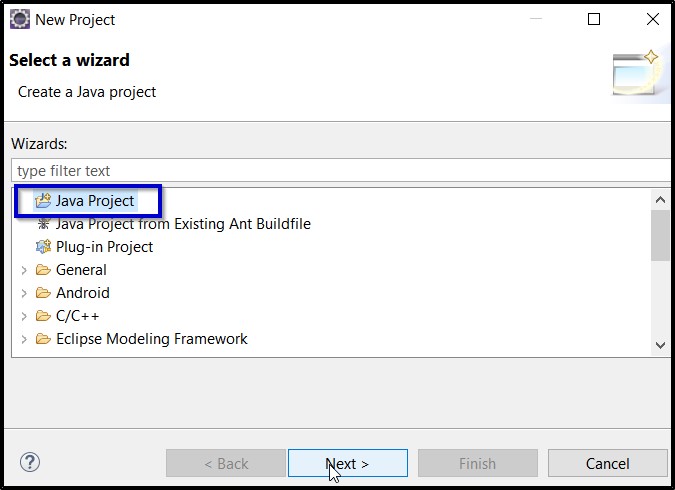
Click on ‘Next’ >> Enter a suitable name >> Finish.
Your project will be shown at the left-hand side in the project editor area.
Create package (customize) in Eclipse:
In case, if you want to create your own test suite (package) –
Right click on the newly created project >> New >> Package >> Enter suitable package name >> Finish.
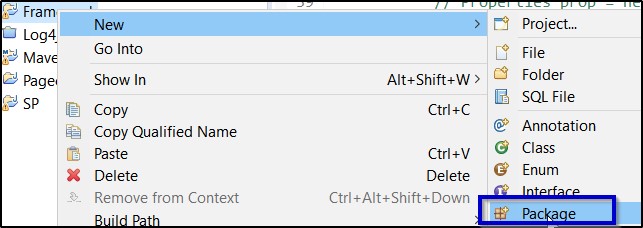
You should be able to see this package once you expand you project.
Create class file in Eclipse:
Now this is the actual place where you need to start working on your scenario.
Select the package >> right click on it >> Select “Class” >> Give appropriate name to the class file >> Finish.
Class file should be created properly.
Now here are few points to be mentioned.
- Class files can be created accordingly based on the requirement of the scenario and test framework. It is totally up to the developer’s area of knowledge and interest.
- While creating the class file, files can be customized accordingly (can be different if developer is using it as main file or a part of TestNG framework or any other conditions might be applied.).

Data driven approach:
We will follow an approach in which test data will be written in an external file (excel, csv, notepad etc.) where all the site URLS will be listed down. We will refer this file in our selenium code. The data will be imported and fed to the application under test.
We can use any third-party APIs (for example – Apache POI for Excel) to support read and write operations or Java based on what type of file we are using.
Coding part:
Here comes the real part where you need to automate the application steps with help java code.
But, before digging into the code directly, let’s build the logic first –
- Initialize the input file (input path, where the input file is saved).
- Invoke the required browser (Chrome/IE/Firefox/Opera).
- Open any one site and login with proper credentials (This approach is taken to avoid login part to the application every time for all sites).
- Start a for loop to open all the site URLs one by one.
- Automate the navigation part as required like select one web component, click a button as per application flow.
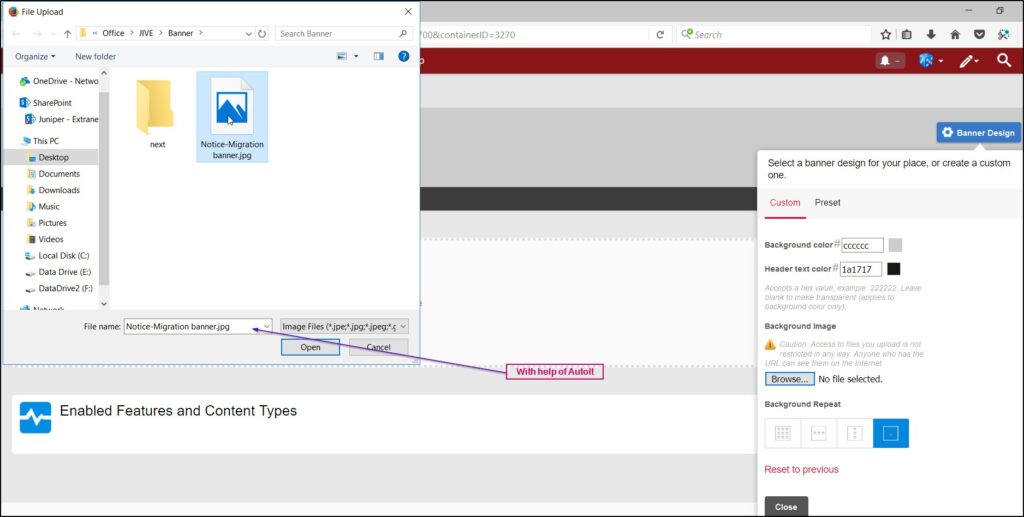
- In case of windows (GUI) file upload, you need to use freeware BASIC-like scripting language designed for automating the Windows GUI and general scripting – AutoIt or Robot and create a script and its corresponding exe file.
- Refer the exe file in the code where window handling will be needed.
- Once the banner upload, refresh the page.
PS: Use wait (Explicit/Implicit) as required in your code.
Below is the code:
try {

			reader = new CSVReader(new java.io.FileReader(csvInputPath));
			String[] celldata = reader.readNext();


			while ((celldata = reader.readNext()) != null) {

				String urls = celldata[0];
				String[] urlVals = urls.split(",");
				String eroomurl = urlVals[1];

				System.out.println(eroomurl);

		driver.get(eroomurl);

		if (eroomurl != null && !eroomurl.contains("javascript")) {

			try {
				URL eroomsite = new URL(eroomurl);
				HttpURLConnection eroomconn = (HttpURLConnection) eroomsite.openConnection();
				eroomconn.setRequestMethod("GET");
				System.out.println(
						eroomconn.getResponseCode() + "   :   " + eroomconn.getResponseMessage() + "---" + eroomurl + "\n");

				if (eroomconn.getResponseCode() != 404) {

					String eroompageTitle = driver.getTitle();

					try {
						if (!eroompageTitle.equals("Error")) {

							Thread.sleep(2000);

							String iniImgsrc = driver.findElement(By.xpath("html/body/table/tbody/tr[2]/td/img")).getAttribute("src");

							//CLICK EDIT--------------------------------------------------------------------
							driver.findElement(By.xpath("//td[@class='screen InsertEditButton']")).click();

							//CLICK OPTION---------------------------------
							driver.findElement(By.xpath("html/body/table/tbody/tr[6]/td/table/tbody/tr/td[2]/form[1]/table[3]/tbody/tr/td/table/tbody/tr/td[1]/table/tbody/tr/td/table/tbody/tr[4]/td/table/tbody/tr[2]/td/div/a")).click();
							Thread.sleep(2000);

							//CLICK BROWSE---------------
							driver.findElement(By.xpath("html/body/table/tbody/tr[6]/td/table/tbody/tr/td[2]/form[1]/table[3]/tbody/tr/td/table/tbody/tr/td[3]/table[1]/tbody/tr[2]/td/div/p/input[2]")).click();

							//CALL WINDOW UPLOAD--------------------
							Runtime.getRuntime().exec("E:\\Upload1.exe");
							Thread.sleep(2000);

							//CLICK OK------------------------------
							driver.findElement(By.xpath(".//*[@id='screen']/tbody/tr/td[1]/table/tbody/tr/td[1]")).click();
							Thread.sleep(1000);

							String FinalImgsrc = driver.findElement(By.xpath("html/body/table/tbody/tr[2]/td/img")).getAttribute("src");
							//System.out.println("imgsrc --->"+iniImgsrc);

							//VALIDATION---------------------------
							if(!iniImgsrc.equals(FinalImgsrc)) {
								CSVWriter writer = new CSVWriter(new FileWriter(csvOutputPath, true),',');
								System.out.println("file opened");
								writer.writeNext(new String[]{driver.getCurrentUrl(),"Banner Applied"});
								System.out.println("file write -- APPLIED");
								writer.writeNext(newline);
								writer.flush();
								writer.close();
								System.out.println("file saved and closed");
							}else{
								CSVWriter writer = new CSVWriter(new FileWriter(csvOutputPath, true),',');
								System.out.println("file opened");
								writer.writeNext(new String[]{driver.getCurrentUrl(),"Banner Not Applied"});
								System.out.println("file write -- NOT APPLIED");
								writer.writeNext(newline);
								writer.flush();
								writer.close();
							}

							Thread.sleep(1000);

						} else {
							System.out.println("Sorry, something went wrong -->>  " + eroomurl + "\n\n");
							driver.close();
							Test1 class1 = new Test1();
							class1.invokeBrowser();
						}

					} catch (Exception e) {}

				} else {
					System.out.println("Invalid URL:  " + eroomurl + "\n");
					driver.close();
					Test1 class1 = new Test1();
					class1.invokeBrowser();
					}

			} catch (IOException e) {
				e.printStackTrace();
			}
		}

	}
}catch (IOException e) {
			e.printStackTrace();
		}
	}
Validation:
One optional part you can add, in case you want to go with an extra level of validation to be confirmed where the banner is uploaded successfully or not.
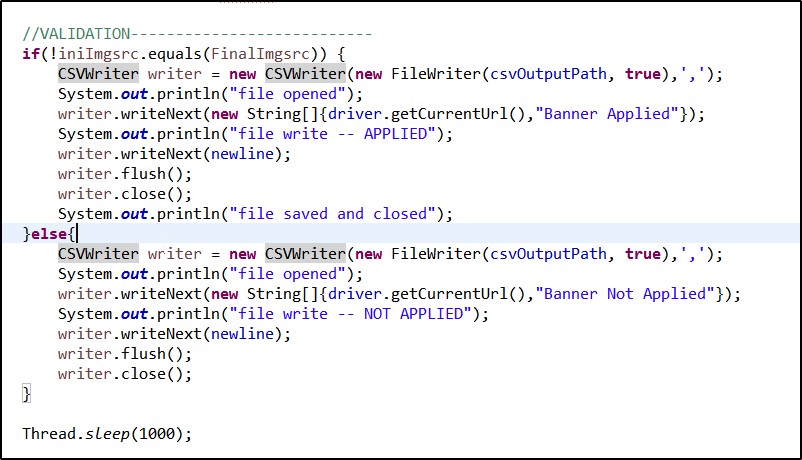
For this, you need to store the banner name in a variable (iniImgsrc) in your code and compare the final banner name uploaded. If these names are same then we can come to a decision that banner is not uploaded.
This result can be customized as per user’s choice and we can write this result into an output file (csv/excel etc.).
Below is a glimpse of how the output file would look like,

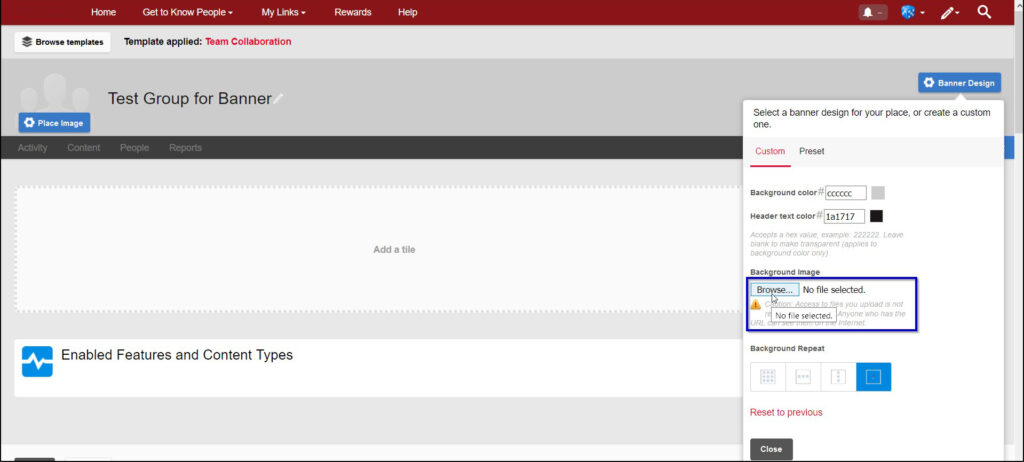
Below are the few screenshots of the application, taken at the time of automation script execution.

Conclusion:
So, we have successfully uploaded the banners with help of Selenium.
We can automate many other web related steps like this.
The method described above is based on my experience, but the same can be modified or some other entities can be introduced as well to make the framework more flexible.


Great Article. Explains very simply and beautifully. Keep up the good work. Your blog has helped me to improve knowledge. The unique information provided in this article on Selenium, I love your writing style very much, I would like to suggest your blog to my friends and colleagues, so keep on updates!
The information given in this article is quite useful & informative. Thanks for sharing this kind of informative article. I hope you will come up with more such informative articles. keep sharing!