In this blog I will cover on how to install and use the Selenium Test Automation Tool to create automated test cases for your projects.
Steps to Install Selenium
1. Preconditions
Firefox browser should be installed in the system where the user wants to install selenium.
Note: Selenium IDE is a web application testing tool. It supports only Mozilla Firefox browser. If users want to run their test cases of Selenium IDE they should have the Mozilla Firefox browser opened. Now let us see how to download Selenium IDE.
2. Steps:
The following steps will explain how to download Selenium IDE Add-on:
1. First download Mozilla Firefox browser.
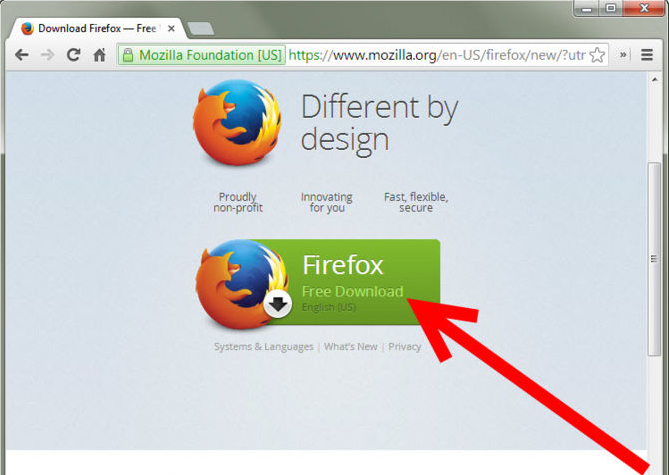
Note: User should download the latest version of Firefox (or update the existing one).
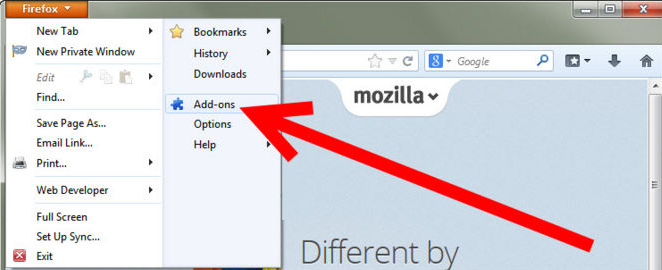
2. Click on the Firefox tab present at the top the browser window.

3. Click on Add-on in drop down menu.
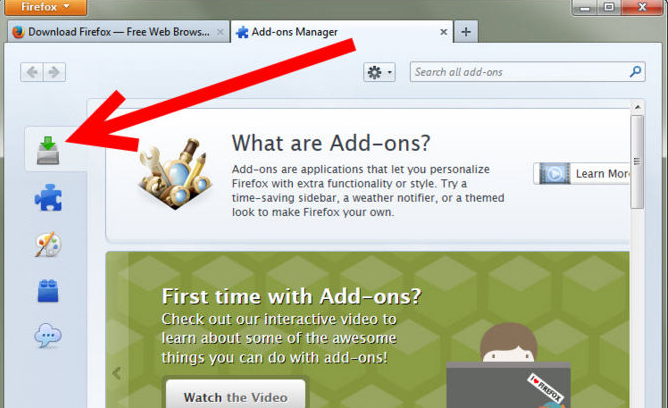
4. Go to add on page of Mozilla Firefox browser
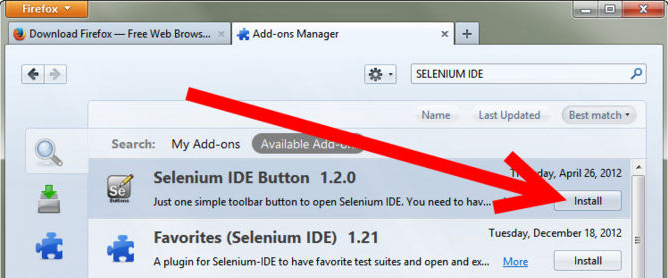
5. In the search box of Add on page search the term “Selenium IDE” and press enter

6. A page will open which displays Selenium IDE add-on.
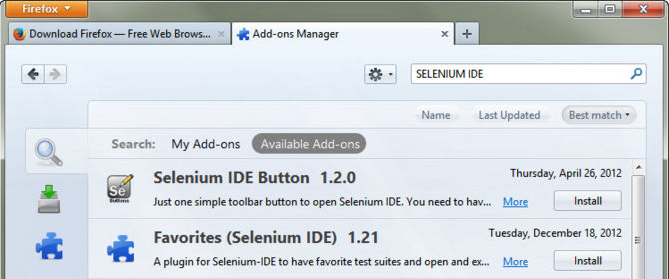
7. Click on install next to the Selenium IDE add-on
8. Once installation is done the Mozilla Firefox browser will ask you to restart the browser.
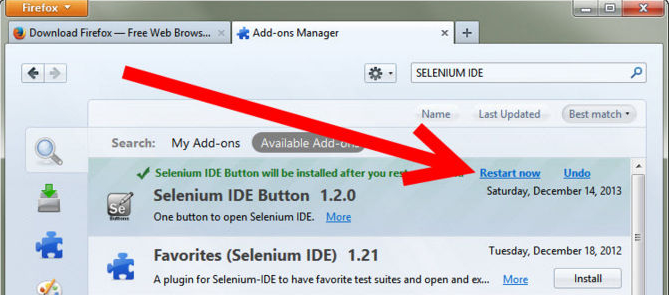
The User should restart the browser.
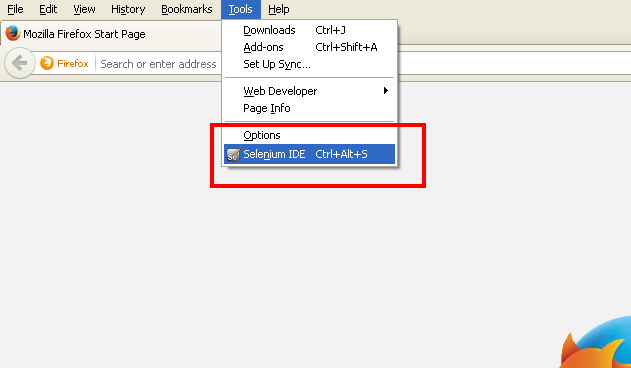
9. Open the Selenium IDE under the tools tabs after the browser gets restarted.
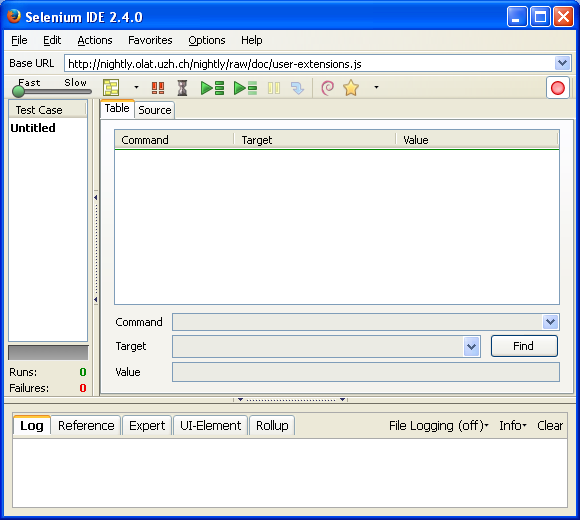
10. The Selenium IDE will open for the user to start recording of the test cases.
3. Post Condition
The user should be able to see all the following IDE features required for creatring automated test cases:
1. Menu Bar
The File menu has options for Test Case and Test Suite (suite of Test Cases). Using these you can add a new Test Case, open a Test Case, save a Test Case and export Test Case in a language of your choice. You can also open the recent Test Case. All these options are also available for Test Suite.
The Edit menu allows copy, paste, delete, undo, and select all operations for editing the commands in your test case. The Options menu allows the changing of settings. You can set the timeout value for certain commands, add user-defined user extensions to the base set of Selenium commands, and specify the format (language) used when saving your test cases. The Help menu is the standard Firefox Help menu; only one item on this menu–UI-Element Documentation–pertains to Selenium-IDE.

2. Toolbar
The toolbar contains buttons for controlling the execution of your test cases, including a step feature for debugging your test cases. The right-most button, the one with the red-dot, is the record button.


Speed Control: controls how fast your test case runs.

Run All: Runs the entire test suite when a test suite with multiple test cases is loaded.

Run: Runs the currently selected test. When only a single test is loaded this button and the Run All button have the same effect.

Pause/Resume: Allows stopping and re-starting of a running test case.

Step: Allows you to “step” through a test case by running it one command at a time. Use for debugging test cases.

TestRunner Mode: Allows you to run the test case in a browser loaded with the Selenium-Core TestRunner. The TestRunner is not commonly used now and is likely to be deprecated. This button is for evaluating test cases for backwards compatibility with the TestRunner. Most users will probably not need this button.

Apply Rollup Rules: This advanced feature allows repetitive sequences of Selenium commands to be grouped into a single action. Detailed documentation on rollup rules can be found in the UI-Element Documentation on the Help menu.

Record: Records the user’s browser actions.
3. Test Case Pane
Your script is displayed in the test case pane. It has two tabs, one for displaying the command and their parameters in a readable “table” format.
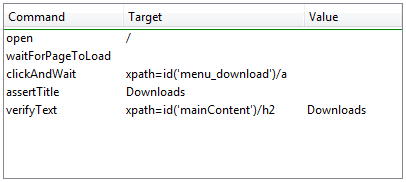
The other tab – Source displays the test case in the native format in which the file will be stored. By default, this is HTML although it can be changed to a programming language such as Java or C#, or a scripting language like Python. See the Options menu for details. The Source view also allows one to edit the test case in its raw form, including copy, cut and paste operations.
The Command, Target, and Value entry fields display the currently selected command along with its parameters. These are entry fields where you can modify the currently selected command. The first parameter specified for a command in the Reference tab of the bottom pane always goes in the Target field. If a second parameter is specified by the Reference tab, it always goes in the Value field.

If you start typing in the Command field, a drop-down list will be populated based on the first characters you type; you can then select your desired command from the drop-down.
4. Log/Reference/UI-Element/Rollup Pane
The bottom pane is used for four different functions–Log, Reference, UI-Element, and Rollup–depending on which tab is selected.
- Log
When you run your test case, error messages and information messages showing the progress are displayed in this pane automatically, even if you do not first select the Log tab. These messages are often useful for test case debugging. Notice the Clear button for clearing the Log. Also notice the Info button is a drop-down allowing selection of different levels of information to log.

- Reference
The Reference tab is the default selection whenever you are entering or modifying Selenese commands (commands that we use in Selenium IDE are called “Selenese commands”) and parameters in Table mode. In Table mode, the Reference pane will display documentation on the current command.
When entering or modifying commands, whether from Table or Source mode, it is critically important to ensure that the parameters specified in the Target and Value fields match those specified in the parameter list in the Reference pane. The number of parameters provided must match the number specified, the order of parameters provided must match the order specified, and the type of parameters provided must match the type specified. If there is a mismatch in any of these three areas, the command will not run correctly.

- UI-Element and Rollup
UI-Element is a Selenium feature that makes it possible to define a mapping between semantically meaningful names of elements on webpages, and the elements themselves. The mapping is defined using JavaScript Object Notation, and may be shared both by the IDE and tests run via Selenium RC. It also offers a single point of update should the user interface of the application under test change.
Note:
Detailed information on these two panes (which cover advanced features) can be found in the UI-Element Documentation on the Help menu of Selenium-IDE.


