Many times, we do receive a requirement from the customer to show Date range filter controls in Entity List Page in Dynamics 365 Portal. The existing filter option will only accept a fixed value to be added in filter control and there is no OOB way to add date range filter in Entity List.

But we can add Date Range Filter control as shown below using the below steps.

In our example, we have used ‘RequestedShipDate’ field to get the Order Entity Details.
Step 1: Make a fetch XML filter on entity list as per our need
Fetch XML filter for ‘RequestedShipDate(On or After)’
<filter type="or" adx:uiinputtype="dynamic" adx:uiname="Ship From Date">
      <condition value="" attribute="new_requestedshipdate" operator="on-or-after" adx:uiinputtype="dynamic" />
</filter>
Fetch XML filter for ‘RequestedShipDate(On or Before)’
<filter type="or" adx:uiinputtype="dynamic" adx:uiname="Ship To Date">
      <condition value="" attribute="new_requestedshipdate" operator="on-or-before" adx:uiinputtype="dynamic" />
</filter>
P.S We need to define type as ‘dynamic’ so that portal will not perform any data transformation on filter options.
Step 2: Change the check boxes to Text controls
The Fetch XML filter controls will be displayed as checkboxes in the Entity List Page as shown below. We need to change the ‘type’ as ‘text’ for the checkbox controls to set value for the Dates.

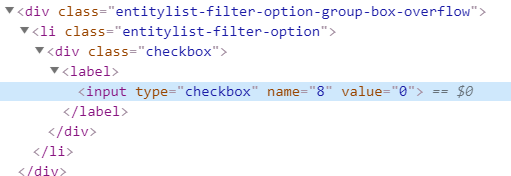
Change the ‘Ship From Date’ check box as Text Box
//Change the ‘checkbox’ control’s type as Text
$('[name="7"]').prop('type', 'text');
//Set Unique Id for the control
$('[name="7"]').prop('id', 'bk_fld_shipDateAfter');
//Hide the control
$('[name="7"]').hide();
//Set null value for the Dates
 $("#bk_fld_shipDateAfter").val("");
Follow the same above steps to change the ‘Ship To Date’ check box as Text Box
$("input[type=checkbox][name=8]").prop('id', 'bk_fld_shipDateBefore');
    $("input[type=checkbox][name=8]").hide();
    $("input[type=checkbox][name=8]").prop('type', 'text');
    $("#bk_fld_shipDateBefore").val("");
Step 3: Use Date Range Picker Control to select two different set of Dates.
1) Add the following DateRangePicker’s JavaScript and CSS reference to our Entity List Web Template page.
<script type="text/javascript" src="https://cdn.jsdelivr.net/momentjs/latest/moment.min.js"></script>
<script type="text/javascript" src="https://cdn.jsdelivr.net/npm/daterangepicker/daterangepicker.min.js"></script>
<link rel="stylesheet" type="text/css" href="https://cdn.jsdelivr.net/npm/daterangepicker/daterangepicker.css" />
2) Create and append the Date Range Control to the Entity List Filter Panel (ul#entitylist-filters)
$("ul#entitylist-filters").append("<li class='entitylist-filter-option-group'><label class='entitylist-filter-option-group-label h4'>Shipment Date Range</label><div id=dtShipmentDateRange class='form-control'><i class='fa fa-calendar'></i> <span id=dtShipmentDateRangeValue></span><i class=fa fa-caret-down pull-right></i></div></li>");3) Set Properties for Date Range Picker Control
var start = moment();
var end = moment().add(10, 'days');
function cb(start, end) {
        $('#dtShipmentDateRangeValue').html(start.format('dddd, MMMM DD, YYYY') + ' - ' + end.format('dddd, MMMM DD, YYYY'));
    }

    $('#dtShipmentDateRange').daterangepicker({
        startDate: start,
        endDate: end,
        ranges: {
            'Today': [moment(), moment()],
            'Tomorrow': [moment().add(1, 'days'), moment().add(1, 'days')],
            'Next 7 Days': [moment(), moment().add(6, 'days')],
            'Next 30 Days': [moment(), moment().add(29, 'days')],
            'This Month': [moment(), moment().endOf('month')],
            'Next Month': [moment().add(1, 'month').startOf('month'), moment().add(1, 'month').endOf('month')]
        }
    }, cb);
    cb(start, end);
The Date Range Picker control will be displayed as shown below.
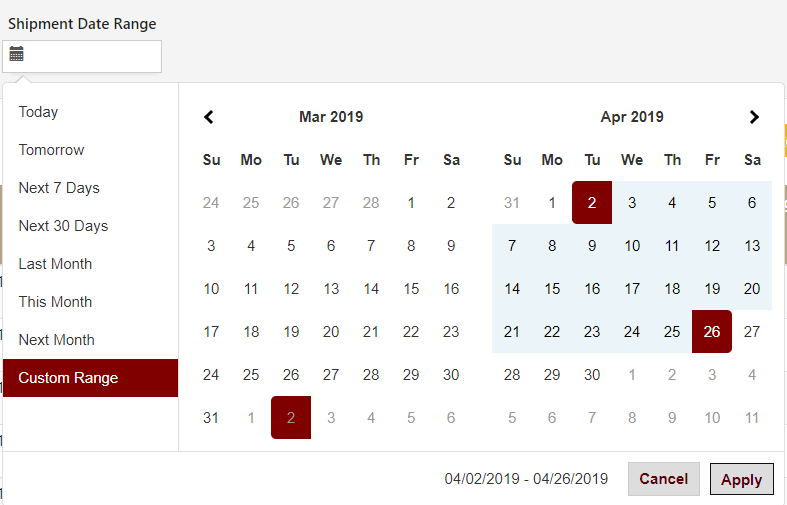
4) Set value for the Text box controls(‘Ship From Date’ and ‘Ship To Date’) on change of Date Range Filter control value.

$('#dtShipmentDateRange').on('apply.daterangepicker', function(ev, picker) {
              var dates = $("#dtShipmentDateRangeValue").html().split(" - ");

              $("#bk_fld_shipDateAfter").val(dates[0]);
              $("#bk_fld_shipDateBefore").val(dates[1]);
  });
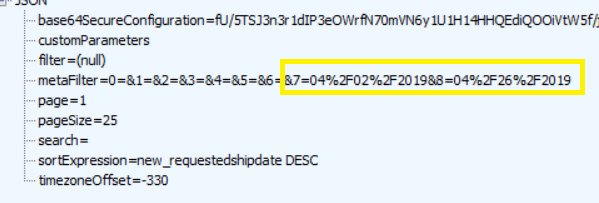
5) Check the values passed for the Date controls in Fiddler
The results can be seen below.
Happy CRMing !!😊





Can you show how you made a custom webtemplate that included the metadata filter? when I try to build a custom entity list template it always displays the entity list only. I can get search added but no meta filters?
I got the metadata filers working but I have 2 question:
1) Is there a way to auto submit metadata filter on select of a date range? currently once I select a date range and click apply I still have to click the portal “Apply” button for the filter to impact the entity list.
2) The “.hide()” is only tied to the text control and does not include the labels. adding $(‘.entitylist-filter-option-group-label’).hide(); removed the labels but the bullet points are still on screen for where the items use to be. Is there a way to remove those?
1) You can trigger the ‘Apply’ button click event after setting values for the dates as shown below:
$(‘#dtShipmentDateRange’).on(‘apply.daterangepicker’, function(ev, picker) {
var dates = $(“#dtShipmentDateRangeValue”).html().split(” – “);
$(“#bk_fld_shipDateAfter”).val(dates[0]);
$(“#bk_fld_shipDateBefore”).val(dates[1]);
$(“.btn-entitylist-filter-submit”).click();
});
2) You can hide the entire label and control by using the below code. Here ‘Ship From Date’ is the Label name for the ‘Ship From Date’ Filter Condition.
$(‘label’).filter(function() {
return $(this).text().trim() == “Ship From Date”
}).parent().hide();
$(‘label’).filter(function() {
return $(this).text().trim() == “Ship To Date”
}).parent().hide();
Hi there,
I receive a http error 500, when sending data:
metaFilter: “0=&1=12%2F01%2F2018&2=12%2F31%2F2018”
🙁
My mistake.
I wrote wrong attribute in FetchXML filter.
Fixing and works.
I also simplified a little:
Instead of additional date picker (which is really nice!) I ued only
$(‘[name=”7″]’).prop(‘type’, ‘date’);
$(‘[name=”8″]’).prop(‘type’, ‘date’);
and done.
Thank you for help
AndKan
Hello
Thank your this great guide.
i was trying to set this up in my portal. but im having some difficulties can you please guide me to set this up correctly ?
1s problem :
i couldn’t change checkbox to text :
maybe i placed the code in the wrong area, can you please tell me where to put the following code ?
_________________
//Change the ‘checkbox’ control’s type as Text
$(‘[name=”7″]’).prop(‘type’, ‘text’);
//Set Unique Id for the control
$(‘[name=”7″]’).prop(‘id’, ‘bk_fld_shipDateAfter’);
//Hide the control
$(‘[name=”7″]’).hide();
//Set null value for the Dates
$(“#bk_fld_shipDateAfter”).val(“”);
_________________________
as well i need to know wehere to put each code.
Many thanks.
did you get the answer if yes please share with me
I already add date range but filter button from portal are already no text. how can i change it? anyone can help me?
where i need to implement those upwrite codes kindly help me to find out