
Off late I was delegated a task to back up a document in a document library as an automated process. This doesn’t sound interesting…correct!
Coupled with the above was the archival of this copy to an existing folder. Still not enticing? Now, let me add to it a condition – the backup archival process need not have to be triggered with any item creation or modification, but rather had to be done for only one item and at a specified time. Not interesting still…?
Okay, how about making this an automated periodic process at that specified time? Still lifeless…?
Then think from the perspective of a non-developer, doing this entirely with SharePoint Designer for someone who doesn’t have coding hands-on. Does it sound like a real challenge sufficing the existence of this article?
Yes, definitely, you know the audience now! This article is addressed specifically to all those who work with SP OOTB with no involvement of a development environment and given a set of conditions as above.
Hence, now I can unveil my task. The objective is to create a weekly copy of the document named Document and move the copy to the folder Archive
thereafter.
Environment
For me there’s nothing better than a SharePoint Designer to create workflows for all minor customizations that need to be automated.
Workflow is rather a misleading term, as it normally only arises a visualization of some systematic process from user to user or level to level. However, I consider it normally as a sequence of steps that can be automated and hence for this specific task, I just had to settle at one version of the SPD for creating the workflow all the reasons that unfold in the course of the document.
What I’m talking about in this article is my experience on the SharePoint Online only. This can definitely be implied on SP 2013, but, I’m certain, definitely not on lower versions for all the same reasons.
Challenges
When I started this task, I took this up as a challenge to be self-sufficient, or rather make the best use of the limitations that I have.
While I could get started with creating a copy of the document using a workflow, to begin with, my first challenge was to trigger the process at a specified wee hour, since all that I knew was either workflows could get started when items are created or modified, and in the last case triggered manually…I could be dependent on some console app or some available scheduler apps for SP Online, but then I had to deal with the infrastructure challenges of setup and enabling the corresponding features. Or lastly, I could stay awake to initiate the workflow. Not that bad for a one-time trigger, but it would have then lacked the generalization.
Anyways, just as I thought the only hindrance was getting the workflow started, I stumbled against another – the archival process had to be periodic! This churned my grey cells to think of something beyond a manual process and set up an automated delay process in the process that I still ‘would be’ conceptualizing. But it did open an avenue to work with Date-Time and Pause, and here’s when I opted out of my most preferred SPD 2010 to explore a new terrain – SPD 2013 for the best I knew that processes could be setup in a loop in the latter.
This was however not the end of my woes. When a simple workflow is triggered, it acts upon just one specific item. Now I face my next challenge – how to identify the copy that was created and move it to the specified folder. It’s easy when we think of it – get the last index of the document library. That’s exactly what’s needed, but unfortunately, for anyone who’s had a little experience with SPD would know, there exists no such function that can directly return the last index of the list and document library in this approach.
By now I’ve enumerated my major challenges so far, and the remaining that I faced weren’t show stoppers, but yes, I would definitely discuss them in the course of this solution.
Belling the cat
I’ll tackle all my challenges listed so far in the same sequence.
How to set up the scheduler
It wasn’t that tough a job. I could start my workflow whenever I wanted, however, the slight workaround that I did was to add a Pause until the required schedule. Thereafter, the workflow would just be in motion.
By now, I’ve a fair idea of how my entire process will be framed, hence, this is the first reason why I preferred the SPD 2013 over 2010 – the former allows creating stages, and so, after I’ve set the scheduler in the starting stage, I can isolate this step from the subsequent.
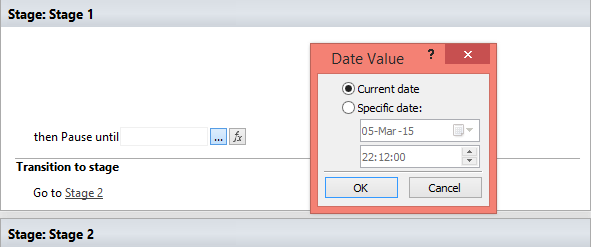
The Pause function lets you choose from either the Current date or the Specific date. So now I can do everything that I want in
Stage 2.
To keep the curiosity active, I’ll unfold the details of the steps as we knock out each challenge.
How to set up the infinite loop
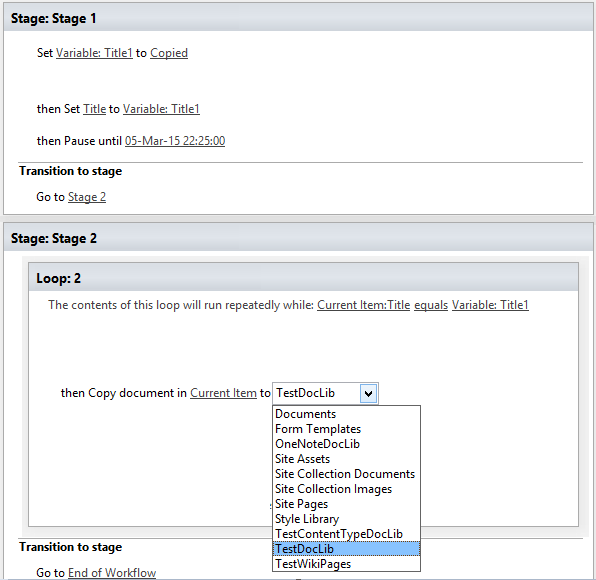
Now that I know that my workflow will transition to Stage 2 after the scheduled time, I can safely setup the loop. This suffices stronger to use the SPD 2013 now. However, setting up the loop requires evaluation of some metadata, for which, from the given set of columns, using the Title seems to be a good bet as this lies unused so far, not impacted by time also if I don’t wish to create any additional columns in my document library (however creating a dedicated column of a type as simple as a Single line of text suffices). The only other thing that I need to do is setup the value before the workflow starts and make sure the value is maintained to keep the loop running, and thereby I get my first step to setup the loop.

P.S.: I’ve made use of string type variable Title1 for the only reason that no error incorporates in manual change that may impact evaluation.
I’ve exploited the column Title at various other places in the process to indicate the state of the workflow, however, before ending one loop, I’ll make sure the Title column is set back to the value that keeps the loop running infinitely (unless I need to perform only a finite set of iterations).
How to create a copy of the document
This can be easily done with the Copy document action and since the requirement is to create the copy in the same document library, select the corresponding destination.
How to move the copy to the archival folder
Now that the item of interest is copied, the copy needs to be moved to the Archive folder. Thinking of a normal case, modifying Path and Name is not a task, but only when we perform this on the item that triggered the workflow and not any other item of the library. For this reason it is required that the copy can be distinguished uniquely and its Path and name can then be modified.
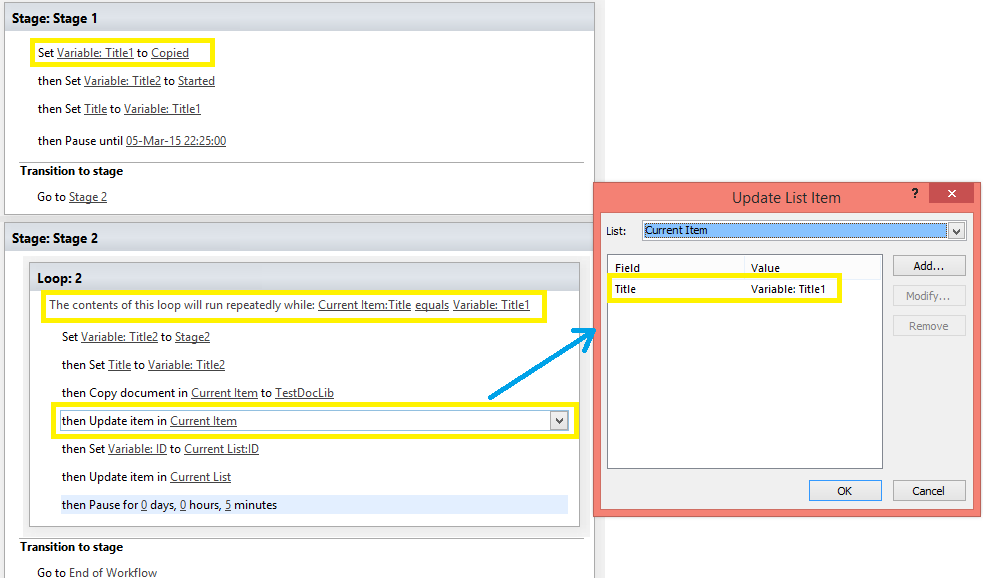
To do so, set the Title of the original item before the copy, so that the copied document contains a known value for the metadata and then modify the Title of the original item after copy so that the copied item can be uniquely identified in the document library.
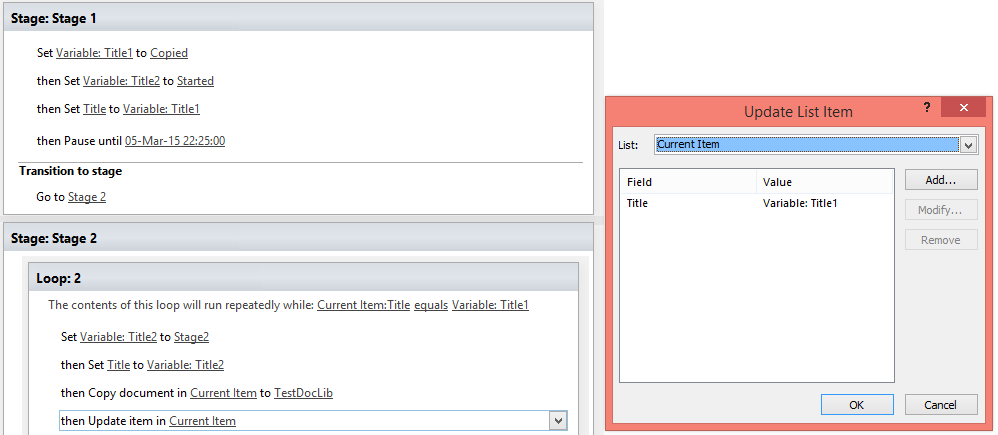
Having performed as in the screen shot above, we can now see that the Title of the original item was set to Stage2 before copy, so that the copied item has the same value in the Title field, and soon after copy, the Title of the original item is set to Copied.
Having done this, using some workarounds, we can fetch the ID of the copied item as demonstrated in the following screen shot.
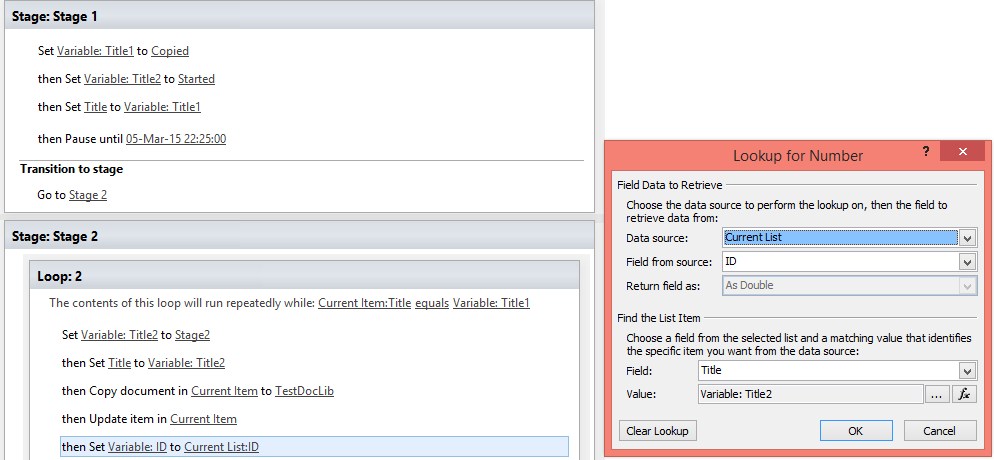
The captured ID will now do wonders, as this lets us uniquely pick the copied item for relocation.
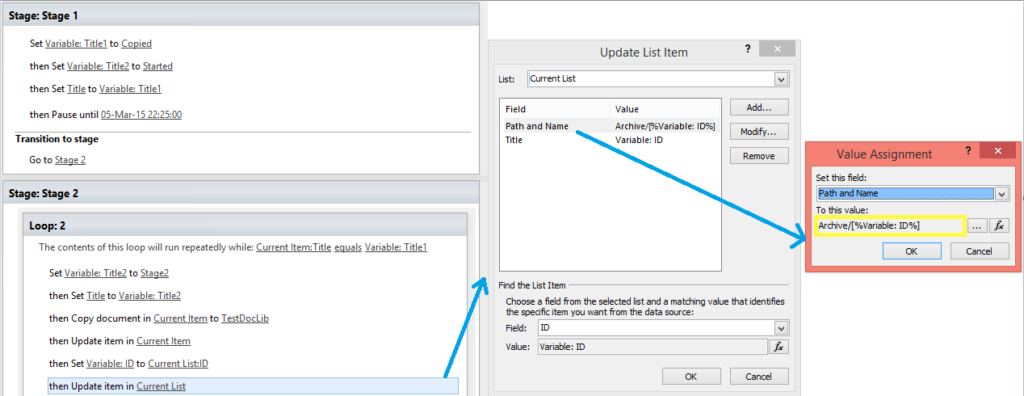
The one thing that needs to be highlighted here is the use of ID in setting up the Path and Name.
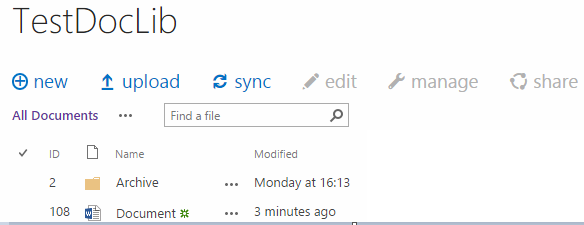
If I were to present the revelation of this workflow before the end, the backed up documents would be named something as in the following screen shot.
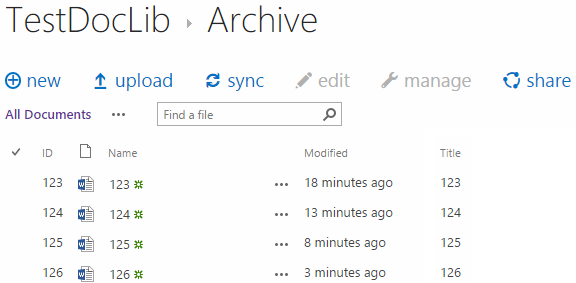
The frequency of the repetition of the cycle is translated as time difference observed in Modified column. But the backups definitely don’t have an appealing Name.
With my experience of iterations, I figured out that the workflow returns an error to create (or move documents in a location) if there already exists an item with the same name.
This makes us wonder why not append the document name with a timestamp – good question, but my experience says if the process is repeated multiple times over the day, the timestamp remains constant throughout the day. Hence, a minimum gap of 24 hours is desirable to fetch a unique date-timestamp.
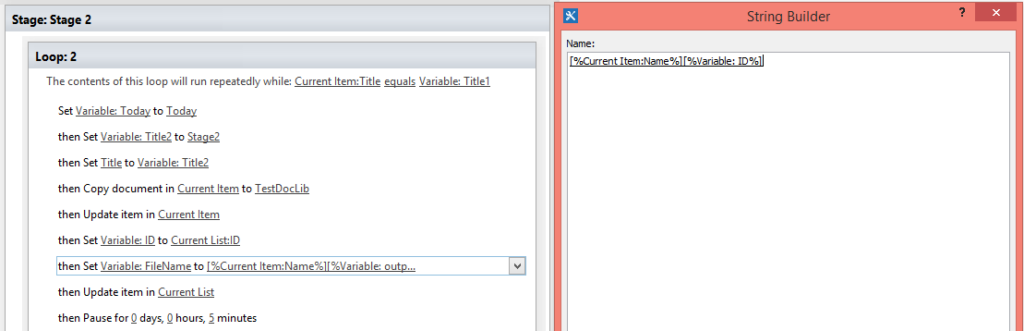
However, using the ID for uniqueness seems to be a safe generalized bet. Hence, using the ID seems to be one of the logical propositions irrespective of the frequency of repetition, considering that there’s no available function to concatenate strings.
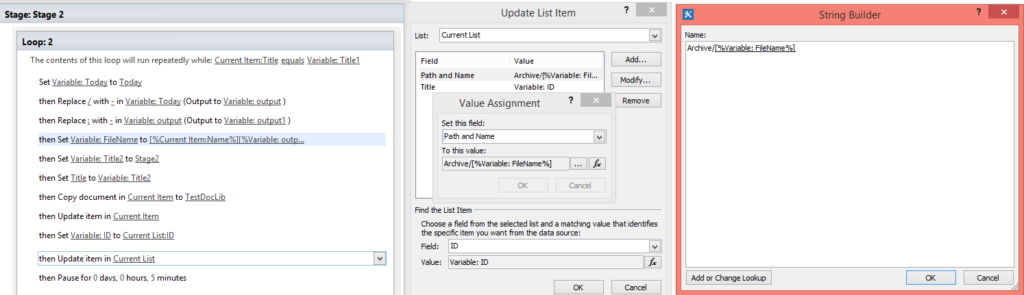
However, we are not that short of ingenious ideas also. I’ve tweaked my item name to create a workflow variable FileName and concatenate the Name of the current item with the ID using a string builder.
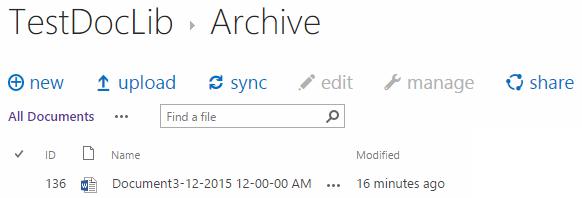
If the workflow has a minimum frequency of 24 hours, similar concept can be used with the date-timestamp. However, the thing to be noted is to replace the special chars ‘/’ and ‘:’ while using it.

Having setup the value for FileName either ways, this variable can now be used to edit the Path and Name for the copied item as described in section How to move the copy to the archival folder
How to setup the periodic loop
Now that a single copy and relocation process is setup, the entire process can be setup at the desired interval by setting up a Pause before the next loop gets executed and the areas highlighted in the following screen shot ensure well that the workflow is in place for the next loop to get executed after the pause.
How does the output look
Keeping the curious minds satiated, the following screen shot gives an insight of how the backup archival process progresses.
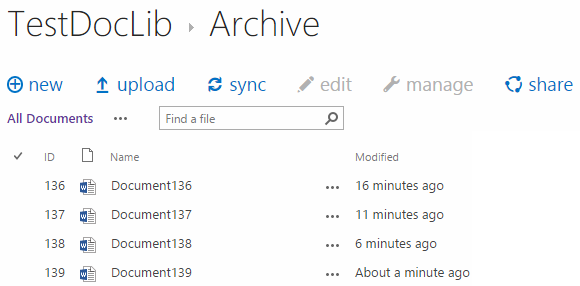
In the given example, since the workflow interval was 5 minutes, I preferred to use ID to append to the original file name. However, as mentioned afore, if the cycle had a minimum interval of 24 hours, I would get backed up documents christened as in the following screen shot.


Very nice post, I was having this kind of requirement. But unfortunately I had not seen your article. Really a very useful article. Worth reading.