
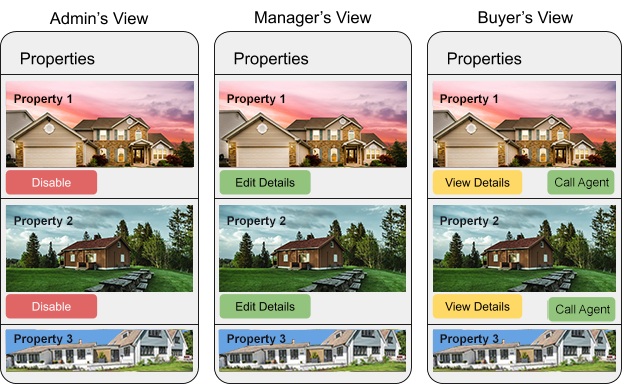
An application can have different types of users. Not all the users have the same roles or access to the application. For example, a property repository website may have admins, property managers and property viewers, where admins should have full access, managers should be able to ‘create’ and ‘edit’ properties and viewers should only be able to view properties.
Depending on user types, custom SharePoint groups can be created. A SharePoint group is a collection of users who all have the same set of permissions to sites and content. Permissions allow SharePoint users to perform certain actions, such as edit items in a list or create a site etc. But individual permissions can’t be assigned to individual users in SharePoint. Instead, related permissions must be grouped together into a permission level. SharePoint comes with some default permission levels that can be used, but SharePoint allows to create custom permission levels as well. SharePoint Admin can assign that permission level to a SharePoint group that includes the people he is assigning permissions for.
This will provide or restrict user access from backend. But the same should be implemented in the front-end of the application too. This means an application can have different views for each type of users. For example, if there is a button in an application to edit an item in a list, a user, who is not allowed to edit, should not be able to see it. In this article, we will see how we can get the name of the group of the current logged in user in a Spfx application and then use it to show or hide action buttons in an application.
To implement this feature in an application, we need to know, which group the current logged in user belongs to. Now one user can belong to a single group as well as multiple groups. Using PnP JS we can get the group information of any user by their user id. All the custom group names can be kept in project configuration list and matched with the current user’s group to provide or restrict his access to the application. We can achieve this in following steps:
Step 1: Get the absolute URL:
var absoluteUri = this.context.pageContext.web.absoluteUrl;Step 2: Create new instance of Web using that Absolute URL:
let web = new Web(absoluteUri);Step 3: Get details of current logged in user:
web.currentUser.get().then((user) => {
      let groups: any[] = [];
Step 4: Get groups details of the current logged in user by User Id and store in groups array:
pnp.sp.web.siteUsers.getById(user.Id).groups.get()
.then((groupsData) => {
      		groupsData.forEach(group => {
      			groups.push({
     				Id: group.Id,
            			Title: group.Title
          			});
        		});
});
});
Step 5: Get the custom groups names from configuration:
pnp.sp.web.lists.getByTitle("ConfigStore").items.getAll()
.then((allItems: any[]) => {

          let groupAlias = this.getDataFromConfig(allItems, "GROUPALIAS").split(";");// ADMIN;MANAGER;BOTH;NONE

          let allGroups: string[] = this.getDataFromConfig(allItems, "AllGROUPS").split(";");// ADMIN;MANAGER
Step 6: Match with groups names of current logged in user with custom groups:
groups = groups.filter((item) => {
            		return allGroups.indexOf(item.Title) > -1;
          		});
Step 7: Depending on the custom groups the user belong, set the user type:
let userType = '';
         		 if (groups.length === 0) {
            		userType = groupAlias[3];//none
          		} else if (groups.length === 2 || user.IsSiteAdmin) {
            		userType = groupAlias[2];//both
         		} else if (groups[0].Title === allGroups[1]) {
            		userType = groupAlias[1];// manager
          		} else if (groups[0].Title === allGroups[0]) {
            		userType = groupAlias[0];//admin
          		}
Step 8: Pass the user groups and user type as props to the base component:
const element: React.ReactElement<ICollectionsProps> = React.createElement(
            Collections,
            {
  	userGroups: groups,
              	userType: userType,
            }
          );
          ReactDom.render(element, current.domElement);

        });
Step 9: Now depending on the user type customise the applications view by showing or hiding child components/buttons throughout the component hierarchy:
if (userType === ‘ADMIN’) {
            	<DefaultButton
                text="Disable Property "
                onClick={() => this.disableProperty()}
              />

          	} else if (userType === ‘MANAGER’) {
	<DefaultButton
                text="Edit Property"
                onClick={() => this.editPropertyDetails()}
              />
         	} else if (userType === ‘BOTH’) {
            	<DefaultButton
                text="Disable"
                onClick={() => this.disableProperty()}
              />
	<DefaultButton
                text="Edit Property"
                onClick={() => this.editPropertyDetails()}
              />

          	} else if (userType === ‘NONE) {
            	<DefaultButton
                text="View"
                onClick={() => this.viewPropertyDetails ()}
              />
	<DefaultButton
                text="Call Agent"
                onClick={() => this.callPropertyManager()}
              />

          	}
These is how we can make use of custom groups in any application.


That’s great. What would the ConfigStore look like?
“ConfigStore” is a list having 2 columns: Key, Value and 2 records as follows
Key : Value
GROUPALIAS : ADMIN;MANAGER;BOTH;NONE
AllGROUPS : ADMIN;MANAGER
what is getDataFromConfig?
can I get this complete project file??
what is inside getDataFromConfig. could you please share.
getDataFromConfig function will be as follows-
//Gets data from config store
private getDataFromConfig(configData: any[], configKey: string) {
return configData.filter(obj => obj.Key == configKey).length > 0 ? configData.filter(obj => obj.Key == configKey)[0].Value.toString() : “”;
}