This blog discusses user migration issues while using Sharegate and specifically how to preserve the authorization data of Orphaned Users.
An Orphaned User is a user account that is still referenced by SharePoint (the user exists in the site’s user information list) even though the user cannot access SharePoint anymore. This could happen if the user account has been disabled or deleted from the Active Directory (or Azure Active Directory if you are using Office 365). In case of Office 365, an External User can also be an Orphaned User. External Users are guest users who have their own accounts with limited access rights in Azure Active Directory.
There could be client requirements and situations where the original authorization data of Orphaned Users need to be preserved at the destination site instead of replacing those with that of the migration account or any other account at destination.
A known limitation of Sharegate is that the authorization data is not preserved for Orphaned Users while copying .ASPX pages or OneNote. As Sharegate by default switches to Normal Mode whenever either of these two file types are encountered during the migration. In that instance, it defaults to migration account for all file types, not only of Orphaned Users but also of Non-orphaned Users for which user mappings are pre-defined and applied while initiating migration. In other words, if the scope of content has any .ASPX or OneNote file(s), then the whole migration is converted into Normal Mode leading to loss of user authorization data of all Users within the scope.
However, in the absence of.ASPX pages or OneNote files, migration to Office 365 occurs in Insane Mode, whereby the Users are preserved.
Assume that you have three files in your scope. If you have a third file called document.aspx in your scope, you’d end up with a warning on the library. The warning tells you it’s being migrated in Normal Mode because .ASPX pages are not supported in Insane Mode, and the user would not be preserved for all the files in that scope (library/folder/subfolder).
How Orphaned User Can be Preserved Post Migration?
For the Orphaned Users or users that cannot be found through the people picker at the destination, any library that’s migrated in Normal Mode, whether you specifically chose, or Sharegate switches to that mode due to the limitation mentioned above, the user authorization data simply cannot be preserved. The only thing you can do to preserve these Users, is to map and then migrate them subsequently, to prevent their default mapping to migration account. This is how Orphaned Users data can be preserved post migration.
Therefore, a workaround could be created by separating the .ASPX and OneNote files by some utility and then migrate all other files through Insane mode and those .ASPX and OneNote files through normal mode. This can be achieved by using some PowerShell script.
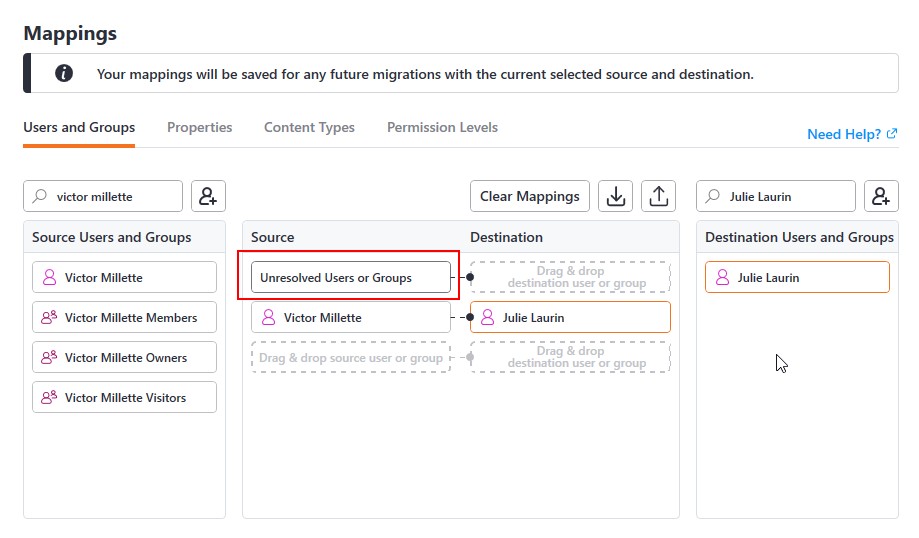
Step 1: Create User Mapping
The unresolved, Orphaned users and groups are mapped (as shown in the screenshot below).
Step 2: Use PowerShell Script
Follow the steps below to execute it:
- Do a structure copy with – NoContent. This will create an empty structure of your site without any content.
- Run the script excluding the ASPX pages and OneNote files. This will copy ALL the content, except the ASPX and OneNote files. Everything will be in Insane Mode.
- Run the script for only ASPX and OneNote pages. This will migrate ONLY the ASPX pages and the OneNote files.
NB: These steps should be executed in the INITIAL migration phase.
Here are the step by step instructions to migrate the content only. First migrate the content excluding ASPX pages and OneNote files and next migrate the remaining content, namely, the ASPX pages and OneNote files. The process revolves around a CSV file with a For-Each loop. You may modify your own script using this.
Creating the CSV for fetching all source and destination List and Libraries
We’ll use a Site Collection, with Subsites as an example, but you can run this on multiple Site Collections if you wish.
- In the main Sharegate application (not migration) click on “Reporting” in the left column.
- Click on “New Report” in the top-right corner.
- Under “Select Object Type” select “List” (it will also pull libraries).
- Under “Filters” select system lists it should include: “Is System”, “Is”, “No”.
- Add nothing to the “Columns” section (the default will give us everything we need).
- Click on “Save & Continue” as we shall use this again later and give it a name (something like “Lists – No system”)
- In the next window, select your source Site Collection (or connect to one and select it if no connection was previously made).
- Click on “Run Now” in the bottom-right corner.
- Export the Results with the “Export” button in the top-right corner and save the file.
- Click again on the “Reporting” button in the left column.
- Find the same report you previously saved, and repeat steps 7 to 10 to run it against your destination Site Collection this time.
Once you have the two reports, combine the data into four new columns in a new Excel sheet: SourceList, SourceSite, DestinationList and DestinationSite (as shown in screenshot below).
Each row should have the source list name, source site URL, destination list name and destination site URL that correspond with each other. If your source and destination lists are more or less the same, the records should match from the reports (alphabetical ordering should help). Otherwise, this step could require some work to arrange them suitably for ready comparison.

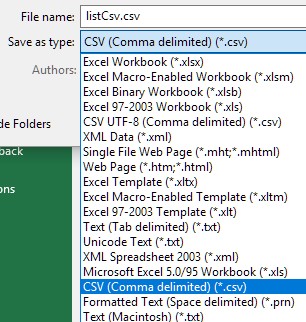
After doing the necessary arrangement as shown above, simply save this file on your drive, and make sure you save it in Excel as a CSV (I called it listCsv.csv).
Here’s the script I used with that CSV file to copy the content excluding ASAP and OneNote files. You will see annotations preceded by the “#” symbol:
Import-Module Sharegate

#You will have to modify the file path to match the path on your drive
$csvFile = "C:\Users\victor.millette\Desktop\listCsv.csv"
$table = Import-Csv $csvFile -Delimiter ","
$propertyTemplate = New-PropertyTemplate -AuthorsAndTimestamps -VersionHistory -Permissions -WebParts -ExcludeFileExtension aspx, one, onetoc2

#Initialize your variables

Set-Variable srcSite, srcList, dstSite, dstList
foreach ($row in $table)
{
 #clear your variables to avoid any misdirection issues if one connection fails in the process
 Clear-Variable srcSite
 Clear-Variable srcList
 Clear-Variable dstSite
 Clear-Variable dstList

#For both the Connect-Sites, you might have to add a condition see my note below the code

 $srcSite = Connect-Site -Url $row.SourceSite
 $srcList = Get-List -Name $row.SourceList -Site $srcSite
 $dstSite = Connect-Site -Url $row.DestinationSite
 $dstList = Get-List -Name $row.DestinationList -Site $dstSite
 $result = Copy-Content -SourceList $srcList -DestinationList $dstList -Template $propertyTemplate

#You will set the file path where you want to export the migration reports
 Export-Report $result -Path "C:\Users\Victor.millette\Desktop\"
}
For the Connect-Site lines of that script, leaving the script as it is, will attempt to connect to your sites using the same credentials as you’re using for Windows. If you need to use another method in the UI, you simply need to modify the $srcSite and $dstSite line to match. You will find examples here:
https://support.share-gate.com/hc/en-us/articles/115000640548-Connect-Site
I suggest using the “PowerShell ISE” application in Windows to run the script. In the first step, you can copy what I provided in the top panel and modify it to work in your environment. Then, you can copy/paste from there to the bottom panel to run/test the script. This will copy all your files and list items, but not the ASPX and OneNote files.
Script to copy only.ASPX pages and OneNote files:
Import-Module Sharegate
#You will have to modify the file path to match the path on your drive
$csvFile = "C:\Users\victor.millette\Desktop\listCsv.csv"
$table = Import-Csv $csvFile -Delimiter ","
$propertyTemplate = New-PropertyTemplate -AuthorsAndTimestamps -VersionHistory -Permissions -WebParts -LimitToFileExtension aspx, one,onetoc2

foreach ($row in $table)
{
 #clear your variables to avoid any misdirection issues if one connection fails in the process
 Clear-Variable -name $srcSite
 Clear-Variable -name $srcList
 Clear-Variable -name $dstSite
 Clear-Variable -name $dstList

#For both the Connect-Sites, you might have to add a condition see my note below the code
 $srcSite = Connect-Site -Url $row.SourceSite
 $srcList = Get-List -Name $row.SourceList -Site $srcSite
 $dstSite = Connect-Site -Url $row.DestinationSite
 $dstList = Get-List -Name $row.DestinationList -Site $dstSite
 $result = Copy-Content -SourceList $srcList -DestinationList $dstList -Template $propertyTemplate

#You will set the file path where you want to export the migration reports
 Export-Report $result -Path "C:\Users\Victor.millette\Desktop\"
}
This will copy only the ASPX pages and OneNote files and will use the Normal Mode by default. You probably won’t have too many of these, so this will probably be the shortest process.
In the end, each library will create its own Migration Report. There really isn’t a way around this one since each line of the CSV is a different migration.
Files checked out by migration account during migration
Below are the scenarios where the files may be checked during migration.
- This could happen when a file has many versions. In such cases, migration is usually performed by locking the content with the migration account. It may so happen that before completion of the process of migration, any network glitch or any server connection interruptions occurs, will throw a migration error and will log it in the report.
- This could also happen when any list/library has huge files and throttling issues. Sharegate tool will consider any repository as large list/library when a list or a library falls under the below categories:
- Having more than 5k items or view having more than 5k items
- Having huge no of columns
- Having huge no of look up and calculated columns
Resolution
The files that have been checked out with migration account are reported in the migration report. Therefore, go to the Sharegate tool and copy the reported files from UI using Copy Content option. If the fraction of such files is huge, you might consider restarting the Migration Process all over again.
Conclusion
If you want to work on the migration process in Sharegate, knowing the nuance beforehand will be an added benefit. To know more or to clear any doubt on this topic, do drop your comments below.