Introduction
In SharePoint List, if any privilege (like Read, Contribute or Full Control) is provided to any SharePoint User or Group, then that user or people of that group enjoy their level of access on all the items.
However, it may sometimes be required to limit user access to their own created or modified items only.
I quote an example as in the case of employee payslips. While all members of the Accounts Department (group), which generates payslips, can access all payslips for all employees of the organization at any central storage location, the payslips of any user are accessibly only to the corresponding user
Considering real world scenarios, this may seem to be a cumbersome manual process considering the volume of items for which permissions have to be uniquely provided to a specified set of users of groups, since the default behavior of each list item is to inherit from its parent (list).
One approach to break and reset permission at item level is to use Power Automate which breaks the default permission inheritance and sets up unique permission on each SharePoint list item.
Creating the Solution
Create SharePoint List
I have used another example in the article to demonstrate the case study and its solution. Begin with adding a SharePoint list named ‘ContactList’ to the Site Contents. In that ‘ContactList’, add a Manager column of type Person or Group.
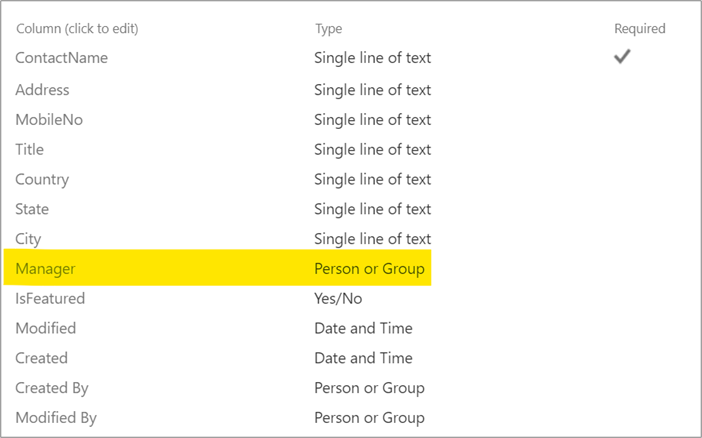
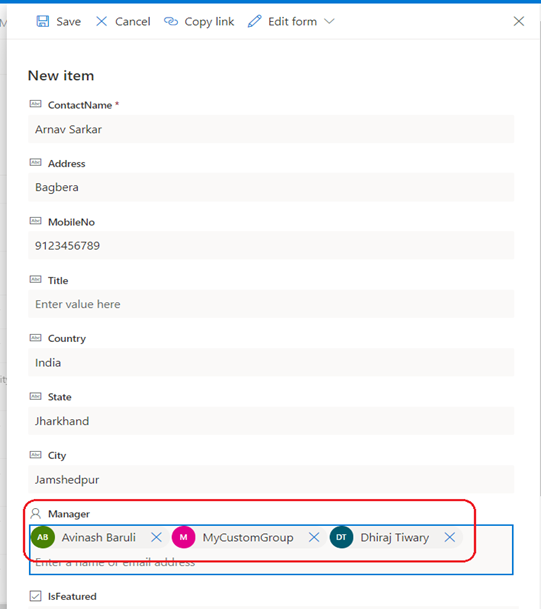
I am trying to associate a Manager for each contact item in the list, who will be assigned Contribute access to the item for any modification on the list item.
The next sections demonstrate the process to reaching the solution using Power Automate.
Setup the Flow
Log in with your Office 365 account to https://flow.microsoft.com/, and Create a new “Automated flow”.
Assign a name to the Flow and select the trigger as “When an item is created or modified”.
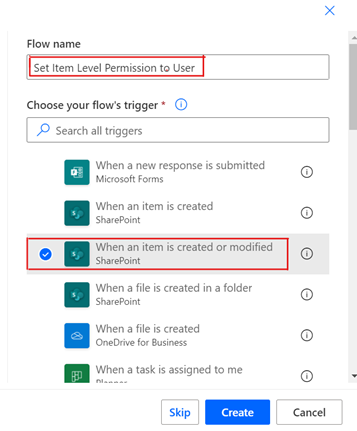
Create and follow the below steps:
Step 1
Point the Flow trigger to the appropriate SharePoint Site Address and List Name.
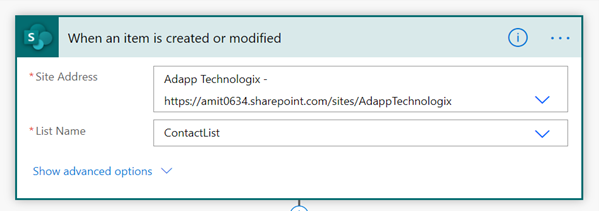
Step 2
Add the new step as “Send an HTTP request to SharePoint” action.
Note: Since this action will be used multiple times in the process, rename the action for better identification.
This action here will break the default inheritance permission on the list item.
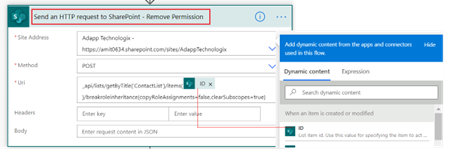
Fill the above fields as follow:
Site Address: Select the Site Address as in Step 1
Method: POST
Uri: Enter the following text:
_api/lists/getByTitle('List_Name')/items(@{triggerOutputs()?['body/ID']})/breakroleinheritance(copyRoleAssignments=false,clearSubscopes=true)copyRoleAssignments – Specifies whether to copy the role assignments from the parent securable object.
clearSubscopes – with the clearSubscopes parameter set as true, the role assignment for all child objects will be cleared and those objects will inherit role assignments from the current object after this call.
Step 3
Next step is to fetch all the Manager Ids of a particular item from this list to modify their access to Contribute. To do so, we will add another “Send an HTTP request to SharePoint” action and rename it for identification of this step.

Site Address remains the same throughout.
Use the GET method. And enter the below text as URI
_api/web/lists/getByTitle(‘List_Name’)/items(@{triggerOutputs()?[‘body/ID’]})?$select=Manager/Id&$expand=ManagerStep 4
Parse the JSON output from the “Send an HTTP request to SharePoint – Get User List” request, using the “Parse JSON” action, as shown in the below image.
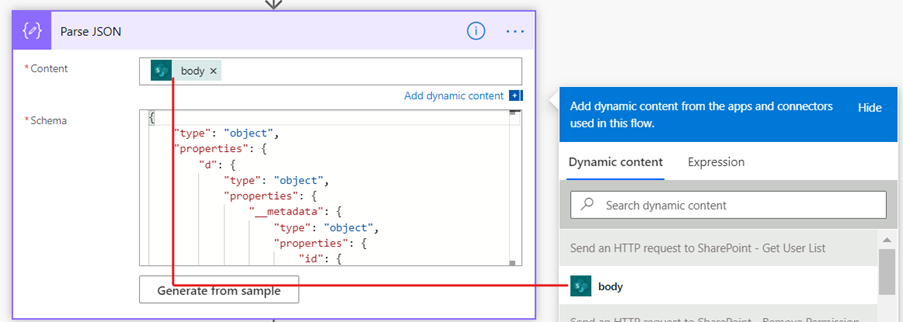
Paste the below text in Schema field. Schema is nothing but it is the structure and semantic of output of the previous step (i.e. Step 3). (Refer this link for how to generate schema).
{
    "type": "object",
    "properties": {
        "d": {
            "type": "object",
            "properties": {
                "__metadata": {
                    "type": "object",
                    "properties": {
                        "id": {
                            "type": "string"
                        },
                        "uri": {
                            "type": "string"
                        },
                        "etag": {
                            "type": "string"
                        },
                        "type": {
                            "type": "string"
                        }
                    }
                },
                "Manager": {
                    "type": "object",
                    "properties": {
                        "results": {
                            "type": "array",
                            "items": {
                                "type": "object",
                                "properties": {
                                    "__metadata": {
                                        "type": "object",
                                        "properties": {
                                            "id": {
                                                "type": "string"
                                            },
                                            "type": {
                                                "type": "string"
                                            }
                                        }
                                    },
                                    "Id": {
                                        "type": "integer"
                                    }
                                },
                                "required": [
                                    "__metadata",
                                    "Id"
                                ]
                            }
                        }
                    }
                }
            }
        }
    }
}
Step 5
Use the results output from the parse JSON action to get the entire users list, which will be iterated through for each Manager’s Id which can be either User Id or Group Id associated with the specific item ID.

Add another action “Send an HTTP request to SharePoint” to assign the required permission to the specific item ID.
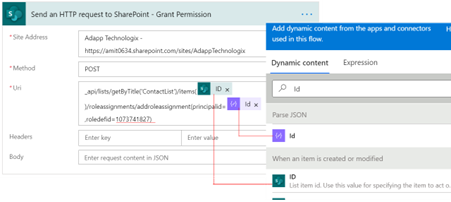
Method: POST
Uri: Enter the below text:
_api/lists/getByTitle('List_Name')/items(@{triggerOutputs()?['body/ID']})/roleassignments/addroleassignment(principalid=@{items('Apply_to_each')?['Id']},roledefid=1073741827)PrincipalId: It is taken from Id field of the Parse JSON request.
RoleDefId: 1073741827 is the ID associated with Contribute permission. Refer to the below table for roles/access and associated predefined IDs for assignment per the requirement.
| Permission Level | Permission ID |
| Full Control | 1073741829 |
| Read | 1073741826 |
| Contribute | 1073741827 |
That is all, the flow is ready to run.
Verifying the Flow Solution
Create a new item on the list, select any Person or Group in the Manager field and save the item.
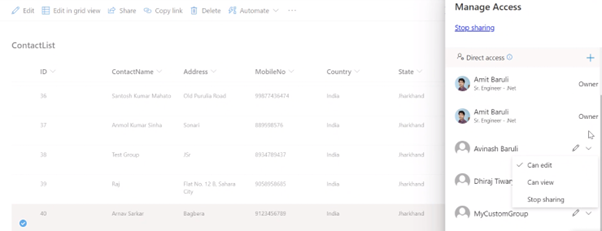
For the item for which modification is made, check “Manage Access” to confirm that the selected person/group in the Manager field have gotten the contribute permission for that item.





Hello, I am interested in your article but there is a missing url at step 3 “Use the GET method. And enter the below text as URI” is it possible to specify it
Thank you very much for your work
Hi Eric,
I’d missed the text. Enter the below text as URI-
_api/web/lists/getByTitle(‘List_Name’)/items(@{triggerOutputs()?[‘body/ID’]})?$select=Manager/Id&$expand=Manager
My requirement is exactly same ,but this get request uri isnt working
Hi,
Can you please specify exactly what error is coming so that I can provide proper suggestion?
Hi,
Is there any reasons why the actions “Grant access to an item or a folder” and “Stop sharing an item or a file” wouldn’t be used for this instead of messing with the HTTP requests?
Cheers
Hi Daniel,
Thanks for sharing this approach, actually I had not explored this option earlier.
I was researching this as well and from what I’ve found, it seems like “grant access” does not allow you to grant access to a group – only to an email address or a people field.
Hello,
first of all many thanks for this super tutorial.
If I search for another attribute instead of manager, where do I have to make adjustments everywhere?
I currently get errors and just don’t see where anything else needs to be adjusted.
Kind regards and thank you!
Hello Amit,
I facing issue on step 3.
I already have column “Manager” but it’s giving me this error. Can you help me with this sir?
The field or property ‘Manager’ does not exist.
clientRequestId: 9fc0ca5a-61a5-42dd-824e-ab7f6ba7f853
serviceRequestId: b1f3fa9f-f099-0000-b56a-8ea96d09bdea