
This is just a small addendum to my previous article . Once you have created a repeating section in PowerApps and saved it in a SharePoint list, I am going to show you one easy step to retrieve those data from the SharePoint list and make them available in edit and view form.
I am sure you already have created the repeating section in your form. If you haven’t yet, please refer to my earlier blog.
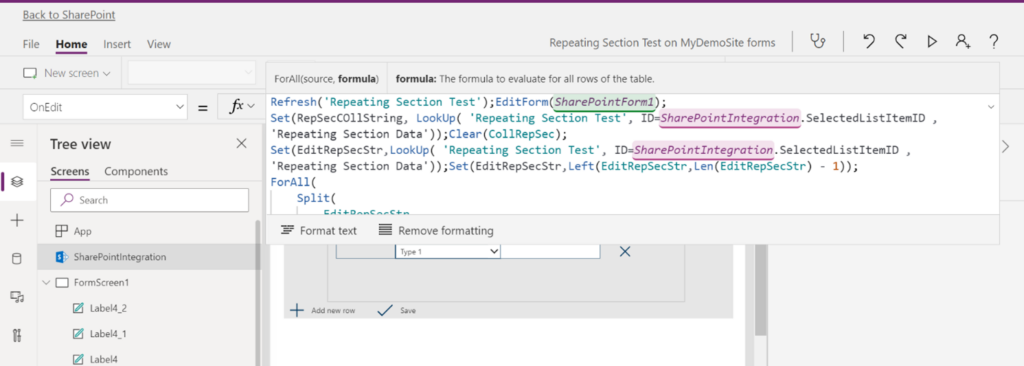
Now consider the following lines of code in the OnEdit and OnView property of SharePointIntegration of the form.
Set (RepSecCOllString, LookUp( 'Repeating Section Test', ID=SharePointIntegration.SelectedListItemID, 'Repeating Section Data')); Clear (CollRepSec);
Set (EditRepSecStr,LookUp( 'Repeating Section Test', ID=SharePointIntegration.SelectedListItemID , 'Repeating Section Data'));Set(EditRepSecStr,Left(EditRepSecStr,Len(EditRepSecStr) - 1));
ForAll (
    Split (
        EditRepSecStr,
        "|"
    ),
    Collect (
        CollRepSec,
        {
            SrNo: Text (Last (FirstN(Split(Result,";").Result,1).Result).Result),
            Type: Text (Last (FirstN(Split(Result,";").Result,2).Result).Result),
            Description: Text (Last (FirstN(Split(Result,";").Result,3).Result).Result)
        }
    )
)
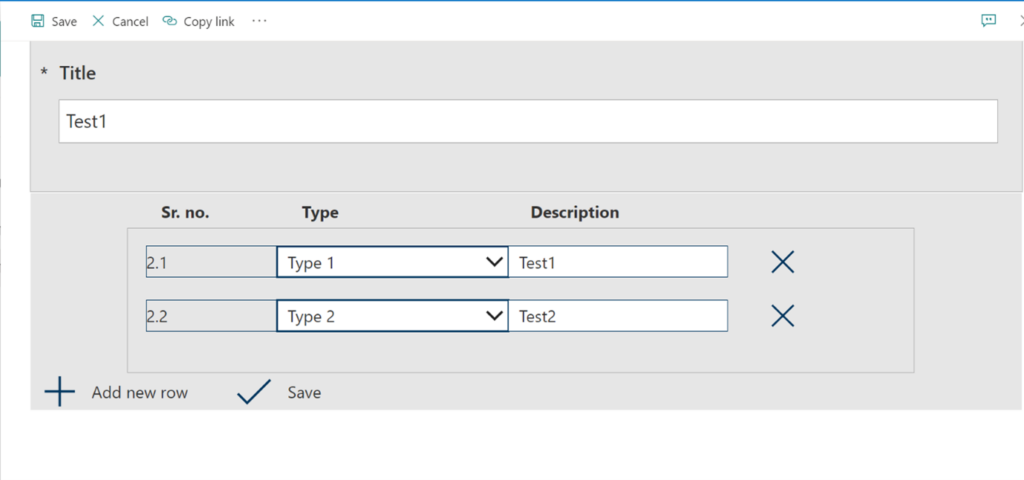
Finally, when you open your SharePoint form in edit and view mode you will be able to see your data like this.
This concludes the demonstration of how easily you can make use of repeating sections perhaps even to create an editable grid. PowerApps do not yet provide a straight forward grid control and this is one of the ways to get to a workaround. I thought tables are pretty important controls to use!
Let me know what you think of it.


Let’s say the repeating field is empty, what happens to the code?
I added this in a button to load the gallery with some data, it addes three gallery items with null values in the text box
Set(ProjectAmountDescriptionsgal,”245;adding 245;| 265;adding 265;|”);
ForAll(
Split(
ProjectAmountDescriptionsgal,
“|”
),
Collect(
Spendingcoll,
{
ColAmount: Text(
Last(
FirstN(
Split(
Result,
“;”
).Result,
1
).Result
).Result
),
ColAmountDesc: Text(
Last(
FirstN(
Split(
Result,
“;”
).Result,
1
).Result
).Result
)
}
)
);
Remove the last “|” from ProjectAmountDescriptionsgal, It will work.
Set (RepSecCOllString, LookUp( ‘Repeating Section Test’, ID=SharePointIntegration.SelectedListItemID, ‘Repeating Section Data’)); Clear (CollRepSec);
In the above code, what is mean ‘Repeating Section Test’. Is it List name? or Repeating section column name in the list? Please can you help me to understand this line.
In my example, ‘Repeating Section Test’ is the list name.
Hi Ravi, are you able to solve the repeating section with people picker type?
I have text box, people picker (combobox), dropdown controls in the gallery (repeating table) and followed your steps. working for text box and multiline text but not for people picker.
How to assign email address to people picker control in Power apps gallery? As you mentioned, I able to split text but not working for people picker like below code
AssingedTo:Text (Last (FirstN(Split(Result,”;”).Result,5).Result).Result)
Please can you help on this?
For that you need to use Office 365 Users connection.
Can you please tell what is EditRepSecStr and where is it being used
Hi,
Hope you are doing well.
I achieved everything as above. Thanks for the help.
However, when i edit an already created form and delete the rows and save, new list item is created. how to overcome this.
I am trying to use this in a Power App with a SharePoint list as my data source. How or where would I add this code to my form that uses the SP list as the datasource? I am not seeing any OnEdit or OnView properties there.
I do not get the items stacked , I get a scroll bar. but when I add this new code. in the OnEdit and Onview. however, it writes a new record to the SharePoint list. instead of updating the current record.
when I go to edit an existing record it is blank, none of the original entries are there and it creates a new line item.
I was wondering do these items have to make the type of input box they are like Dropdowns?