The opening statements by presenters in most of the Enterprise Mobility & Security (EMS) related ignite sessions last year was, “The data is exploding and it is happening at an alarming rate”. This is the reality that is realized by most of the organizations, and due to which more and more organizations are now embracing the data protection and governance strategy in order to avoid the data/information being lost or misused.
Microsoft already offers many protection and governance capabilities. One such data protection capability is the Azure Information Protection (AIP) offering. The official definition of AIP is.
Azure Information Protection (sometimes referred to as AIP) is a cloud-based solution that helps an organization to classify and optionally, protect its documents and emails by applying labels. Labels can be applied automatically by administrators who define rules and conditions, manually by users, or a combination where users are given recommendations.
When you decide to implement protection & governance policies, it is advised not to apply these policies directly to the production tenant as it may impact the day-to-day activities. Microsoft provides various options to migrate from Development tenant to the production tenant. You can either use .NET SDKs or PowerShell/Azure CLI scripts etc.
In this article, I will be walking you through the steps required to migrate the AIP labels along with the required permissions settings from development or test tenant to production tenant using the PowerShell script. Mentioned below are the three simple steps in the sequence which you to be executed in order to migrate the AIP templates from Dev/test tenant to production tenants.
- Export the AIP Templates from Dev tenant: Export the templates to local drive.
- Modify the AIP label Template file: Make necessary adjustments to the templates.
- Import the AIP label Templates into Prod tenant: Import the templates from local drive into the production.
Export the AIP Templates from Dev tenant:
To export/import AIP labels, you need to install the AzureRM module and AIPService module from Windows PowerShell. Here is the installation command.
- Install-Module -Name AzureRM -AllowClobber
- Install-Module -Name AIPService (apply -AllowClobber if the module already install)
After the required modules are installed, you need to connect to AIP service as a Global Admin using the PowerShell command below.

Connect-AipService
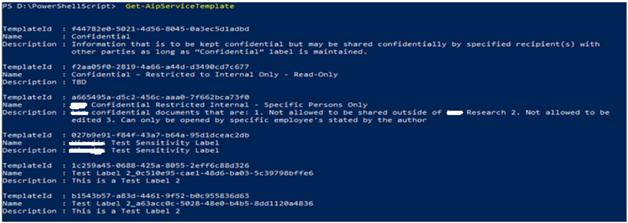
After Azure Information Protection service is opened successfully, run the PowerShell command to export AIP labels. For each AIP labels, you need to run the bellow command (you just need to change the file name and template GUID for each).
You may also like: Learn how to proactively identify and protect your sensitive information
Export-AipServiceTemplate
Path “D:\AIP-SensitivityLabels\MyTemplateFile.xml” -TemplateId f9072db2-463e-478f-a3fa-5795d3858a4b.
In the Export-AipServiceTemplate command above, we need to supply two parameters, that is
- Path: accepts the local xml file path with the file name where template will be saved.
- TemplateId: accepts the GUID of the template of AIP label.
You can get the template of all the AIP labels using the command Get-AipServiceTemplate

Modify the AIP label Template file:
Once all the templates are successfully exported to the local drive, you need to modify the exported template (xml file) to match the required settings in the production tenant.
The important settings that need to be updated are, tenant and domain related information such as
- User/Group E-Mail etc.
- Template GUID or
- Name (if already exists)
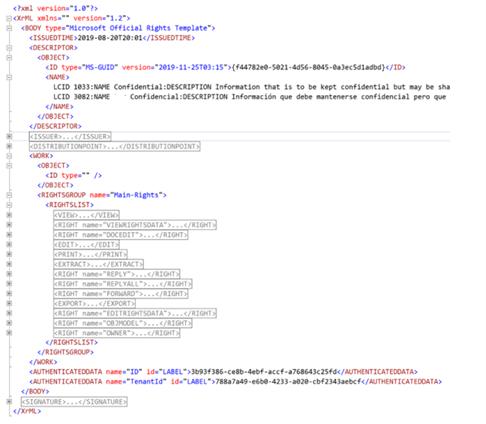
Remove the following tags from the template as these tags contain the settings related to the development tenant. And these settings will be automatically configured with the production while getting imported.
- <ISSUER> </ISSUER>
- <DISTRIBUTIONPOINT> </DISTRIBUTIONPOINT>
- <SIGNATURE> </SIGNATURE>
- <AUTHENTICATEDDATA name=”ID” id=”LABEL”> </AUTHENTICATEDDATA>
- <AUTHENTICATEDDATA name=”TenantId” id=”LABEL”> </AUTHENTICATEDDATA>
Import the AIP label Templates in to Prod tenant:
Before running the import command, you need to connect/open Azure Information Protection service with proper credential and permission (global admin). Here is the command bellow.
Connect-AipService
After that you need to import the template using the bellow PowerShell command.
Import-AipServiceTemplate -Path “D:\AIP-SensitivityLabels\MyTemplateFileTestLabel2.xml”.
Once the above command is executed, you can browse to azure portal at https://portal.azure.com and then search for the Azure Information Protection.

After that you import the template using the bellow PowerShell command.
Import-AipServiceTemplate -Path “D:\AIP-SensitivityLabels\MyTemplateFileTestLabel2.xml”

The Azure Information Protection pane will be opened. You can now click on the Labels under the section Classification as shown below.
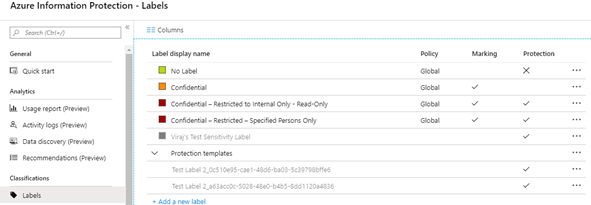
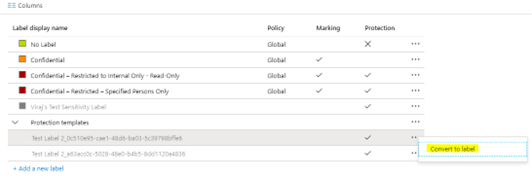
You will notice that the templates are already migrated but are in a disabled format in the AIP label section within Azure portal. This means that these templates are not yet published as AIP labels across the organization in the production. You can right-click on these templates and then convert them to AIP labels.
The automated solution discussed above is just the tip of the iceberg, which basically helps the teams to perform all the activities related to information protection in a dev/test tenant and then migrate to production using PowerShell so that the production remains unaffected and that it gets the final setup (similar to the typical software development scenario).
Since many organizations are now realizing the importance of information protection and governance, it is now becoming important more than ever for IT professionals & Developers to be ready with such automated utilities and guess what Microsoft is investing heavily to develop SDKs so as to help developers to develop similar utilities.
Download the Datasheet to learn more about Netwoven’s Information Protection and Compliance service.
Download the Solution Brief to learn how Netwoven’s solution proactively identifies and protects your sensitive data.
We at Netwoven have a dedicated resource pool to investigate, analyze various scenarios and have developed a host of such utilities that will help organizations with the org specific custom solutions. If you have any such requirement, please contact here.





thank you for article. Couple of questions:
1) Any change behavior which would be noticed at end level ? Would they still be able to open the mail item they encrypted earlier in old tenant ?
2) They would be able to protect the new mails with new labels ?
3) any changes or limitation at end user that they will face after AIP migration?
1. Permission and encryption should work as before like old tenant. User should be able to open the email, if user exists in the AD in the new tenant.
2. Yes.
3. If AD is synchronized with the old tenant. It should work as like old tenant.