Introduction :
In this blog, I will elaborate on how to read large Microsoft excel files from SharePoint online document library and import it into a list using Azure App with Microsoft Graph API delegated permissions and Power Automate flow. There are options such as Excel service which help you import MS Excel data into a SharePoint list. But in scenarios where the number of records is high (e.g., >25,000 rows), the excel file must be processed periodically, after the new file is uploaded or modified in the SharePoint library. One of the ideal ways to process the file is with Microsoft Graph API with Azure App.
Follow the steps below:
Step 1:
Validate the sample source Excel (.xlsx) file in the SharePoint library
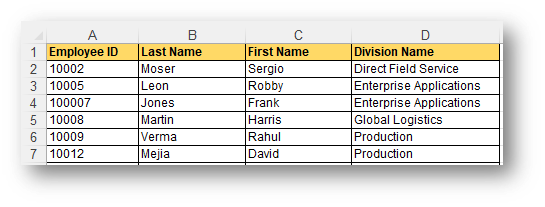
Step 2:
Configure an Azure app with the following Microsoft Graph API delegated permissions. To connect with Microsoft Graph, you will need a work/school account or a Microsoft account.
- Go to the Azure App registrations page.
- When prompted, sign in with your account credentials.
- From the top menu, select the New Registration button.
- Enter the name for your app
- Confirm changes by selecting the Register button.
- Now click on “API Permissions” and add the following “Microsoft Graph” Delegated permissions- (Site.Read.All, Site.ReadWrite.All,User.Read)

- Now click on “Certificates & secrets” from the left panel and generate a “New client secret “
- Copy and save the secret value for future reference
- Also copy the app Client ID and Tenant ID from the APP Overview Page
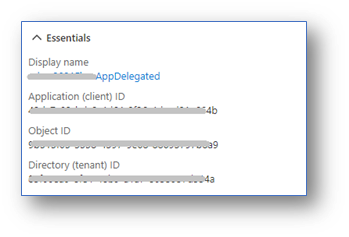
Step-3:
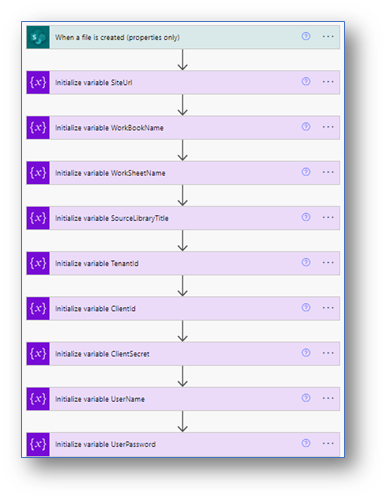
Create a Power Automate Flow. This is a glimpse of how our Power Automate Flow will look like,
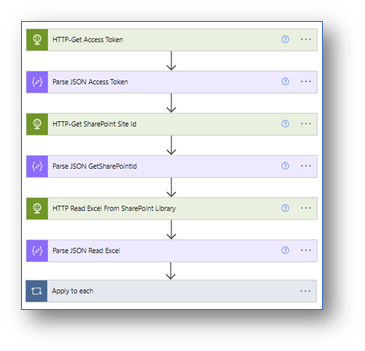
Follow the steps below to create the Power Automate flow:
a. Create a new “Automated cloud flow”
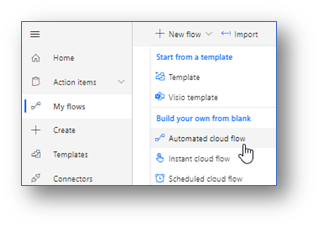
b. Enter the Flow Name and chose “When a file is created (property only)” trigger
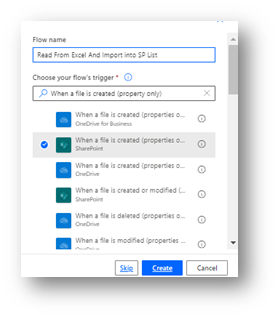
c. Add the following variables to store Site URL, Excel File Name, List/Library name, Azure App Client ID, and Client Secret etc.
Step 4:
Add an HTTP action to get the access token. This access token is used to get the SharePoint site details and read excel file.
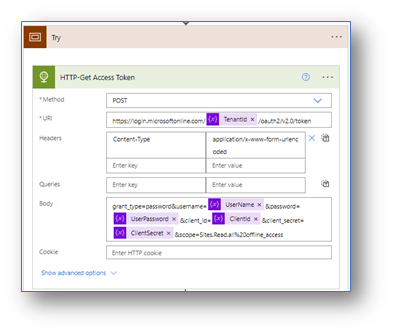
Note: As I am using the Microsoft Graph API delegated permissions, in the above action I am using “grant_type=password” and used Username and Password along with the “client_id” and “client_secret”
Step-5:
Add a Parse JSON action to parse the previous HTTP call response to get the “access_token”
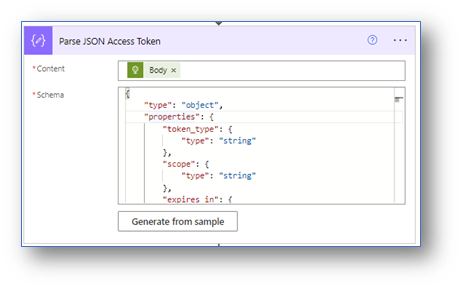
Sample JSON
{
    "type": "object",
    "properties": {
        "token_type": {
            "type": "string"
        },
        "scope": {
            "type": "string"
        },
        "expires_in": {
            "type": "integer"
        },
        "ext_expires_in": {
            "type": "integer"
        },
        "access_token": {
            "type": "string"
        },
        "refresh_token": {
            "type": "string"
        }
    }
}
Step-6:
Collect the SharePoint Site ID from MS Graph by configuring an HTTP action as shown below. Below is the URI format
URI: https://graph.microsoft.com/v1.0/sites/.sharepoint.com/sites/
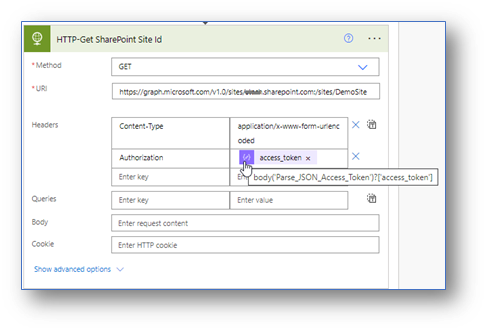
In the above HTTP call, we pass the “access_token” as “Authorization,” that we get from Step-4 parse JSON output
Step-7:
Add a Parse JSON action to parse the above HTTP call response to get the SharePoint site ID
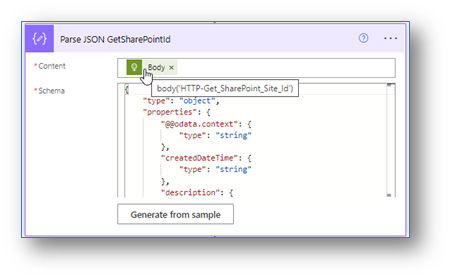
Sample JSON
{
    "type": "object",
    "properties": {
        "@@odata.context": {
            "type": "string"
        },
        "createdDateTime": {
            "type": "string"
        },
        "description": {
            "type": "string"
        },
        "id": {
            "type": "string"
        },
        "lastModifiedDateTime": {
            "type": "string"
        },
        "name": {
            "type": "string"
        },
        "webUrl": {
            "type": "string"
        },
        "displayName": {
            "type": "string"
        },
        "root": {
            "type": "object",
            "properties": {}
        },
        "siteCollection": {
            "type": "object",
            "properties": {
                "hostname": {
                    "type": "string"
                }
            }
        }
    }
}
Step-8:
Add a HTTP action to read the Excel file
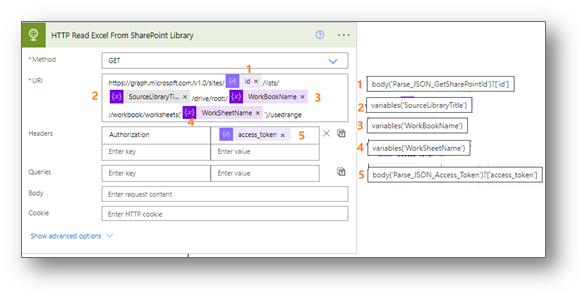
Note: In the above HTTP call if you want to read selected range of cells from excel file you can specify the range like “range(address=’A1:D4500′)” instead of “usedrange” in the URI
Step-9:
Add a Parse JSON action to parse the above HTTP call response to get the excel data
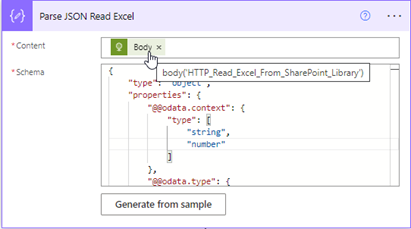
Sample JSON
{
    "type": "object",
    "properties": {
        "@@odata.context": {
            "type": [
                "string",
                "number"
            ]
        },
        "@@odata.type": {
            "type": [
                "string",
                "number"
            ]
        },
        "@@odata.id": {
            "type": [
                "string",
                "number"
            ]
        },
        "address": {
            "type": [
                "string",
                "number"
            ]
        },
        "addressLocal": {
            "type": [
                "string",
                "number"
            ]
        },
        "columnCount": {
            "type": "integer"
        },
        "cellCount": {
            "type": "integer"
        },
        "columnHidden": {
            "type": "boolean"
        },
        "rowHidden": {
            "type": "boolean"
        },
        "numberFormat": {
            "type": "array",
            "items": {
                "type": "array",
                "items": {
                    "type": [
                        "string",
                        "number"
                    ]
                }
            }
        },
        "columnIndex": {
            "type": "integer"
        },
        "text": {
            "type": "array",
            "items": {
                "type": "array",
                "items": {
                    "type": [
                        "string",
                        "number"
                    ]
                }
            }
        },
        "formulas": {
            "type": "array",
            "items": {
                "type": "array",
                "items": {
                    "type": [
                        "string",
                        "number"
                    ]
                }
            }
        },
        "formulasLocal": {
            "type": "array",
            "items": {
                "type": "array",
                "items": {
                    "type": [
                        "string",
                        "number"
                    ]
                }
            }
        },
        "formulasR1C1": {
            "type": "array",
            "items": {
                "type": "array",
                "items": {
                    "type": [
                        "string",
                        "number"
                    ]
                }
            }
        },
        "hidden": {
            "type": "boolean"
        },
        "rowCount": {
            "type": "integer"
        },
        "rowIndex": {
            "type": "integer"
        },
        "valueTypes": {
            "type": "array",
            "items": {
                "type": "array",
                "items": {
                    "type": [
                        "string",
                        "number"
                    ]
                }
            }
        },
        "values": {
            "type": "array",
            "items": {
                "type": "array",
                "items": {
                    "type": [
                        "string",
                        "number"
                    ]
                }
            }
        }
    }
}
Step 10:
Add an “Apply to each” action to loop through all the rows from excel and add into the SharePoint list using “Send an HTTP request to SharePoint” action.
Add the expressions to specify the column index of the excel file of each item in the “Send an HTTP request to SharePoint” action.
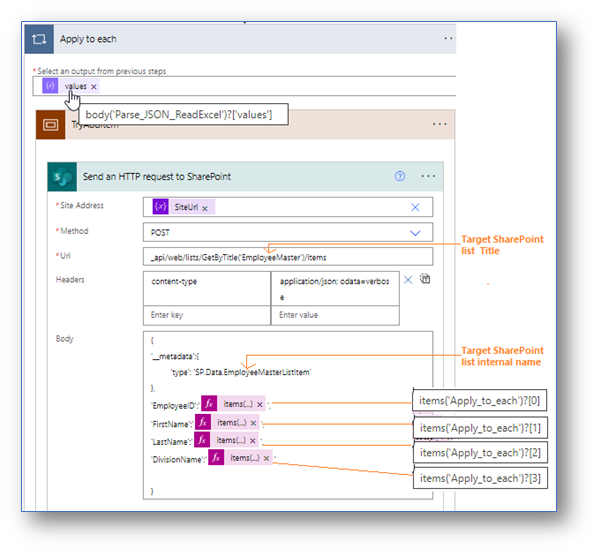
Now our flow is ready to go. Run the flow and validate data into the SharePoint list.
Outcome:
- Process enormous number of records quickly.
- No need for Excel Tables and Excel connector.
- My flow is a generic process that is easy to copy between environments as we are using variables to store site and excel file details
- You can configure the flow to read file periodically
Conclusion:
I hope this blog has helped you learn how using the Microsoft Graph API we can easily reach into an excel file, stored in SharePoint, and process the data for use in other places


