
We know to provide infrastructure support for SharePoint Apps we have to do a number of configuration steps. I have worked for a number of business where the App infrastructure for their on-premises SharePoint farm has not been set up but there are some important business requirement to be implemented without trusted solution and managed code as a practice. In this article I will show you a structured way of developing custom SharePoint functionalities using JavaScript CSOM and jQuery which is very compatible with SharePoint hosted Apps.
Solution:
The main components that are required to develop client side functionality are HTML, CSS, and JavaScript along with SharePoint list/libraries which holds related data. You can just use SharePoint designer as the only tool to develop these components or any of your favorite editor is good. I will demonstrate the structure and separation of code using SharePoint designer:
1. Open you site using SharePoint Designer and on the navigation click on “Site Assets”.
2. Now because you can have multiple custom functionalities, for a good structure and code management you can create following folder structure:

Each separate functionalities could be a subfolder under “Utilities folder.
3. Say you are developing a functionality for showing announcements, so you can create following three files under “AnnouncementTicker” folder:
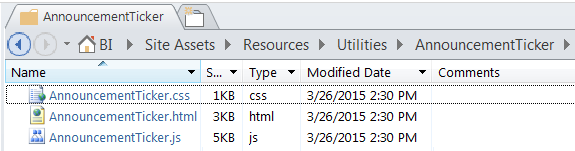
Do your required coding for the components. Refer to the “.css” and “.js” files from the .”html” files.
4. Now as your custom coded components are ready, open the page in browser where you need to add the functionality. Edit the page and add a Content Editor Web Part in the required zone and link the “.html” file. In the Content Editor Tool Pane, under Content Link, type the link of the “.html” file, for example “SiteAssets/Resources/Utilities/AnnouncementTicker/AnnouncementTicker.html”.
5. Save the page and you can see the results. For updating the functionality you do not need any deployment. Just edit the code from the corresponding files using SharePoint Designer and save to see the update in browser.
Pretty fast and efficient development process compared to SharePoint Hosted App Development!
A real life example will be good and for this I am demonstrating the “Announcement Ticker” functionality to be added on a say dashboard page:
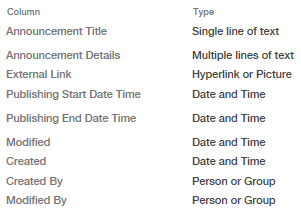
1. Create a SharePoint List “Announcements” which will host all announcement/notification/news details.
2. Only the active announcements (current date within publishing start and end date time) will display on dashboard page. This way you can set up future announcements and will automatically display on dashboard when start date time appears and will expire from dashboard after the specified publishing end date time.
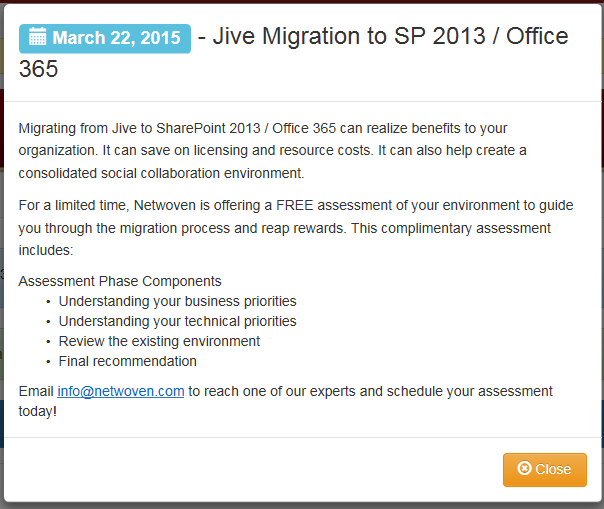
If an announcement contains an external link, clicking on “More” button will open the link in a new window else the announcement details will appear in a modal window.
3. You can configure multiple active announcements and those active announcements will scroll one by one on dashboard page.
I have used JQuery, Bootstrap and SharePoint JavaScript Client Object Model as the main technologies for the solution. Use SharePoint designer to open your site and create following folder structure inside “SiteAssets” library – “/SiteAssets/Resources/Utilities/AnnouncementTicker” and create following three files inside the “AnnouncementTicker” folder:
- AnnouncementTicker.html
- AnnouncementTicker.js
- AnnouncementTicker.css
The code of the files are given below on this article. Please note that you have to download Bootstrap and JQuery plugin file(s) and add to the “Resources” folder as shown in the code. Once you have the files ready add a “Content Editor WebPart” in the appropriate place and add reference to the “AnnouncementTicker.html” file in the content editor web part and you get the ticker functionality like below:

Clicking on the “More…” button will display the announcement details in a bootstrap modal like below:
AnnouncementTicker.html
| <html><head><scripttype=”text/javascript”src=”/_layouts/15/sp.runtime.js”></script><scripttype=”text/javascript”src=”/_layouts/15/sp.js”></script><linkrel=”stylesheet”href=”/SiteAssets/Resources/bootstrap/css/bootstrap.min.css”><linkrel=”stylesheet”href=”/SiteAssets/Resources/bootstrap/css/bootstrap-theme.min.css”><scriptsrc=”/SiteAssets/Resources/Plugins/jquery-1.11.1.min.js”type=”text/javascript”></script>
<scriptsrc=”/SiteAssets/Resources/bootstrap/js/bootstrap.min.js”type=”text/javascript”></script> <linkrel=”stylesheet”href=”/SiteAssets/Resources/Utilities/AnnouncementTicker/AnnouncementTicker.css”/> <scriptsrc=”/SiteAssets/Resources/Utilities/AnnouncementTicker/AnnouncementTicker.js”type=”text/javascript”></script> </head> <body> <divclass=”container-fluid”> <divclass=”alert alert-info alert-dismissible announcementAlerts”role=”alert”> <table> <tr> <td> <spanclass=”badge badge-info bAnnouncement”><iclass=”glyphicon glyphicon-volume-up”></i></span><strong>Announcements!</strong> </td> <tdstyle=”vertical-align:top;”> <ulid=”AnnouncementTicker”class=”AnnouncementLabel”></ul> </td> </tr> </table> <buttontype=”button”class=”close”data-dismiss=”alert”style=”top:-55px; vertical-align:top;text-align:right;”> <spanaria-hidden=”true”>×</span><spanclass=”sr-only”>Close</span> </button> </div> <divclass=”modal fade”id=”announcementDetail”tabindex=”-1″role=”dialog”aria-hidden=”true”> <divclass=”modal-dialog”> <divclass=”modal-content”> <divclass=”modal-header”> <buttontype=”button”class=”close hidden”data-dismiss=”modal”aria-label=”Close”><spanaria-hidden=”true”>×</span></button> <h3class=”modal-title”id=”announcementDetailDialogTitle”></h3> </div> <divclass=”modal-body”id=”announcementDetailDialogBody”></div> <divclass=”modal-footer”> <buttontype=”button”class=”btn btn-warning”data-dismiss=”modal”><iclass=”glyphicon glyphicon-remove-circle”></i> Close</button> </div> </div> </div> </div> </div> </body> </html> |
AnnouncementTicker.js
| $(document).ready(function () {LoadAnnouncements();});function LoadAnnouncements() {var clientContext = new SP.ClientContext.get_current();var oList = clientContext.get_web().get_lists().getByTitle(‘Announcements’);var camlQuery = new SP.CamlQuery();
var camlQueryText = “<View>” + “<Query>” + “<Where>” + “<And>” + “<Leq>” + “<FieldRef Name=’PublishingStartDateTime’ />” + “<Value IncludeTimeValue=’TRUE’ Type=’DateTime’><Today /></Value>” + “</Leq>” + “<Geq>” + “<FieldRef Name=’Expires’ />” + “<Value IncludeTimeValue=’TRUE’ Type=’DateTime’><Today /></Value>” + “</Geq>” + “</And>” + “</Where>” + “<OrderBy>” + “<FieldRef Name=’Modified’ Ascending=’False’ />” + “</OrderBy>” + “</Query>” + “</View>”; camlQuery.set_viewXml(camlQueryText); this.collAnnouncementListItems = oList.getItems(camlQuery); clientContext.load(collAnnouncementListItems); clientContext.executeQueryAsync( Function.createDelegate(this, this.onAnnouncementQuerySucceeded), Function.createDelegate(this, this.onQueryFailed) ); } function onAnnouncementQuerySucceeded(sender, args) { var announcementCount = collAnnouncementListItems.get_count(); if (announcementCount > 0) { var listItemInfo = ”; var listItemEnumerator = collAnnouncementListItems.getEnumerator(); var announcementHTML = “”; var annDlgTitle = “”; var annDlgBody = “”; while (listItemEnumerator.moveNext()) { var oListItem = listItemEnumerator.get_current(); var announcementID = oListItem.get_item(‘ID’); var announcementTitle = oListItem.get_item(‘Title’); var announcementBody = oListItem.get_item(‘Body’); var announcementExternalLink = “”; if (oListItem.get_item(‘ExternalLink’) != null) { announcementExternalLink = oListItem.get_item(‘ExternalLink’).get_url(); } var pubSDT = $.date(oListItem.get_item(‘PublishingStartDateTime’)); annDlgTitle += ‘<span id=”annDlgTitle’ + announcementID + ‘”><h3 class=”annDlgTitle”><span class=”label label-info”><i class=”glyphicon glyphicon-calendar”></i> ‘ + pubSDT + ‘</span> – ‘ + announcementTitle + ‘</h3></span>’; annDlgBody += ‘<div id=”annDlgBody’ + announcementID + ‘”>’ + announcementBody + ‘</div>’; announcementHTML += ‘<li><span class=”label label-info”><i class=”glyphicon glyphicon-calendar”></i> ‘ + pubSDT + ‘</span> – <span class=”AnnTitle”>’ + announcementTitle + ‘ <button data-externallink=”‘ + announcementExternalLink + ‘” onclick=”javascript:OpenAnnouncementDetails(‘ + announcementID + ‘, this);” type=”button” class=”btn btn-xs btn-primary”><i class=”glyphicon glyphicon-fullscreen”></i> More…</button></span></li>’; } $(“#AnnouncementTicker”).html(announcementHTML); $(“#announcementDetailDialogTitle”).html(annDlgTitle); $(“#announcementDetailDialogBody”).html(annDlgBody); setInterval(function () { RotateAnnouncement() }, 5000); } } function RotateAnnouncement() { $(‘#AnnouncementTicker li:first’).slideUp(function () { $(this).appendTo($(‘#AnnouncementTicker’)).slideDown(); }); } function onQueryFailed(sender, args) { alert(‘Request failed. ‘ + args.get_message() + ‘n’ + args.get_stackTrace()); } function OpenAnnouncementDetails(itemID, moreBtn) { $(“[id*=annDlgTitle]”).each(function (i) { $(this).css(‘display’, ‘none’); }); $(“[id*=annDlgBody]”).each(function (i) { $(this).css(‘display’, ‘none’); }); $(“#annDlgTitle” + itemID).css(‘display’, ”); $(“#annDlgBody” + itemID).css(‘display’, ”); $(‘#announcementDetail’).modal({ keyboard: false }); if ($(moreBtn).attr(‘data-externallink’) != “”) { setTimeout(function () { window.open($(moreBtn).attr(‘data-externallink’), ‘AnnouncemwntWindow’, ‘status=1,toolbar=0,resizable=1,scrollbars=1’); }, 500); } returnfalse; } $.date = function (dateObject) { var m_names = new Array(“January”, “February”, “March”, “April”, “May”, “June”, “July”, “August”, “September”, “October”, “November”, “December”); var d = new Date(dateObject); var day = d.getDate(); var month = m_names[d.getMonth()]; var year = d.getFullYear(); if (day < 10) { day = “0” + day; } var date = month + ” ” + day + “, ” + year; return date; }; |
AnnouncementTicker.css
| .AnnouncementAlerts {height: 60px;}#AnnouncementTicker {height: 60px;overflow: hidden;list-style: none!important;
padding: 0px; margin: 0px!important; padding-left: 10px; vertical-align: top; } #AnnouncementTickerli { height: 60px; list-style: none!important; padding: 0px!important; margin: 0px!important; vertical-align: top; } .AnnouncementLabel { list-style: none!important; padding: 0px!important; margin: 0px!important; vertical-align: top; } .AnnDate { font-style: italic; font-size: 13px; } .AnnTitle { padding-left: 0px; font-size: 14px; color: black; } .bAnnouncement { font-size: inherit!important; } .badge-info { background-color: #3a87ad; } .annDlgTitle { margin-top: 0px!important; margin-bottom: 0px!important; } .AnnTitleLink { font-weight: bold; } |