In the first part of this blog, we have seen how to register an App in Azure that has access to Graph API (REST Endpoints) to create, update, delete Azure AD group. We have also seen how to get Client ID, App ID, and Client Secret after registering an APP in Azure that will be used in the subsequent section to access the REST endpoints from O365 Nintex workflow.
Today in this second part, we will discuss Step 3 and Step 4 out of the four-step processes which we mentioned earlier. To help you recapitulate, let me share the processes once more:
Step 1: Having an app registration in Azure that will have the rights to create, update, delete Azure AD group.
Step 2: Getting TENANT ID, APP ID, and CLIENT SECRET while registering the App.
Step 3: Authenticate user through web request and get hold of bearer token that will be used in successive web request calls.
Step 4: Use a web request to create a group.
To complete the process flow, let’s discuss Step 3 and Step 4 and get a definite solution to this issue.
Step 3: Authenticate user Through Web Request
Before you start creating and configuring the components mentioned below, first create three workflow variables tenant_id, app_id and client_secret of string type respectively and initialize the value that you acquired in Step 2.
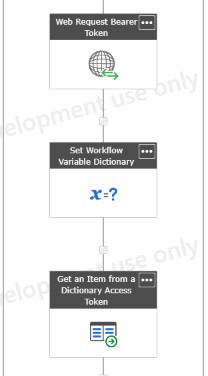
The purpose of this step is to access Bearer token or Access token after successful authentication of the user in the Azure portal by web service. This step comprises of three components as follows:
Let’s configure the components:
Component 3.1:
Component Name: Web Request Bearer Token
Component Type: Web Request
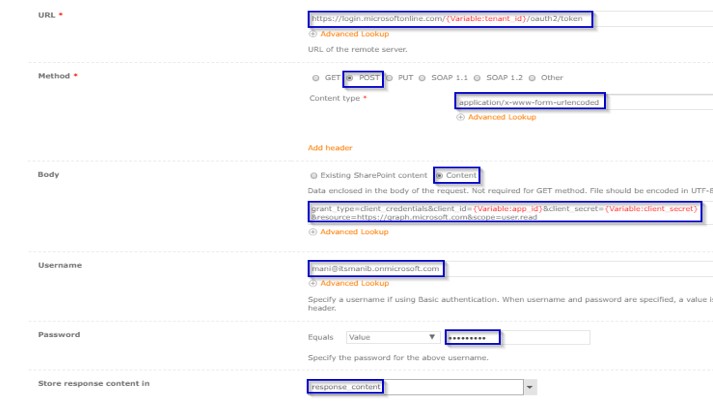
N.B. Username and Password should have tenant admin credential of AZURE portal and tenant_id, app_id, client_secret will be available from Steps 2.1, 2.2, 2.3 respectively.
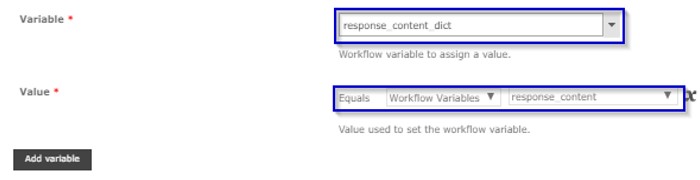
Component 3.2:
Component Name: Set Workflow Variable Dictionary
Component Type: Set Workflow Variable
Before configuring this component create a variable response_content_dict of type dictionary.
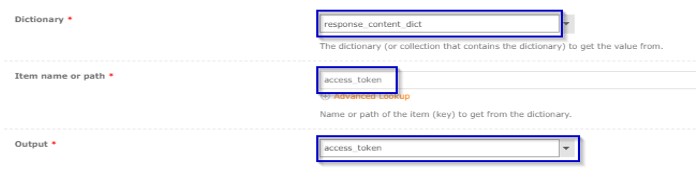
Component 3.3:
Component Name: Get an Item from a Dictionary Access Token
Component Type: Get an Item from a Dictionary
Before configuring this component create a variable access_token of type string.
Step 4: Web request to create a group
The objective of this step is to create a group in Azure AD. This one again comprises of three subsequent steps.
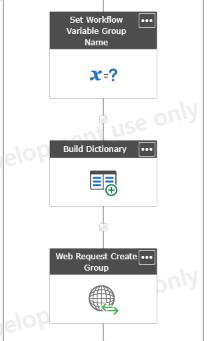
Component 4.1:
Component Name: Set Workflow Variable Group Name
Component Type: Set Workflow Variable
Before you configure this component create and set a variable Group_Name of type string to the group name that you want to create in Azure AD.
N.B. The value will be assigned during runtime and can be a variable name also.

Component 4.2:
Component Name: Build Dictionary Request Header
Component Type: Build Dictionary
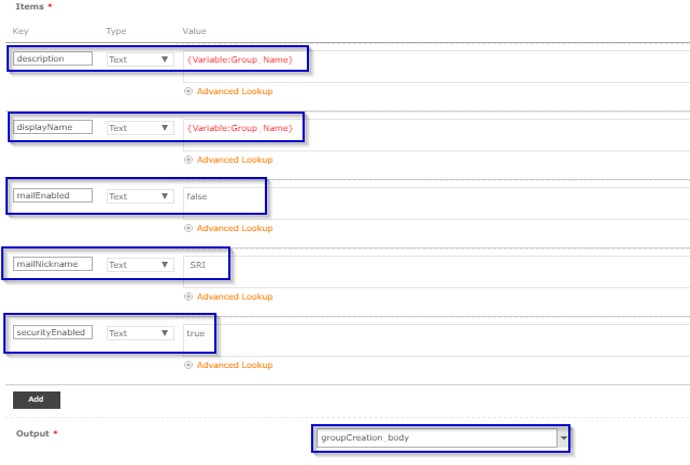
Before you start configuring this component create and set a variable groupCreation_body of type dictionary as follows:
Component 4.3:
Component Name: Web Request Create Group
Component Type: Web Request

N.B. Username and Password should have an admin credential to AZURE portal
Result: After going through all the steps, you will find a group (Security) of name ‘Mani Test Again’ in Azure AD.
Walk-through Video
Wrapping Up
This was a complex issue indeed. We were in an utter fix when the Nintex help desk were not able to give a support for the time being. However, we required an immediate solution to support our clients.
We did gruesome brainstorming and came up with these four-step process to put an end to the complex technical situation forever. It was helpful for us when we implemented it against our client requirements. Hope it does the same for all my readers. Happy reading!