This article is about the brief introduction of Microsoft Information Protection (MIP) which is the latest offering from Microsoft in the protection related Azure offering. Here, I have briefly covered the basic details about MIP and its similarities/differences between another legacy offering, Azure Information Protection. Then we will delve into the development aspects such as what are the available options for developers and further, we will discuss about how to utilize the MIP SDK and develop awesome custom products catering to the specific needs of customers.
This article is for intermediate to advanced users who have some understanding of various protection terminologies and are aware of Azure protection technology. If you are a beginner, then I recommend you start your protection journey with Microsoft protection documentation.
Mentioned below are few prerequisites before you begin with the MIP SDK setup.
- You have an idea of registering multi-tenant Azure AD app and how it works.
- You have an idea of OAuth and various authorization flow it uses, like client credentials flow.
Brief Overview of MIP and AIP
Are you hearing a lot about “data protection” or “Information Protection” these days? These technologies empower users in labeling and protecting their contents, documents, files, e-mails, etc. Microsoft introduced MIP abbreviation for the first time in last year’s Ignite event which they call as Microsoft Information Protection. Probably many of you have heard about the terms like AIP (Azure Information Protection) which is already there, so are many other well-known features, like Office 365 Message Encryption (OME), Office 365 Data Loss Prevention(DLP) and Windows Information Protection (WIP).
Now, Microsoft Information Protection or MIP is a solution for consistent labeling across all Microsoft 365 platform. This has many links to Azure Information Protection (AIP) since you might know that AIP is a Microsoft Azure offering that works in conjunction with Microsoft Online services (Exchange Online, SharePoint Online, etc.) and Office 365 to categorize and protect documents and emails using sensitivity labels and policies defined by an administrator.AIP helps organizations to secure email, content (documents) and makes it possible to securely share these with targeted audiences only. As a cloud-based solution, AIP is an evolution of a variety of technologies all focused on rights management, and it uses Azure Rights Management (RMS) as its protection technology.
So, currently what is new from AIP?
- Microsoft will merge AIP and O365 labels in order to get unified labels.
- The labels will be embedded in MS Office and available in Outlook on the Web.
The integration of all products and extended capabilities is now called Microsoft Information Protection (MIP), the new name for the suite of products which includes AIP, IRM, RMS, O365 labeling, and WIP.
Key Benefits of using MIP
MIP offers from easy classification to embedded labels and permissions, always enhance data protection no matter where it is stored or who it is shared with.
MIP SDK helps in creating third party application which is the unification of Microsoft’s classification, labeling, and protection services.
As for these sensitivity labels, one of the announcements at Ignite was the unification of AIP and SCC labels, although they are still listed as separate types in the portal, and you cannot have a single label apply both retention and encryption. So, in the near future, they will merge this and give us a unified label. From this perspective, MIP provides a solid SDK where you can deal with these features seamlessly.
You may also like: Learn how to proactively identify and protect your sensitive information
MIP SDK Overview and Brief Architecture
The MIP SDK helps you to create custom apps to create, apply, remove labels from your files. It might come handy in cases when as a super admin wants to access a protected file, apply labels based on some sensitive information or even remove labels.
If you see the below architecture diagram the SDK provides below three API’s
- File API
- Protection API
- Policy AP
Basic Setup Prerequisites for MIP SDK
The setup steps are well explained in details in the Microsoft’s official documentation https://docs.microsoft.com/en-us/information-protection/develop/setup-configure-mip but I am here providing the important pre-requisites steps in nutshell below.
- Set up the Office 365 subscription and configure Azure Information Protection and sensitivity labels. Azure Rights Management service must be activated.
- For Windows 10, ensure that the version is 1709 or later. To check this you may refer https://support.microsoft.com/en-in/help/13443/windows-which-version-am-i-running.Optionally, turn on “Developer mode” for the workstation. To turn it, head to Settings > Update & Security > For Developers and select “Developer mode”. You may refer https://www.howtogeek.com/292914/what-is-developer-mode-in-windows-10/ article to check in details on how to turn developers mode.
- Install Visual Studio 2017 or later with the workload Desktop development with C++ Windows workload if you wish to develop in C++, plus the following optional components Windows 10 SDK 10.0.16299.0 SDK or later, if not included by default.
- Download and install the SDK from https://www.microsoft.com/en-us/download/details.aspx?id=57392 (.zip file) or install from Visual Studio NuGet Package Manager console by running.
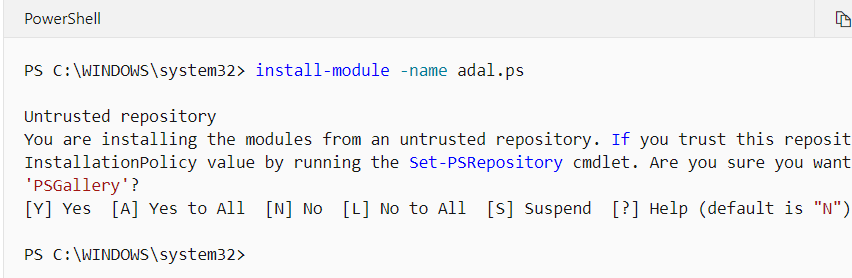
- Install the ADAL.PS PowerShell Module. Sign into your computer with an account that has Administrator rights and run the
install-module -name adal.ps
- Install-Package Microsoft.InformationProtection.File

- If you are not using the NuGet package, then add the paths of the SDK binaries to the PATH environment variable. The PATH variable allows the dependent binaries (DLLs) to be found at runtime, by client applications (OPTIONAL):
To do this open the environment variable editor and add the entries of dll. For detailed steps please check https://docs.microsoft.com/en-us/information-protection/develop/setup-configure-mip article point 5 bullet.
- On the System Properties dialog, click Environment Variables
- On the Environment Variables dialog, click the Path variable row under User variables for , then click Edit….
- On the Edit environment variable dialog, click New, which creates a new editable row. Using the full path to each of the file\bins\debug\amd64, protection\bins\debug\amd64, and upe\bins\debug\amd64 subdirectories, add a new row for each. The SDK directories are stored in a \bins\\ format, where:
- = file, protection, upe
- = debug, release
- = amd64 (x64), x86, etc
- Create a new Azure ad app from Azure portal and note down the application id from there.
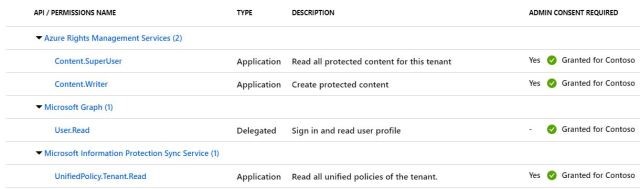
- Navigate to “API permissions” tab and grant below permissions. Make sure to click on “Grant admin consent” so that permissions are authorized by admin. Notice that all are application permission, except for MS Graph which is used for login.
- Configure a client secret, which is a secret string (application password) that the application will use to prove its identity when requesting a token to call the APIs. Copy the save Client Secret.
If you don’t know how to register an app in Azure and get app id and client secret then I would recommend you to go through https://docs.microsoft.com/en-us/Azure/media-services/previous/media-services-portal-get-started-with-aad#get-the-client-id-and-client-secret article. Since discussing that is not focus of this article.
The code to initialize MIP File Engine
Once you have completed the basic setup steps now, we will see how to start using the SDK. I will talk about C# syntaxes here, but the SDK has great examples around C++ also. For reference you can start directly from their official doc https://docs.microsoft.com/en-us/information-protection/develop/quick-app-initialization-csharp .
Below are the steps in code:
- Step 1 – First see below how we create authentication delegate object. Auth Delegate Implementation is a class which is responsible for generating the access token from Azure right management service.
- Step 2 – We have to create MIP file profile.
- Step 3 – Once file profile is created, we can initialize the file engine.
- Step 4 – Finally, from the file engine we can get the list of configured protection labels (notice in yellow highlighted line).We store the configuration values in app settings. This includes client id, app secrets, app names, etc.
private static readonly string clientId = ConfigurationManager.AppSettings["ida:ClientId"];
        private static readonly string appName = ConfigurationManager.AppSettings["app:Name"];
        private static readonly string appVersion = ConfigurationManager.AppSettings["app:Version"];
        private static readonly string mipData = ConfigurationManager.AppSettings["MipData"];
Then see how we initialize the AuthDelegateImplementation (https://github.com/Azure-Samples/MipSdk-Dotnet-File-Quickstart/blob/b169936e85/mip-sdk-dotnet-quickstart/AuthDelegateImplementation.cs) like this,
ApplicationInfoappInfo = new ApplicationInfo()
		{
			ApplicationId = clientId,
			ApplicationName = ClientSecret,
			ApplicationVersion = appVersion
		};

		AuthDelegateImplementationauthDelegate = new AuthDelegateImplementation(appInfo, tenantId);
Now see the complete code, read the comments to gain insights on each line, they are self-explanatory.
private static readonly string clientId = ConfigurationManager.AppSettings["ida:ClientId"];
        private static readonly string appName = ConfigurationManager.AppSettings["app:Name"];
        private static readonly string appVersion = ConfigurationManager.AppSettings["app:Version"];
        private static readonly string mipData = ConfigurationManager.AppSettings["MipData"];
        private readonly string mipPath = Path.Combine(AppDomain.CurrentDomain.BaseDirectory, mipData);
try
{
		SharePointContextspContext = SharePointContextProvider.Current.GetSharePointContext(HttpContext);
		Uri sharepointUrl = new Uri(spContext.SPHostUrl.AbsoluteUri.ToString());

//fetch tenant id to be used in getting access token
		string tenantId = TokenHelper.GetRealmFromTargetUrl(sharepointUrl).ToString();

// Initialize SDK DLLs. If DLLs are missing or wrong type, this will throw an exception
		MIP.Initialize(MipComponent.File);

// Initialize AuthDelegateImplementation using AppInfo.
		ApplicationInfoappInfo = new ApplicationInfo()
		{
			ApplicationId = clientId,
			ApplicationName = ClientSecret,
			ApplicationVersion = appVersion
		};

		AuthDelegateImplementationauthDelegate = new AuthDelegateImplementation(appInfo, tenantId);

		var profileSettings = new FileProfileSettings(mipPath, false, authDelegate, new ConsentDelegateImplementation(), appInfo, LogLevel.Trace);

		//create MIP File Profile
		var fileProfile = Task.Run(async () => await MIP.LoadFileProfileAsync(profileSettings)).Result;

		//create MIP Engine and add it to the file profile
		var engineSettings = new FileEngineSettings("", "", "en-US");
		engineSettings.Identity = new Identity("admin@tenant.com"); //important to paas a valid admin account here
		var engine= Task.Run(async () => await fileProfile.AddEngineAsync(engineSettings)).Result;
// Get labels from the engine and return.
	IEnumerable<Label> labels = engine.SensitivityLabels;

	}
	catch(Exception ex)
		{
                               // Write exception and trace here
                                }
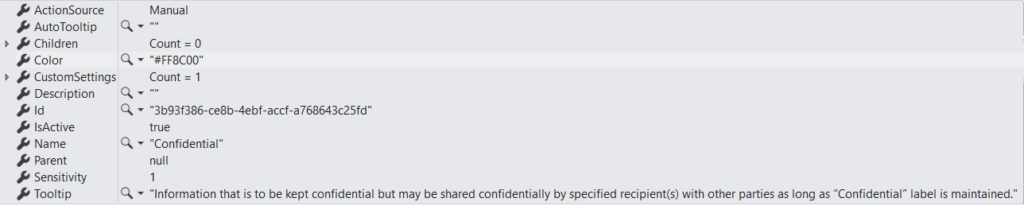
Once you run the above code you will see the output will be a list of sensitivity labels configured in your tenant.
Each label entity will resemble like this
Apply a new Protection Label
Before applying the new label, you may want to check for the existing label applied on the doc. You can do that by below two lines of code.
var handler = CreateFileHandler(options);
ContentLabel label = handler.Label;
See how we define Create File Handler method which creates file handler object.
First, we need to create a file option object containing the input, output file path and the target protection label id which we are planning to apply. Label id is the id of the protection label you want to apply.
// Set file options from FileOptions struct. Used to set various parameters for FileHandler
FileOptions options = new FileOptions
       {
	FileName = inputFilePath,
	OutputName = outputFilePath,
	ActionSource = ActionSource.Manual,
	AssignmentMethod = AssignmentMethod.Standard,
	DataState = DataState.Rest,
	GenerateChangeAuditEvent = true,
	IsAuditDiscoveryEnabled = true,
	LabelId = newLabelId
        };
Now we pass the created file option object to below method to acquire the instance of file handler.
public static IFileHandlerCreateFileHandler(FileOptions options)
{
     var handler = Task.Run(async () => await engine.CreateFileHandlerAsync(options.FileName, options.FileName, options.IsAuditDiscoveryEnabled)).Result;
     return handler;
}
To apply a new protection label we can use below code
As we already have created file handler instance, we will utilize that to invoke Set Label method on it.
// Apply the new label
LabelingOptionslabelingOptions = new LabelingOptions()
       {
	AssignmentMethod = options.AssignmentMethod
       };
try
{
handler.SetLabel(engine.GetLabelById(options.LabelId), labelingOptions,
  new ProtectionSettings());
}
catch (Microsoft.InformationProtection.Exceptions.JustificationRequiredException)
{
Console.Write("Please provide justification: ");
string justification = Console.ReadLine();
labelingOptions.IsDowngradeJustified = true;
labelingOptions.JustificationMessage = justification;
handler.SetLabel(engine.GetLabelById(options.LabelId), labelingOptions,
  new ProtectionSettings());
}

// Finally, commit the changes
Task.Run(async () => await handler.CommitAsync(options.OutputName)).Result;
Now after the execution of the above code you will see the targeted file have the protection label applied successfully.
Delete an Existing Protection Label
We can also remove an existing protection label from a file.Do not forget to call commit method after the respective operation.
LabelingOptionslabelingOptions = new LabelingOptions()
{
AssignmentMethod = options.AssignmentMethod
};
handler.DeleteLabel(labelingOptions);
// Finally, commit the changes
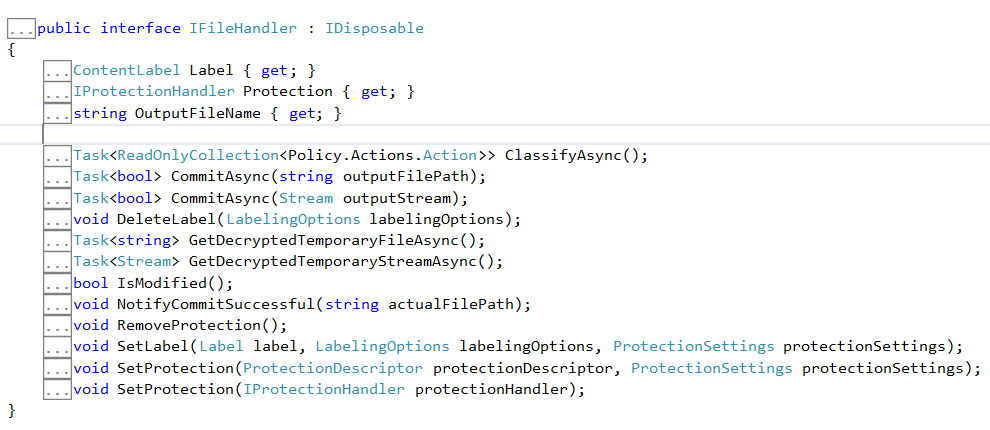
handler.CommitAsync(options.OutputName);Some Useful methods in IFileHandler Interface
The IFileHandler interface which lies under the namespace Microsoft.InformationProtection.File provides a couple of useful functions which can be leveraged to perform different operations.
Here are glimpses of them.
Some Caveats
Please note that MIP SDK does not support content marking (watermark, header, footer) yet. You can apply a label with watermark, but it won’t be reflected until you open the document and save it in Office 365 again.
There are also other capabilities provided in the SDK like setting up the document owner, changing to a new owner, etc. You can explore from https://docs.microsoft.com/en-us/information-protection/develop/.
Download the Datasheet to learn more about Netwoven’s Information Protection and Compliance service.
Download the Solution Brief to learn how Netwoven’s solution proactively identifies and protects your sensitive data.