In this post, we will be using the Dynamics 365 for Finance & Operations (AX)’s OData interface to integrate it with Dynamics CRM. Please refer my previous post to see how we can generate the proxy class from AX. We are using a CRM plugin to initiate the integration and then the rest of the integration code will be run from within an Azure function. By using this method, we can avoid merging the OData DLL with CRM plugin DLL.
Prerequisites
- Visual Studio 2017
- Microsoft Dynamics 365 for Finance & Operations (AX)
- Microsoft Dynamics 365 CRM
End goal and Integration Approach:

Here my end goal is to submit CRM product record details from CRM Product entity to AX and create a new record in an AX custom entity. There are different approaches we can follow to integrate both these systems and here we will be using,
- A CRM asynchronous plugin to submit the data to an azure function.
- An azure function which captures the product record details from the CRM plugin and create a new record in AX using the OData interface.
Why Azure Function:
As per the Microsoft documentation ‘Azure Functions is a serverless compute service that enables you to run code on-demand without having to explicitly provision or manage infrastructure. Use Azure Functions to run a script or piece of code in response to a variety of events.’
The main advantages I find in using Azure function are the ease of use and its scalability. We can create and debug an azure function inside Visual Studio just like a console application. Once tested we can publish it to Azure form within the Visual Studio. Also, it has all the Azure built-in features like auto scalability and Application Insight (Reporting) support. In this post I am using the Plugin to post the JSON data directly to the Function, but it can be further scaled by making the plugin post to a Service Bus and then allowing the function to read from the Service Bus.
CRM Asynchronous Plugin:
In the product entity I have created a custom Boolean field called ‘new_submittoax’ which when set to true triggers the plugin. This is a simple plugin which formats the required field data into a JSON and submits that to the function using the method “PostAsyncMessageToLogicApp” as given below. I have given below a sample JSON and the method which submits the data to the function for your reference.
Sample JSON created by the plugin:
"ProductInfo": { "PrimaryEntityName": "product",
 "MessageName": "Create",
 "new_submittoax_": "1",
 "CustomerNo": "10571",
 "PhoneNumber": "9633123456",
 "productnumber_": "47352936",
 "UOM": "1500",
 "ItemNo": "1234",
 "ItemDescription": "Test Item",
 "new_status_": "Pending",
 "productid_": "4704a238-bbd4-e811-b970-0003ff66a82c"
 }

private static async Task<string> PostAsyncMessageToLogicApp(IOrganizationService orgService, ITracingService tracingService, Entity entity, string organizationName, string messageName, string json)
        {
		//Function URL
            var logicAppEndpoint = “https://testabc.azurewebsites.net/api/CRMToAXProduct?code=1234567890jaAO7LQJUnaSDTnu8gp6jrvSgrdWcGkXcagKahjL0H1A==” ; //This URL should be copied from the Azure portal function details.
            try
            {
                var responseContent = string.Empty;
                var request = (HttpWebRequest)WebRequest.Create(logicAppEndpoint);
                request.KeepAlive = false;
                request.Method = "POST";
                request.ContentType = "application/json";
                tracingService.Trace("Sending request: " + json);
                var postBytes = Encoding.UTF8.GetBytes(json);
                request.ContentLength = postBytes.Length;
                using (var requestStream = request.GetRequestStream())
                {
                    requestStream.Write(postBytes, 0, postBytes.Length);
                }
                var response = await request.GetResponseAsync();
                using (var reader = new StreamReader(response.GetResponseStream()))
                {
                    responseContent = reader.ReadToEnd();
                    tracingService.Trace("Received response: " + responseContent);
                }
                return responseContent;
            }
            catch (Exception ex)
            {
                throw new InvalidPluginExecutionException(
                    string.Format("Error invoking Logic App for entity {0} Id {1} message {2}: {3}", entity.LogicalName,
                        entity.Id, messageName, ex.Message));
            }
        }
Azure Function:
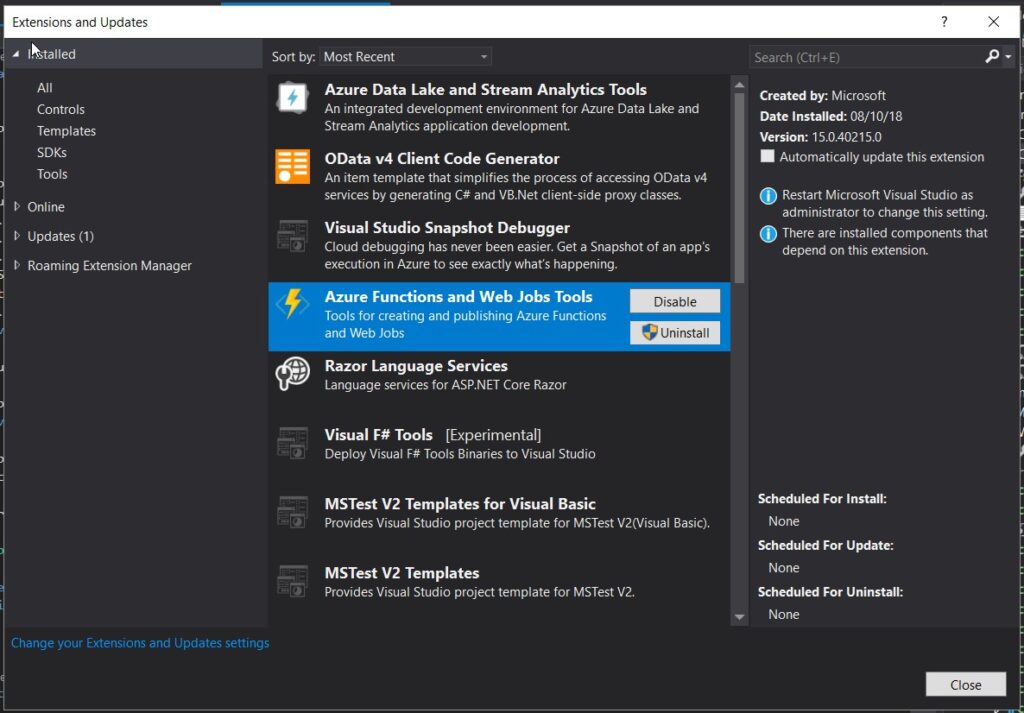
Please make sure that the ‘Azure Function and Web Jobs Tools’ extension is installed in the Visual Studio as given below.
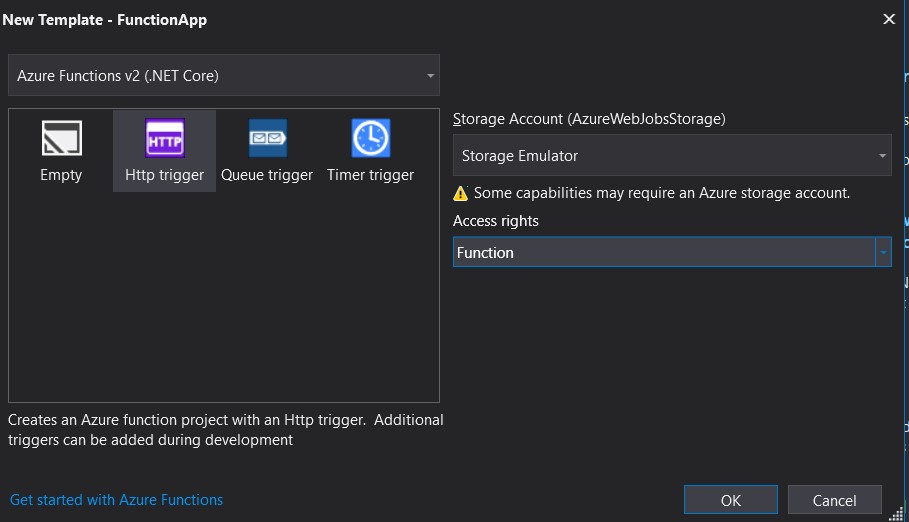
Then create a new function project as given below,

Select HTTP trigger as the template,
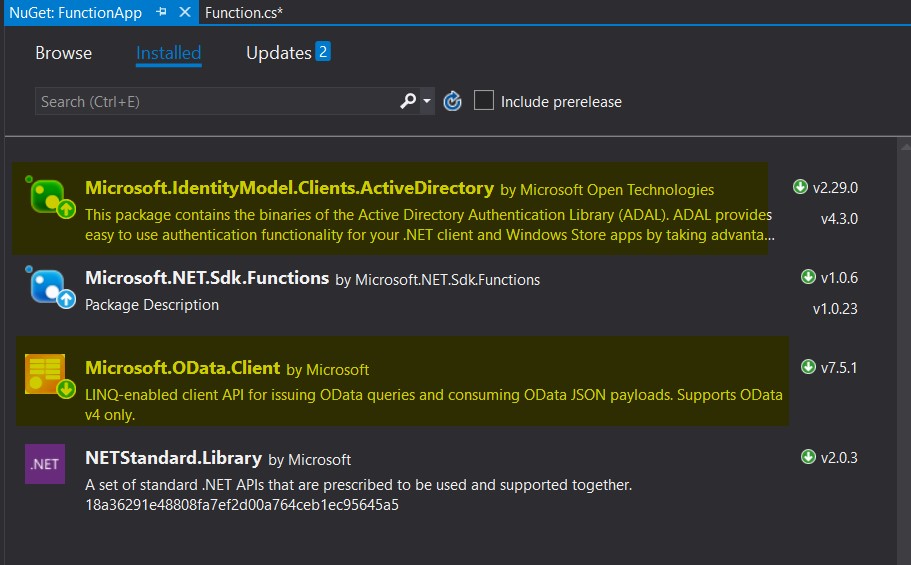
Also, needs to install NuGet packages Microsoft.IdentityModel.Clients.ActiveDirectory and Microsoft.OData.Client. as given below,
Once this is done, we need to reference the proxy class which we have generated against the AX instance. Please check out my previous post to see how we can generate the proxy.
In the below given function sample code I am getting the JSON data which we are sending from the plugin and processing it to update a custom entity “CUSTReleasedProduct” in AX. In the below code, ‘context.SaveChanges’ is when the data is getting saved to AX. Please note that the URL’s and other details can be added into the ‘local.settings.json’ file in the project and then read it in the code using ‘ConfigurationManager.AppSettings[“parameter”]’. And, please follow the link to understand the ‘Auth’ class and how to generate Tenant and ClientAppId for an organization.
We can easily publish this function to the cloud by right clicking on the VS project and publishing it.
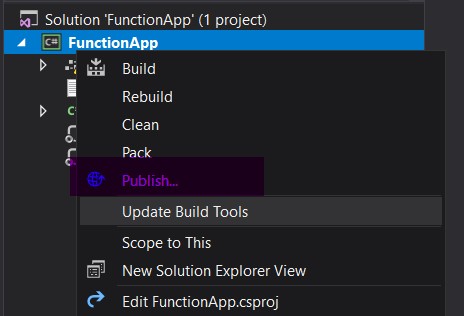
Once published, we can open the function app in Azure portal. By clicking first on the function name and then on ‘Get function URL’ shows the function URL which we will be using inside the plugin as the ‘logicAppEndpoint’.

Sample function code:
using System.IO;
using Microsoft.AspNetCore.Mvc;
using Microsoft.Azure.WebJobs;
using Microsoft.Azure.WebJobs.Extensions.Http;
using Microsoft.AspNetCore.Http;
using Microsoft.Azure.WebJobs.Host;
using Newtonsoft.Json;
using System;
using AXProxy.Microsoft.Dynamics.DataEntities;
using Microsoft.OData.Client;
using System.Net;
using Microsoft.IdentityModel.Clients.ActiveDirectory;

namespace FunctionApp
{
	public static class Function
    {
        [FunctionName("CRMToAXProduct")]
        public static IActionResult Run([HttpTrigger(AuthorizationLevel.Function, "get", "post", Route = null)]HttpRequest req, TraceWriter log)
        {
            log.Info("C# HTTP trigger function processed a request.");

            string name =string.Empty;

            string requestBody = new StreamReader(req.Body).ReadToEnd();
            dynamic data = JsonConvert.DeserializeObject(requestBody);

			try
			{
				name= SetSkuAX( data);

			}
			catch (Exception e)
			{
				log.Info(e.Message);
			}

			return (ActionResult)new OkObjectResult(name);
        }

		static string SetSkuAX(dynamic data)
		{

			Uri oDataUri = new Uri("https://orgname.sandbox.operations.dynamics.com/data", UriKind.Absolute);
			var context = new Resources(oDataUri);
			var auth = new Auth();

			context.SendingRequest2 += new EventHandler<SendingRequest2EventArgs>(delegate (object sender, SendingRequest2EventArgs e)
			{
				var authenticationHeader = auth.GetAuthenticationHeader();
				e.RequestMessage.SetHeader("Authorization", authenticationHeader);
			});

			CUSTReleasedProduct product = new CUSTReleasedProduct();
			DataServiceCollection<CUSTReleasedProduct> salesOrderCollection = new DataServiceCollection<CUSTReleasedProduct>(context)
			{
				product
			};
			if (data?.UOM != null)
			{
				product.BOMUnitSymbol = data?.UOM;
				product.PurchaseUnitSymbol = data?.uom;
				product.SalesUnitSymbol = data?.uom;
				product.UnitId = data?.uom;

				product.WINUnitConversionSequenceGroupId = "EACH";
			}


			if (data?.CustomerNo != null)
			{
				product.CustVendRelation = data?.CustomerNo;
			}
			if (data?.ItemDescription != null)
			{
				product.Description = data?.ItemDescription;
				product.WINExternalDescription = data?.ItemDescription;
			}

			if (data?.new_status_ != null)
			{
				product.WINSKUStatus = data?.new_status_;
			}
			try
			{
				context.SaveChangesAsync(Microsoft.OData.Client.SaveChangesOptions.PostOnlySetProperties | Microsoft.OData.Client.SaveChangesOptions.BatchWithSingleChangeset).Wait();

				return "Success";
			}
			catch (Exception ex)
			{
				return ex.ToString();

			}

		}
	}

	public class Auth
	{
		public string GetAuthenticationHeader()
		{
			var ODataEndpointUri = "https://orgname.sandbox.operations.dynamics.com/data";
			var ActiveDirectoryResource = "https://orgname.sandbox.operations.dynamics.com";
			var ActiveDirectoryTenant = "https://login.windows.net/TenantName.onmicrosoft.com";//Tenant name for your instance.
			var ActiveDirectoryClientAppId = "3ft5rw34-60ba-34rr-rtt3-3456tgher543";//Generated by Azure AD. The ID for an application, which is generated by Azure AD when the application is registered.
			var key = "3423423etrew/ryioui4dft5uyi7iu7oiu7gh6esk=";//Generated by Azure AD. The key that is sent along with a client ID when authenticating to Azure AD to call a web API.
			System.Net.ServicePointManager.SecurityProtocol = SecurityProtocolType.Tls12;
			System.Net.ServicePointManager.MaxServicePointIdleTime = 10000;

			var request = HttpWebRequest.Create(ODataEndpointUri);
			AuthenticationContext authenticationContext = new AuthenticationContext(ActiveDirectoryTenant);
			// Get token object
			var ar = authenticationContext.AcquireTokenAsync(ActiveDirectoryResource, new ClientCredential(ActiveDirectoryClientAppId, key)).Result;
			// Create and get JWT token
			return ar.CreateAuthorizationHeader();
		}
	}
}
Conclusion:
Please note that the entity should be explicitly exposed to public in the AX system to be available in the proxy class.
This link ServiceSamples will give you plenty of samples to play with on how to use the proxy to authenticate and do CRUD operations against an AX system. In my next post, we will see how we can use Postman client to locally debug this function.

Could you please explain about the method “CUSTReleasedProduct”