Introduction
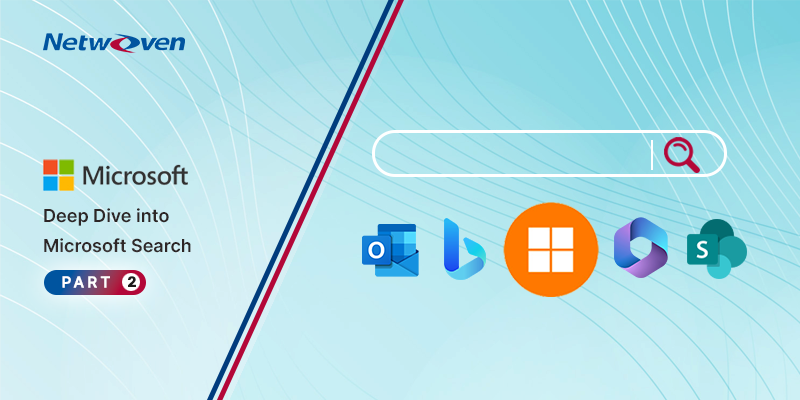
Microsoft Search is the most effective way to help users find what they need, but it requires some configuration from your search and knowledge administrators to be truly powerful. Answers in Microsoft Search allow administrators to specify results that should be highlighted and shown first whenever specific query terms are searched for and can be filtered by dates, locations, devices, and Active Directory Groups. In this blog, we will take a dive into the deep end of the pool that is Microsoft Search by going through all of the configuration settings for Answers.
Answers
The Answers tab allows you to configure results that are promoted in search results, to help people instantly discover the correct knowledge when searching for a particular keyword or query. Answers (previously known as Promoted Results and Best Bets in older versions of SharePoint), show up as the first result, with a special flair, when a keyword that they are associated to is searched for. Basically it’s a way to ensure that certain contents (a link, document, location, or even just information) are shown front and center when specific keywords or terms are queried. Configuring Answers are a key way to help users find important contents and should be utilized as much as possible.
Answers come in 4 flavors (yes, there are 5 tabs for settings, but we’ll discuss Topics later):
- Acronyms
- Bookmarks
- Locations
- Q&A
They each have slight variations, but act and are displayed in the same fashion. Let’s dive in!
Acronyms
As you would imagine, Acronyms are a way to help people find out the full definition of the acronyms that are commonly thrown around in the workplace, and also link to resources that are the most relevant. A perfect example is PTO – an acronym for Paid Time Off – which some employees may not have heard of before if they only knew it as “Vacation Time”. You can create an Answer that defines PTO as “Paid Time Off” and provides them a link to where they would go to request it.
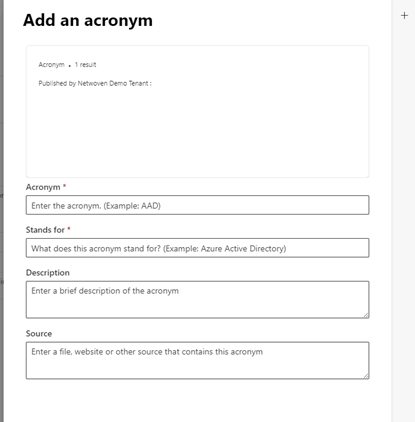
Unlike the other Answers, you don’t specify a Keyword for Acronyms, as the acronym itself is the keyword. Adding an Acronym gives you this form:
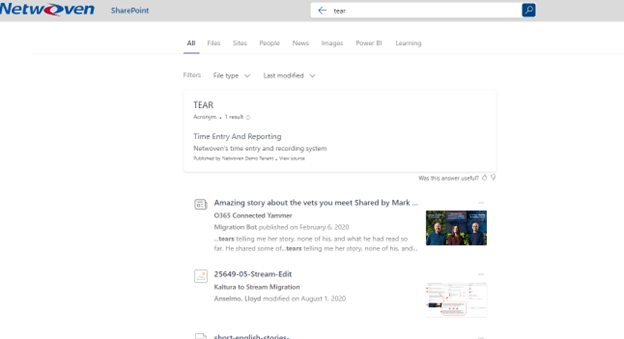
Pretty self explanatory. The Source field populates the hyperlink, which is shown as the text of the “Stands for” field. In the example above, clicking on “Time Entry And Reporting” would take you to the time entry website.
The best way to bulk add Acronyms is to use the Import function, download the CSV file template, and fill it in. Then you choose that CSV file to upload.
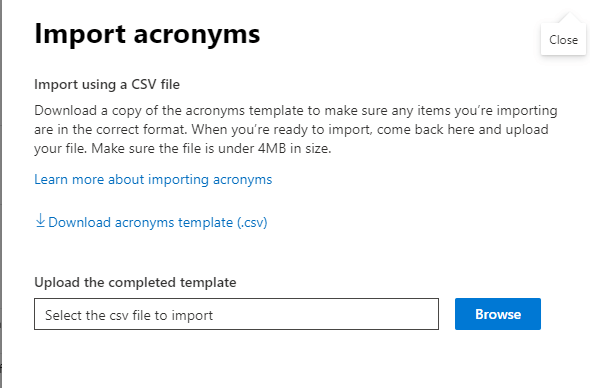
The CSV template has only a handful of fields, but the only ones that you have to fill in are Acronym, Stands for, and State.

The options for State are “Published”, “Draft”, and “Excluded”. Acronyms that are Excluded will not show up in search results.
*Importing Acronyms in bulk will overwrite existing Acronyms, but won’t delete any. If you want to edit existing Acronyms, then use the Export function to download a CSV of all Acronyms, make your changes, then Import it again.
Bookmarks
Bookmarks are one of the most versatile, and useful, Answers, and should definitely be utilized heavily!
The form for adding Bookmarks has significantly more fields than Acronyms.

The Title is the main heading a user will see when the Bookmark is shown and the URL will be displayed below and also be used as a link if the Title is clicked on. The Description can have up to 300 characters so be sure to use this to adequately define the Bookmark.
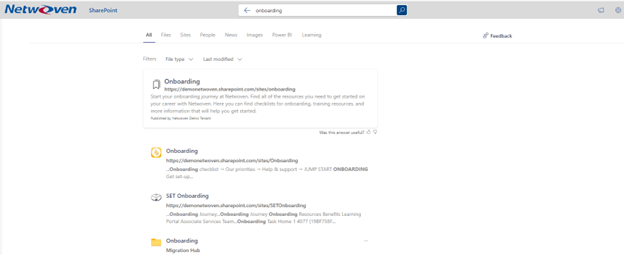
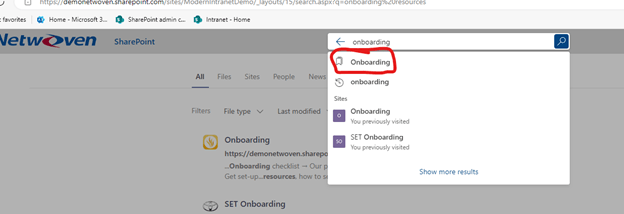
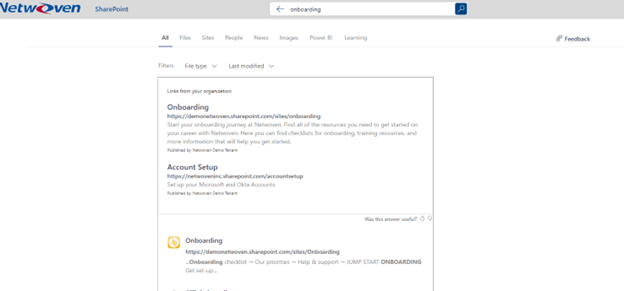
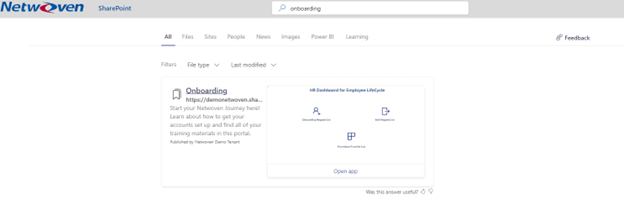
It’s important to know the difference between Keywords and Reserved Keywords. As you might imagine, a Bookmark will be displayed when a Keyword is matched in the search query. The entire Bookmark is only displayed if the keyword matches the query completely. In other words, the Onboarding complete bookmark will not be shown if the user searches for “Onboarding Resources”. However, the results preview (shown immediately when a user is typing their query, before they press Enter or click on the magnifying glass icon), will show the Bookmark as a result, with a bookmark icon and just the Title. Clicking on the Title will take the user to the URL.
Multiple Bookmarks will be shown if they are all configured with the same keyword. You can also specify multiple keywords for a bookmark by separating them with a comma when entering them.
If you want to ensure that only a single Bookmark will ever be shown for a specific keyword, then you will want to enter that into the Reserved Keywords field. This value must be unique so that only a single Bookmark will ever be shown for that keyword.
The Categories field is used for management only and will help you when bulk editing Bookmarks in the future. Users will never see this value in their search experience, but you will see it when you export your Bookmarks into a CSV file.
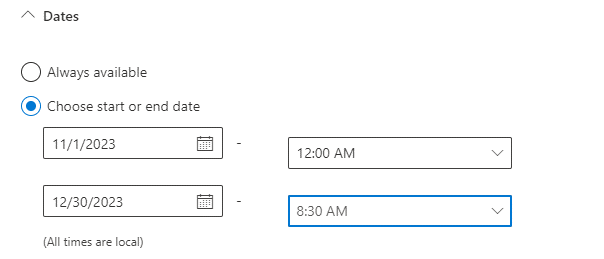
The Bookmark Settings options will allow you to configure when and to whom the Bookmark will be displayed. For example, you may want to create a Bookmark for the Winter Holiday Schedule that will only be displayed in November and December.
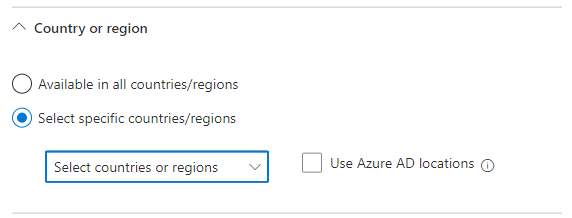
The Country or Region options allow you to only show the Bookmark to users whose IP address matches as coming from the specified Country or Region. You can check multiple countries and regions in the dropdown. If you want to show the bookmark to users whose Azure AD location matches the countries and regions (as opposed to their IP address), then check the box that says Use Azure AD locations. This is useful if your employees may be traveling or use a vpn regularly.
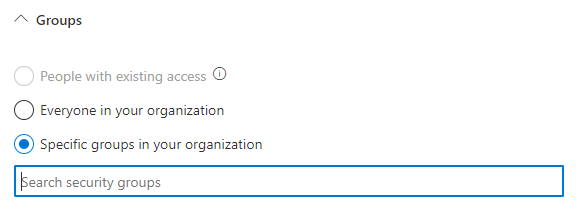
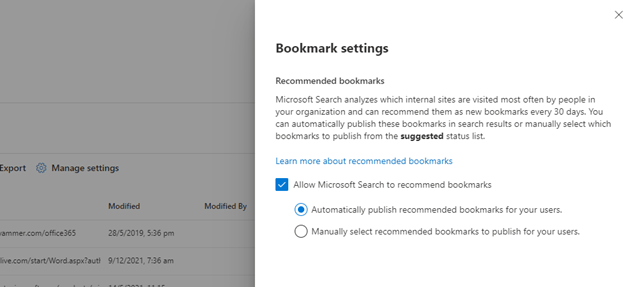
The Groups option allows you to only show the Bookmark to specific Azure AD Groups. The “People with existing access” option is only available for “System-Recommended” bookmarks, which are automatically generated by AI based on past searches that have consistently resulted in clicks for a specific result. Once there have been six searches for a single keyword that have all ended up with the users clicking on the same search result, the system will add the Bookmark automatically in a Draft state. It’s a good practice to regularly export and review existing Bookmarks to see which system recommended additions should be edited and published!
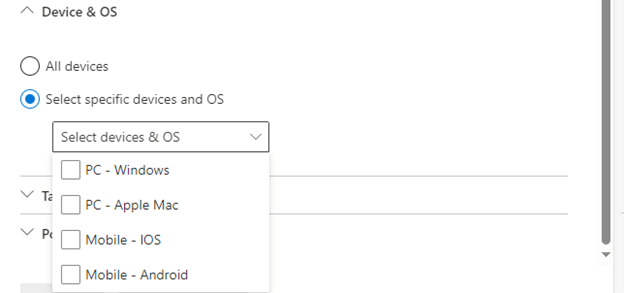
The Device & OS option allows you to only show the Bookmark to users with specific devices and operating systems. This would be useful, for example, if you want to create multiple Bookmarks for “Setting Up My Browser” (one for iPhone, one for Android, one for Mac, and one for PC) and only show the relevant Bookmark when it is searched for.
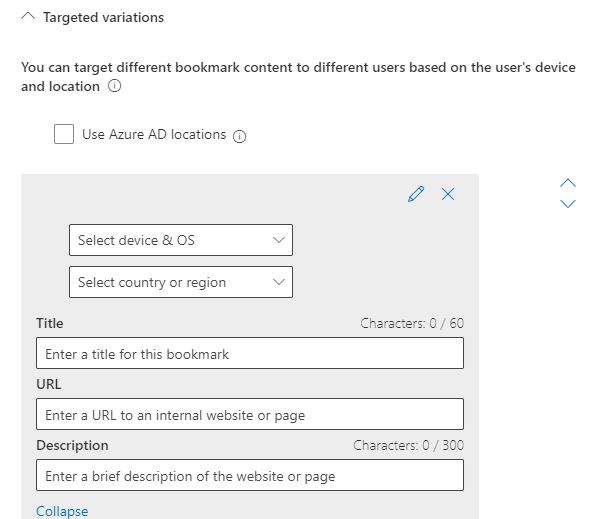
The Targeted Variation options allow you to preconfigure all of the previous options and save them as a “variation”. For example, you may create a variation for “users in the United States in the Human Resources AD group who are on an iPhone” and only show a specific bookmark to them. This may be an extreme example, but you get the point. The variation can also have its own Title, URL, and Description.
The PowerApp option allows you to choose a PowerApp that is automatically launched when the Bookmark is displayed. Keep in mind that the display is limited in its size, so a large PowerApp will be shrunk down considerably. Just enter the App Id of the PowerApp and make sure to wait for the loader to finish spinning before clicking on Publish.
You may have noticed a number of Bookmarks already created that are categorized either as Microsoft Recommends or Microsoft Suggests. By clicking on the Manage Settings button, you can choose whether you want these to be automatically published, or if you want to remain as Drafts and publish them manually.
Bookmarks are a powerful tool for driving enhanced search capabilities and helping your employees easily find the relevant contents that they are looking for. In previous versions of SharePoint, they were referred to as Promoted Results, Best Bets, or configured under Query Rules, but lacked the level of functionality that you have with Microsoft Search. You should definitely use Bookmarks as much as possible! Having someone in the role of Knowledge Manager (with the admin role of “Knowledge Manager”) is a highly recommended practice, and they should be regularly consulting with the business (or promoting a form where the business can reach out to them) about links and resources that are vital to employees and that should be set as Bookmarks.
Locations
Locations allows you to provide an address and a map (in Bing) for specific places and will be shown if users search for specific keywords. The configuration for a new Location contains only a few fields:
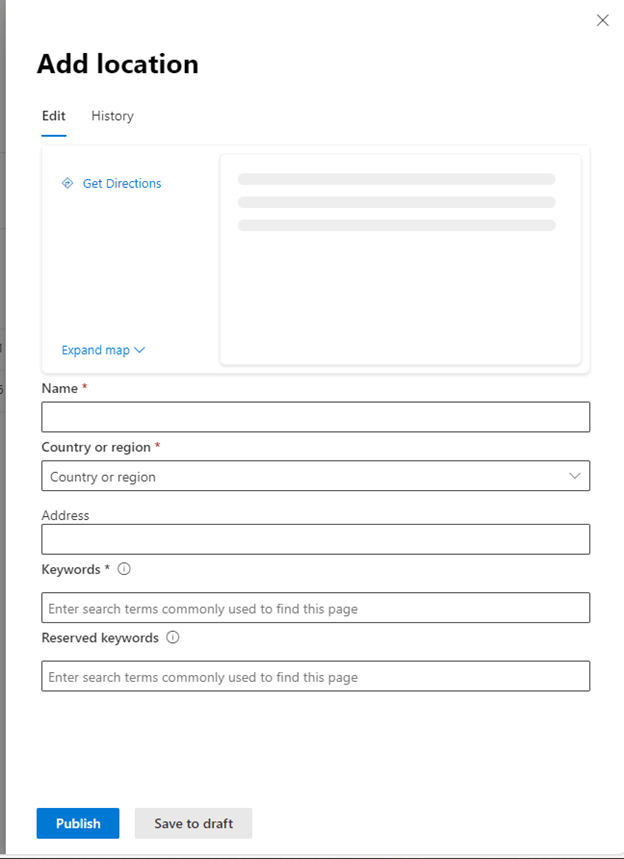
But once it is published, additional metadata is added such as Longitude and Latitude, which are based on the address provided.
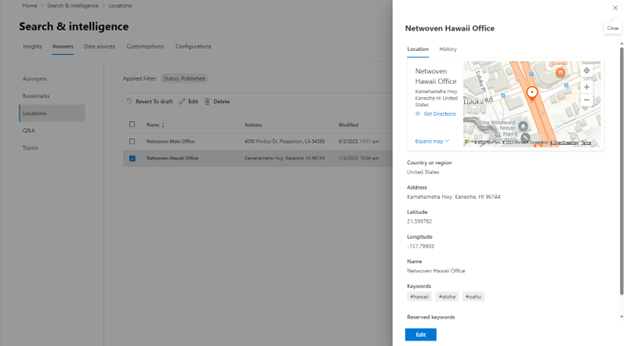
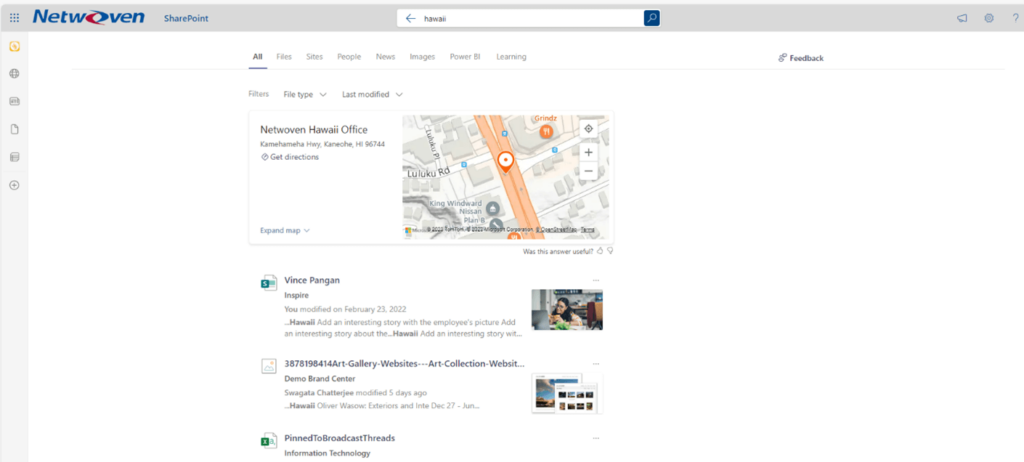
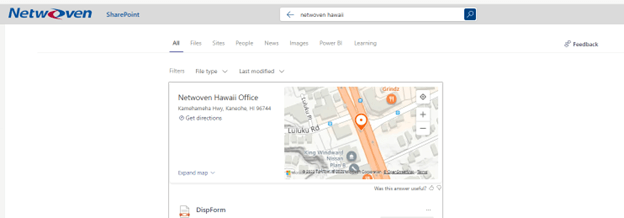
Unlike with Bookmarks, a location will be shown when a keyword is searched for, even if it is not an exact match of the entire query. In the example below, the Netwoven Hawaii Office location is shown even when I search for “Netwoven Hawaii” (only “Hawaii” is a keyword).
The same rules about Keywords and Reserved Keywords applies to Locations as they did to Bookmarks.
Microsoft 365 Modern Intranet & Employee Experience Look Book
In this look book, you’ll see examples of how Netwoven has created layouts and solutions for clients to enhance employee experiences with a modern intranet on Microsoft 365. Download now!
Get the Look BookQ&A
Q&A allows you to show Questions and Answers if a specific keyword is searched for, or if parts of the question are in the search query.
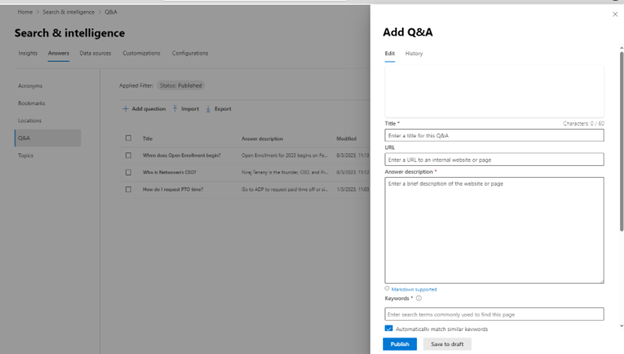
The Answer Description field actually allows for some basic wiki-style markdown (e.g. # = Heading) which you can find more info about here: Markdown syntax for files, widgets, and wikis – Azure DevOps | Microsoft Learn
The Bookmark Settings options also allows you to filter out who can see the Q&A based on location, Azure AD Group, or device, same as with the Bookmarks settings described above.
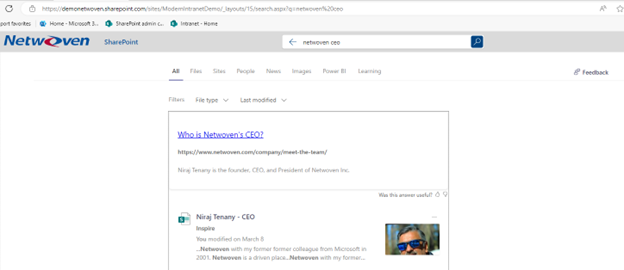
Q&As will be displayed when a keyword is matched exactly with the query, or when parts of the question match the search query. In the example below, I searched for “Netwoven ceo” and the Q&A is displayed, even though “Netwoven” and “CEO” are not configured as keywords.
Topics
Topics can be confusing because it does not really show topics to display, but rather makes sure that the Topic is reserved to be leveraged only by Viva Topics. If you don’t have Viva Topics configured, then this is probably irrelevant.
The only option you have is to “exclude topics” and this is because you don’t want any Bookmarks to be shown if there is already a related Viva Topic. The preference would be that the Viva Topic takes precedence, and so you would want to exclude that Topic from search configurations so that other, less-relevant results don’t show up instead.
The form for excluding a topic shows:
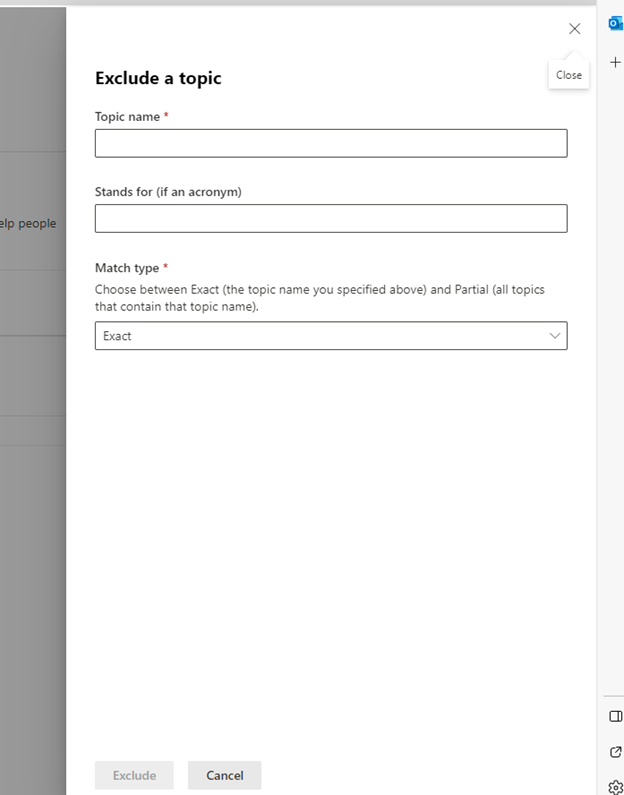
You can choose the Topic to exclude, describe what it means, and choose whether or not you want to exactly match the query, or exclude the results when query matches even part of the Topic name.
For example, in our environment, we have Viva Topics set up and lot of topics configured with the word “migration” in it (e.g. Jive Migration, SharePoint Migration, Egnyte Migration, etc). When a user searches for “Migration”, I want to make sure that only the Viva Topics results are leveraged, so I would exclude the topic “Migration” and choose Partial matching as the option.
Get to know Deep Dive into Microsoft Search Part-1
Get to know Deep Dive into Microsoft Search Part-3
Conclusion
Well that’s quite an eye-full and wraps up this part of our Deep Dive into Microsoft Search. Make sure to follow up with the next blog which will cover configuring Data Sources to leverage search results from almost anywhere!